Ceramic studio Void Fill Paper material guide sounds like the kind of phrase you only care about after a chipped rim shows up in a customer photo, or a handled mug arrives with a faint scrape where it spent three hundred miles tapping the carton wall. The box was there, the packing was there, and the piece still moved. That movement is usually what turns a careful studio shipment into a refund, a replacement, or a very awkward email, which is why ceramic studio Void Fill Paper Material guide decisions matter more than they first appear to. The right paper slows shifting, closes empty space, and gives fragile work a steadier ride inside corrugated cardboard.
For studios shipping mugs, bowls, plates, vases, and the odd sculptural form that never seems to fit any box on the shelf, ceramic studio Void Fill Paper material guide choices affect more than breakage. They change how fast a carton can be packed, how much paper gets used, how tidy the unpacking feels, and whether the packing table stays sane during a heavy run of orders. The goal is not to buy paper because the label sounds eco-friendly. The goal is to choose the right recycled materials, the right compression, and the right format so the packout holds up in actual transit instead of only looking neat in the studio.
Ceramic studio void fill paper material: what it is
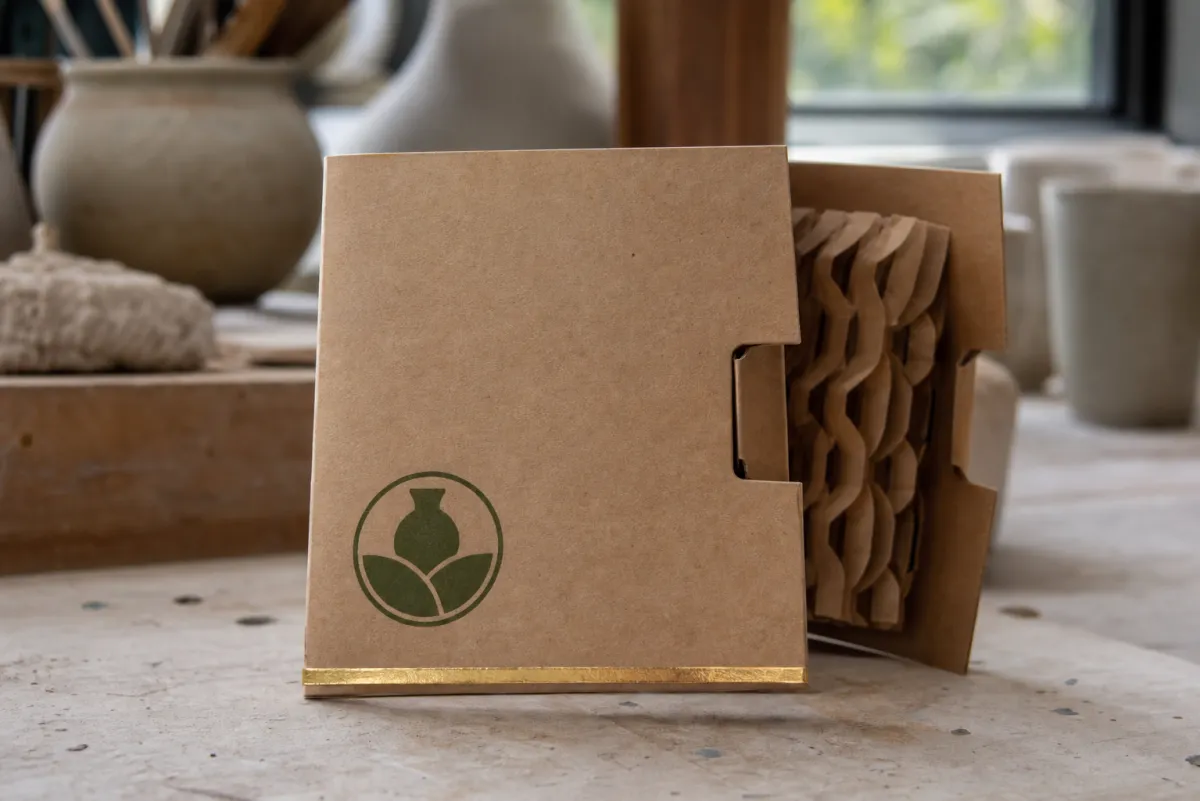
Ceramic studio Void Fill Paper Material guide starts with a plain definition. It is paper placed inside a shipper to keep ceramic pieces from shifting, to close gaps that would otherwise become movement lanes, and to steady items during handling, sorting, stacking, and the vibration that happens anywhere a parcel meets conveyors or truck space. The definition is simple because the material is simple. The mistake comes later, when a simple material is used badly and then blamed for the damage.
In real packing work, ceramic studio void fill paper material guide choices show up in a few familiar places: inner wrap, edge support, gap fill, and top locking. Anyone who has packed a handmade mug into a carton with a little too much headspace has already seen the problem play out. The mug slides, the handle taps the side, the glaze rubs, and the box seems to have been sent out with a quiet grudge. Gravity is patient. Packing mistakes are expensive.
The best ceramic studio void fill paper material guide setup treats paper as a structural filler rather than decoration. Crumpled sheets can brace the top of a box, keep a stack of plates from drifting, or support the body of a narrow-neck vase where bubble wrap would only create a slick shell that shifts under pressure. Paper has a useful, almost humble job here: it takes shape, holds that shape long enough to survive loading and transit, and then releases cleanly when the customer opens the carton. That matters more than it sounds, because a good unboxing starts with a packout that does not fight back.
That fit matters because the paper has to match the product. A flat plate set asks for even pressure and steady vertical restraint. A wheel-thrown vase with a tiny base and a sensitive rim needs support in a different pattern. Dense paper can work well for heavier ceramic pieces, while a lighter kraft sheet may suit smaller or lower-risk items. The point of this ceramic studio void fill paper material guide is not to crown one universal winner. There isn't one. There is only a good fit for the object, the box, and the shipping lane.
Another part of the picture is the full packout system. Ceramic studio void fill paper material guide decisions go wrong when the carton is oversized and paper has to fill too much air, or when the insert is loose and paper gets asked to hold the whole load together, or when the box is too tight and the packer crushes the corners just to make it close. Good shipping setups usually combine kraft paper, dividers, corrugated inserts, and the correct carton dimensions, because one material cannot rescue a weak system by itself. I have seen people try, and it usually ends the same way: extra labor, extra waste, and a box that still feels suspicious when you shake it.
From a buyer's point of view, this is really a performance and waste question. The best ceramic studio void fill paper material guide choice cuts breakage, keeps labor in check, and avoids adding shipping cost through unnecessary weight or overpacking. The truth is plain, even if it is not glamorous. Boring packing choices can save a lot of money, while careless ones can burn through margin very quickly.
Ceramic studio void fill paper material: how it works
The protective effect behind ceramic studio void fill paper material guide systems is straightforward. Paper compresses into place, traps air in a controlled way, and fills dead space so pieces cannot gather momentum before they meet a carton wall or another object. Movement control is the quiet hero here. A ceramic item that is snug can survive a fair amount of handling. A ceramic item that rattles is already losing the fight.
Picture the difference between a mug packed tightly in layered paper and the same mug floating inside a half-empty carton. The first one can absorb small shocks because the paper holds it from several sides. The second one gets a running start each time the box tilts or bumps. That is why ceramic studio void fill paper material guide planning usually focuses on how much fill is needed per box, not just on the material category. Placement and quantity matter as much as the paper grade, and honestly, quantity is the part many people underestimate first.
Bubble wrap does a different job. It can cushion, but it can also create a slippery bundle that shifts as the air cells compress. Loose kraft shreds can fill space, yet they may migrate if the carton is poorly packed or the item has an irregular profile. A good ceramic studio void fill paper material guide approach uses paper because it is easier to shape, cleaner to open, and often easier to recycle in standard paper streams where local rules allow it.
Sustainability still needs a reality check. Paper that can be recycled only helps if the packout actually reaches its destination intact. A broken vase that has to be reshipped is not an environmental win. It is two shipments, two packs, and two chances for something to fail. If you want a material that aligns better with EPA recycling guidance, start by choosing paper that performs, then compare recycled content, post-consumer waste levels, and how much material the packout truly consumes.
Shape retention is another reason ceramic studio void fill paper material guide decisions deserve attention. Handles need side support. Rims need controlled pressure from above. Glazed textures need contact surfaces that will not scuff them into dull marks. Irregular pottery needs restraint at more than one point, or the object rotates inside the carton and turns the whole box into a small moving stage. A plain square block of paper can be more useful than it looks because it can be torn, layered, and tucked exactly where the form needs help.
Practical packing reality: most ceramic damage is not a dramatic fall from a loading dock. It is slow motion inside the box, a corner that flexes, a handle that rubs, or a plate stack that shifts just enough to chip an edge.
Studios that care about sourcing should ask whether the paper is FSC certified or contains a meaningful share of post-consumer waste. Certification matters, though it is not a substitute for performance. An FSC certified sheet that collapses under load is still the wrong sheet. The right ceramic studio void fill paper material guide choice balances source, strength, and ease of use for the packer. That balance is the piece many buyers miss because the sample feels pleasant in the hand. Pleasant does not mean safe in transit.
Transit testing from recognized packaging methods can help too. If shipping volume is high enough that returns hurt, look at the test methods and shipping simulation guidance from ISTA. A lab is not required for every small order, but some kind of repeatable test keeps the team from guessing month after month. A little structure here saves a lot of nerve later on.
Key factors to compare before you buy
If you are comparing options for ceramic studio void fill paper material guide use, start with the spec sheet instead of the marketing language. That sounds obvious, yet plenty of buyers still get distracted by recycled labels and forget to check whether the paper actually packs well. The useful variables are thickness, sheet size or roll width, recycled content, dust level, compression behavior, and how quickly the material dispenses during a busy shift.
The strongest ceramic studio void fill paper material guide setup is usually the one your team can use the same way every time. Paper that is too stiff turns packing into a fight. Paper that is too thin forces people to use more of it. Sheets that are too large create waste. Rolls that unwind badly add labor because someone ends up wrestling the material instead of packing orders. The right product should disappear into the work, not slow the line down.
- Thickness and weight: Heavier paper usually gives more structure, while lighter paper is easier to crumple and shape.
- Roll or sheet format: Rolls suit continuous packing; sheets help with repeatable box builds.
- Recycled content: High recycled content matters, especially with post-consumer waste, but only if the paper still holds shape.
- Dust and cleanliness: Some lower-grade paper sheds more fibers, which is annoying around glazed surfaces and retail unboxing.
- Storage footprint: Bulky formats need more back-room space, which matters in small studios.
- Dispensing speed: A fast tear-off or easy crumple can save minutes per batch, and those minutes add up quickly.
Product shape comes next. A stack of dinner plates needs even pressure and tight vertical restraint. A narrow-neck bottle shape needs support at the base, around the neck, and across the top so it does not twist. A sculptural vase may need void fill in several zones because the center of gravity sits in a strange place. In every case, the ceramic studio void fill paper material guide choice should follow the shape rather than force the shape to follow the material.
Carton compatibility matters too. Paper behaves differently in single-wall, double-wall, and specialty shippers. In corrugated cardboard with good board strength, paper can do more of the anti-shift work. In a weaker box, paper cannot compensate for poor board grade. If the carton flexes too much, the load moves. That is why the ceramic studio void fill paper material guide should be reviewed alongside carton dimensions, dividers, inserts, and tape specs. One weak link makes the packout look careless.
A simple side-by-side checklist and a few actual test packs make comparison easier. Here is a practical buying frame for ceramic studio void fill paper material guide options:
| Option | Best for | Typical format | Approx. material cost | Operational note |
|---|---|---|---|---|
| Light kraft paper | Small mugs, ornaments, lighter bowls | Rolls or nested sheets | $0.05-$0.12 per packed order | Fast to use, but may need more layers |
| Mid-weight recycled paper | Mixed ceramic SKUs, retail orders, moderate voids | Sheets or soft rolls | $0.08-$0.18 per packed order | Good balance of shape and speed |
| Heavier FSC certified paper | Large bowls, fragile forms, longer transit lanes | Large sheets or premium rolls | $0.14-$0.32 per packed order | More support, but can slow packing if overused |
| Pre-crumpled fill | High-throughput teams that need quick void fill | Bulk cartons | $0.10-$0.25 per packed order | Convenient, though waste control varies by packer |
The table is a starting point, not a rulebook. A small studio may prefer cheaper sheet stock because volume is modest and labor stays simple. A growing brand with mixed SKUs may land in the mid-weight range because it gives a good mix of speed and control. A wholesale operation shipping heavier work often needs a stronger paper spec or the whole packing line starts to feel messy and unpredictable.
Step-by-step buying and testing guide
The most practical way to choose ceramic studio void fill paper material guide options is to stop thinking in abstractions and begin with the products you actually ship. List your top five ceramic SKUs, note their dimensions, record the weight, and mark the fragile points that fail most often. For mugs, that may be the handle. For bowls, the rim. For vases, the neck or the base. Write that down before asking for samples. It keeps the conversation grounded in the work itself.
Next, build a test matrix. Do not test one perfect unit in one perfect carton on a spotless table and call it finished. That kind of test says very little. Run at least three setups: a single item, a mixed pack if you bundle items, and a worst-case version where the piece sits near a corner or beside a void. That is where the ceramic studio void fill paper material guide either proves itself or reveals a weak spot in a way that is plain and expensive.
Measure success with criteria the packers can read in seconds:
- No visible movement when the box is gently shaken.
- No glaze rub or scuffing at contact points.
- No crushed corners or bowed box walls.
- Clean unboxing without paper dust covering the product.
- Pack time that keeps the line moving at a steady pace.
The last point matters more than many owners expect. A ceramic studio void fill paper material guide that reduces breakage but doubles pack time may still be the wrong choice if the studio ships enough volume. Labor is part of the cost, and the packer's time is real. If one paper saves material but slows the line, you need to know whether the savings survive contact with daily operations.
A simple side-by-side comparison helps a lot. Test two paper specs on the same day with the same products. Record the number of sheets used, the time per pack, and any damage after a short transit run. That can be a local carrier loop, a courier test, or a mailer simulation based on the service level you use most often. The point is to compare like with like. Nice photos do not ship cartons.
Here is a pilot order plan that works for many studios:
- Order two candidate paper formats in small quantities.
- Run both through the same packout process for at least 20-30 test boxes each.
- Check for damage, movement, and pack speed.
- Choose the format that gives the best total result, not the lowest sticker price.
A strong ceramic studio void fill paper material guide process also checks box fit. If the carton is much larger than the piece, the paper has to do too much work. If the carton is too tight, packers over-compress the fill and create pressure points. The ideal setup leaves enough room for the paper to cushion and lock the item, but not so much room that the carton turns into a moving target.
Actual transit tests matter here. A bench-drop test is useful, yet it does not reproduce carrier vibration, conveyor handling, stacking pressure, or the odd hits that happen once parcels start moving through a network. If the studio ships fragile work every week, the ceramic studio void fill paper material guide should be validated with real movement, not hope dressed up as process.
Process, timeline, and lead time for first orders
First orders often go sideways because nobody writes down the process. The ceramic studio void fill paper material guide path usually moves from brief to quote to sample approval to production order. If the team does not know who signs off on each step, the order drifts. Inventory arrives late. Someone asks why the paper missed the seasonal launch. The answer is rarely mysterious. The process was never clearly defined.
For a straightforward order, a realistic timeline looks like this: sample request in 2-5 business days, internal testing in 3-10 business days, revisions if needed in another 2-5 business days, and production scheduling in about 7-15 business days for standard formats. Custom-cut paper, custom wrap sizes, or special bundling can stretch that longer. A ceramic studio void fill paper material guide that seems simple at first can take more time once custom width, printed notes, or a packaging change gets added after approval.
The risks are familiar. Holiday peaks slow production. Carton fit issues force another round of testing. Someone changes the SKU dimensions after samples have already been approved. Or the team decides the first sample was "close enough" and places the order too early. Close enough is not a shipping standard. Close enough is how breakage gets into the pipeline.
For repeat orders, reorder planning matters more than the first quote. If ceramics ship every week, the paper source should have a reorder window longer than your fastest selling cycle. That keeps a sudden wholesale order or a social launch from draining stock at the worst possible moment. Smaller studios often do well with 2-4 weeks of paper on hand once usage is known. Faster-moving businesses may want more. The right number depends on storage space, lead time, and how much order volume swings from week to week.
If a supplier offers both FSC certified and recycled materials options, ask for the same format in both versions and test them in the same box. The ceramic studio void fill paper material guide comparison becomes much easier when the only variable is the paper itself. If one version creates more dust, slows the pack, or collapses sooner, the difference becomes visible right away. That kind of side-by-side proof is a lot better than guessing with a price sheet.
Supplier documentation deserves attention too. A useful quote should spell out roll width or sheet size, basis weight, recycled content, minimum order quantity, shipping method, and any conversion or setup fees. If the quote is vague, expect surprises later. Packaging quotes often look easy at first and turn complicated once freight, setup, or format changes show up on the invoice.
From a buyer's perspective, the ceramic studio void fill paper material guide is as much a timing tool as a material decision. The right setup arrives before it is needed, fits the packing line, and can be reordered before the last pallet disappears. That sounds basic because it is basic. It is also where plenty of teams stumble.
Cost and pricing: what ceramic studios actually pay
Price discussions get messy when people compare the wrong numbers. The real ceramic studio void fill paper material guide cost is not just the price per roll or case. It includes material usage per order, freight weight, packer time, and the cost of breakage if the fill is too weak. Cheap paper that forces you to use twice as much is not cheap. It is just wearing a low number on the invoice.
For small studio runs, paper void fill often lands in a range that feels manageable, but the math still needs to be normalized. A paper roll at $45 may look inexpensive until you realize it only covers a few hundred orders because the shapes are awkward. A higher-grade sheet stock may cost more up front and still reduce labor because each packer uses fewer movements and fewer adjustments. That is the kind of math the ceramic studio void fill paper material guide should make visible. I have watched teams cut their true packing cost simply by switching to a format that was easier to grab, tear, and place without fiddling.
A fair comparison starts with cost per packed order rather than cost per roll. If one roll packs 250 orders and another packs 400, the second option may be better even if the sticker price is higher. Freight belongs in the calculation too. Paper is bulky, and inbound shipping on a light but large item can feel stubbornly high relative to the paper itself.
For supplier discussions, these are sensible buying ranges:
- Small studio runs: about $0.08-$0.20 per packed order for standard recycled paper, depending on box size and pack density.
- Growing studios: about $0.12-$0.28 per packed order for heavier or more consistent formats that reduce labor.
- Higher-volume wholesale programs: about $0.10-$0.24 per packed order when order volume supports better pricing and standardized packout.
Those numbers are not promises. They are practical ranges that help you ask better questions instead of chasing a perfect price that does not match the real use case. If a quote lands far outside those bands, ask why. The paper may be premium. Freight may already be included. The order may be tiny and the supplier may be protecting margin. The formats may not even be comparable. The ceramic studio void fill paper material guide only works when the comparison is honest.
Packaging waste is another cost trap. Oversized sheets can slow the line and encourage overuse because packers keep grabbing "just one more" sheet. That extra paper adds up. A more controlled format may save material even if the unit price is higher. If the goal is lower total cost, the better question is not what a roll costs. It is how many sheets or how much fill a typical box actually needs.
There is a real tradeoff between premium performance and daily efficiency. Heavier paper can protect better around sharp rim profiles and heavy bowls, but if most of your products are small mugs, you may be paying for structure you do not need. The strongest ceramic studio void fill paper material guide choice usually sits in the middle: enough strength to keep the piece still, enough softness to pack quickly, and enough recycled content to fit the brand story without making the packing line miserable.
The material cost is only part of the story. One broken order can wipe out the savings from a month of cheap paper. That is why a little more spent on the right ceramic studio void fill paper material guide choice often makes better business sense than chasing tiny savings on fragile work. Packaging math tends to punish wishful thinking sooner or later.
Common mistakes that waste money and breakware
The first mistake is underfilling the voids. People wrap the item once, place it in the carton, and assume the box will hold everything in place. It will not. The paper has to close the spaces where movement begins. If a piece can shift even slightly, the ceramic studio void fill paper material guide setup is incomplete.
The second mistake is buying by price alone. Low-cost paper that compresses badly, sheds too much dust, or slows packing can cost more in the end. Small studios do this all the time when trying to save a few cents. The labor cost rises, the packers get frustrated, and breakage still happens. That is not savings. That is a very expensive way to learn about false economy.
The third mistake is choosing a format that is too large. Huge sheets create waste, take up storage, and tempt staff to use too much fill simply because the material is sitting there in oversized chunks. The ceramic studio void fill paper material guide should fit both the packer’s hand and the carton size. If the format feels awkward, it will be used awkwardly.
The fourth mistake is ignoring the box system around the paper. A weak carton, poor insert design, or bad divider choice can make even good paper look ineffective. That is especially true for heavy glazed pieces packed in corrugated cardboard that is too thin for the load. If the carton flexes too much, paper cannot repair the structure. Better board, better fit, better result.
The fifth mistake is treating a bench-drop test like the whole story. A drop test has value, but it does not reproduce conveyor vibration, side impacts, stacking pressure, or the random handling that parcels receive. A ceramic studio void fill paper material guide should be tested in a way that resembles actual shipping conditions, even if the test is small. Realism beats optimism every time.
Another issue is using paper as a substitute for poor pack discipline. If one packer uses three sheets and another uses seven, the outcome will vary wildly. That is why simple instructions matter. A good ceramic studio void fill paper material guide should include standard sheet counts, wrap methods, and top-lock guidance. Consistency is what turns a decent material into a reliable system.
The unboxing experience matters too. Too much loose fill creates a mess. Too little support creates damage. The best result feels clean and practical. That matters even more for retail orders, where the customer sees the inside of the box and starts judging the brand before touching the piece. Nobody wants a beautiful hand-thrown bowl arriving in a paper snowstorm, no matter how pretty the photo looked on the packing bench.
Expert tips and next steps for your first order
My first recommendation is simple: write a packing spec sheet. Include paper size, fill count, carton type, fragile SKU notes, and any wrap sequence your team should follow. That one sheet reduces confusion more than many owners expect. A good ceramic studio void fill paper material guide should live on the packing table, not in one person's memory.
Second, ask for samples in the exact format you plan to use. If the plan is to pack from rolls, do not settle for a tiny swatch. If the plan is to use nested sheets, do not test with a different fold style. The sample should match the real workflow. Otherwise you are testing a convenient fiction rather than the material that will actually be used.
Third, define a reorder trigger. A simple rule works well: reorder when you hit your lead time plus one extra week of stock. If the supplier needs 10 business days and launch weeks eat paper faster than normal, do not wait until the last pallet is half empty. That is how teams end up paying rush freight for something that could have been handled with ordinary planning.
Fourth, track actual consumption per SKU during the first month. Some ceramic pieces eat paper. Others barely need any. Once the data is visible, you can refine the ceramic studio void fill paper material guide choice and avoid overbuying. That is especially useful for studios shipping a wide range of forms, from compact mugs to oversized serving bowls.
Fifth, compare two paper specs against your most fragile products before placing a larger order. That is the cleanest way to find the best-fit option. You want the one that reduces breakage, keeps pack speed steady, and gives a tidy unboxing. If it also uses recycled materials and fits the brand story, that is a welcome bonus. If not, performance still wins.
Here is the short action list I would use for a first purchase:
- Test two candidate paper formats on your top five ceramic SKUs.
- Measure damage, glaze rub, movement, and pack time.
- Check carton fit with your current kraft paper, dividers, and inserts.
- Choose the spec that gives the lowest total cost per shipped order.
- Place the first production order for the winning ceramic studio void fill paper material guide setup.
For a packaging standard that will hold up over time, choose a paper option that is practical, repeatable, and easy for staff to use under pressure. Predictable packing means fewer surprises after dispatch. That is the real job here. Not polished jargon. Not empty buzzwords. Just fewer broken pieces and fewer headaches.
Brands that care about sourcing can also use a ceramic studio void fill paper material guide to support broader packaging goals like biodegradable packaging claims, lower plastic use, and cleaner recycling pathways. Keep the claim honest. A package that breaks, gets replaced, and ships again is not a sustainability win. It is paperwork with a carbon footprint.
Start with the product, test the paper, and make the box system do the heavy lifting. If you do that, the ceramic studio void fill paper material guide becomes a practical decision tool instead of another file someone prints, files, and forgets. That is the difference between a packaging plan and a neat-looking spreadsheet.
FAQ
How much ceramic studio void fill paper material should I order for a small studio?
Estimate usage by packed orders per week rather than by box count alone, because larger pieces consume far more filler. A sensible starting point for a small ceramic studio is 2-4 weeks of coverage, then adjust once you track real use. If you are launching a new collection or expecting a holiday spike, add buffer. The ceramic studio void fill paper material guide approach works best when it follows actual order volume instead of wishful thinking.
What paper weight works best for ceramic studio void fill paper material?
Most studios should test a mid-range cushioning paper first, then move heavier only if the piece shape or shipping distance calls for it. Higher weight helps with larger voids and heavier forms, but too much stiffness can slow packing and make the box harder to close. The right choice depends on whether you need soft gap fill, shape retention, or both. A good ceramic studio void fill paper material guide is usually built from a few targeted tests, not from one guess.
Is recycled ceramic studio void fill paper material strong enough for fragile mugs and bowls?
Yes, if the paper has enough compression and the packout is designed correctly. Recycled content matters, but performance matters more, because a recycled sheet that collapses in transit is just expensive recycling. Test it with real mugs, bowls, and stacked sets before switching your whole line. The ceramic studio void fill paper material guide should prove strength in transit, not only look responsible on the spec sheet.
How do I test ceramic studio void fill paper material before buying in bulk?
Run a small transit test with your worst-case products, then inspect for movement, corner pressure, and glaze rub. Compare at least two paper formats so you can see whether one reduces pack time or breakage. Document the result per SKU rather than as a general pass or fail. That is the cleanest way to apply the ceramic studio void fill paper material guide to real operations instead of theory.
What affects lead time for ceramic studio void fill paper material orders?
Lead time usually depends on format, quantity, custom cutting, and how busy the supplier is when you place the order. Sample approval can add time, especially if your team needs to test multiple box sizes or packing methods. Build in extra time before product launches, holiday sales, or wholesale restocks. A ceramic studio void fill paper material guide is only useful if the supply arrives before the orders do.


