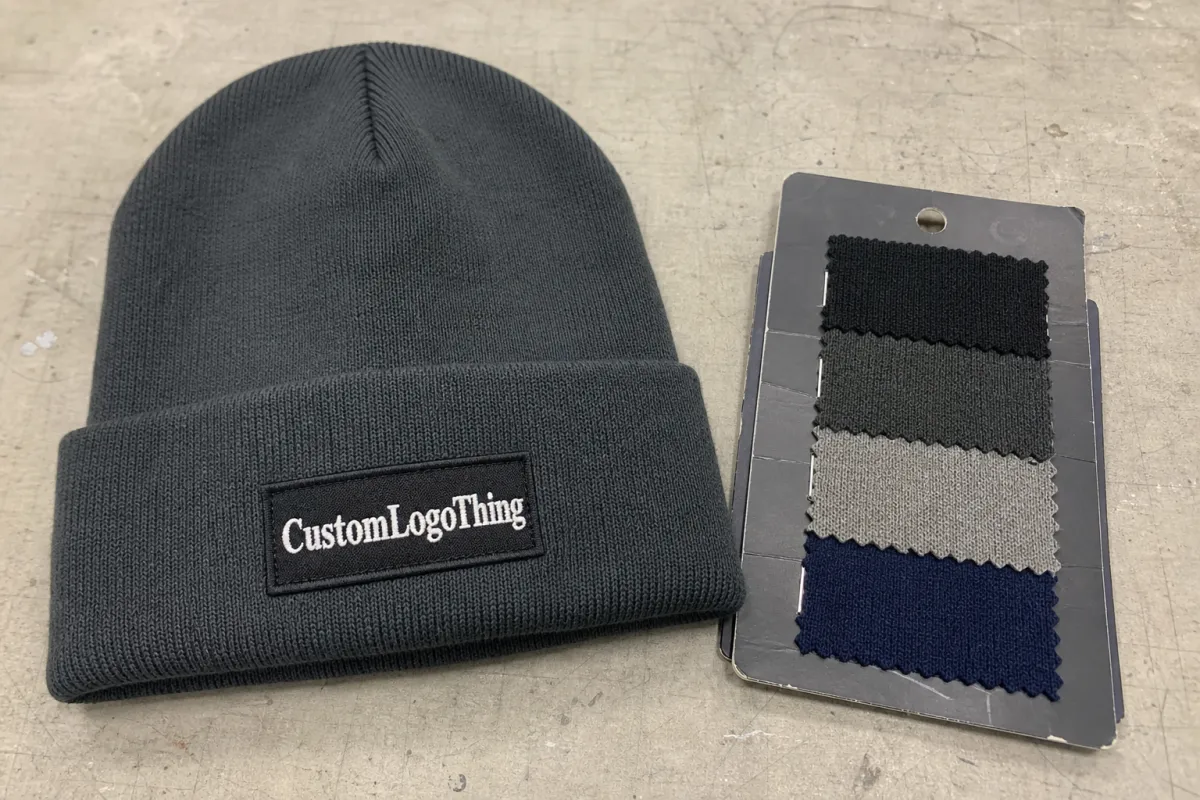
If you are ordering branded knit hats, the ceramic Woven Label Beanies material sample guide is the point where artwork stops being hypothetical and starts behaving like a real product. On screen, a woven label can look clean, balanced, and premium. Once it is reduced to beanie scale, stitched to a stretchy cuff, and seen under ordinary indoor light, the weaknesses appear fast.
That is why samples matter more than many buyers expect. They do not just confirm color; they show whether the label still reads clearly, whether the edge feels smooth, how the backing sits against skin, and whether the branding survives folding, sewing, and daily wear. For most beanie programs, the sample is the first honest proof of what the final accessory will feel like in hand.
A label that looks excellent flat can still fail on a beanie if the letters crowd together, the border turns scratchy, or the contrast disappears once the hat is worn.
What the ceramic woven label beanies material sample guide reveals
A ceramic woven label Beanies Material Sample guide is not a color card with a fancy name. It is a practical test of readability, comfort, and proportion. Buyers often discover that a logo with thin strokes or tight spacing feels elegant in design software, then softens or closes up once it is woven at actual size. That is not a failure of the artwork. It is the difference between a digital file and a textile built from yarn.
The first checks should be simple: letter clarity, contrast, thickness, and the amount of visual breathing room around the mark. If your brand name includes small type under a symbol, that detail deserves extra scrutiny because woven structures compress small text faster than most mockups suggest. A sample also tells you whether the label feels soft enough for forehead contact, which matters on beanies worn for hours.
Placement changes the reading even more than many teams expect. Beanies rarely give generous real estate, and the same label can look tidy on a flat swatch but awkward when folded, stitched, or wrapped around a curved cuff. A few millimeters can change the balance completely. On a knit hat, that tiny difference is not minor.
If you already have a broader trim system, compare the beanie spec against other products rather than treating it as a separate universe. The same brand may need one visual language for hats, another for garment labels, and a third for hang tags. Our Custom Labels & Tags page is a useful reference for how those trim decisions shift across product types.
That comparison is also where buyers spot brand drift. A woven label on a beanie should feel integrated with the garment, not attached as an afterthought. The sample stage is the place to catch that mismatch before a bulk run turns it into inventory.
How woven label samples are built and checked
The sampling process usually begins with artwork translation. A production team takes your vector file, final dimensions, color count, and backing preference, then converts that into loom settings or a strike-off plan. Small design choices become physical almost immediately: weave direction, density, border treatment, and the way each thread sits beside the next one.
A useful sample workflow should answer more than one question. It should show whether the logo is legible at beanie scale, whether registration stays tight, and whether the edge holds its shape after handling. If the art contains fine serif text or narrow icons, the sample is where you learn whether those details survive production without turning soft or muddy.
Approval needs to be specific. Mark the exact colorway you accept, confirm the backing, and note any text corrections before the order moves on. Vague approval creates avoidable problems later. If there is anything still under discussion, leave it unresolved until you have a sample that proves the point.
Side-by-side samples are especially useful when the artwork is borderline. A tighter weave can improve detail, while a looser weave can feel softer in the hand. Neither is automatically better. The right choice depends on whether the priority is visual sharpness, comfort, or a workable compromise between the two.
Good sampling also helps with repeat orders. A properly documented sample becomes the reference for future reorders, seasonal color changes, and line extensions. That matters because a label that performs well on one beanie body may read differently on another if the knit is thicker, looser, or more textured.
For sourcing teams, that documentation is not trivial. It becomes the baseline for production control, which is much easier to trust than memory or a loose verbal approval.
Material, stitch, and finish choices that change the result
Material choice changes more than appearance. The yarn type, backing type, label thickness, and finishing style all influence how the label feels and how it behaves on knit fabric. That matters on a beanie because the label sits close to skin, flexes constantly, and is often pressed into a cuff where any rough edge becomes obvious.
Stitch density is one of the biggest variables. A tighter weave usually gives sharper detail, cleaner lettering, and stronger color separation. A looser weave can feel softer and more pliable, but small text may lose definition. If the artwork depends on narrow lines or tiny curves, the sample has to prove that the density is sufficient before production starts.
Edge treatment deserves equal attention. Merrowed edges add a more finished border and can hide a little irregularity, but they also add bulk. Laser-cut edges usually look flatter and cleaner, especially for minimal branding. Folded finishes give a softer edge and a more garment-like feel. None is universally superior. The right choice depends on placement, cuff thickness, and whether the label will sit visibly on the outside or tuck into a seam.
Backing changes the result just as much. Sewn-only labels tend to feel more flexible, while heat-applied or adhesive-backed options can speed application but may not suit every fabric or wash expectation. If the beanie is heavily textured or very stretchy, a backing that works on flat goods may behave differently on knitwear. That is one of the first things a sample should expose.
It helps to judge the sample two ways: in the hand and mounted on the actual beanie style. Flat, a label can look immaculate. Once it is stitched to a stretch knit body, the same label may curve, pucker, or pull in ways that are easy to miss on a table. The mock placement is where the real picture appears.
Packaging can affect review quality as well. Samples that arrive in corrugated cardboard cartons, kraft sleeves, or simple mailers usually stay protected if the package is well organized. If a supplier claims recycled materials, FSC certified paper, or biodegradable packaging, ask for documentation rather than assuming the claim is accurate. For transport standards, ISTA is a useful reference when thinking about how samples should survive shipping, and FSC is the right place to verify paper sourcing claims.
| Sample type | Best for | Typical quote range | What it helps you verify |
|---|---|---|---|
| Single woven strike-off | Simple logos, clean type, quick approval | $20-$50 | Basic clarity, scale, and color balance |
| Revision sample | Artwork with small text or multiple color changes | $35-$90 | Detail retention, edge finish, and updated placement |
| Pre-production sample set | Brands needing exact handfeel and final fit confirmation | $60-$150 | Full spec confirmation before bulk run |
Those numbers are planning ranges, not guarantees. Final price shifts with size, color count, special backing, and the amount of setup needed to prove the design. A more detailed sample costs more for a reason: the supplier is spending time showing that the detail will survive on the finished beanie, not just on paper.
Cost, MOQ, and quote drivers for sample orders
Sample pricing usually comes down to a handful of variables. The largest are the number of colors, the label size, the weave density, and whether you want a special backing such as adhesive, iron-on, or a softer sewn finish. Each one changes setup time. A simple one-color sample is easier to quote than a small label with tight text, multiple color changes, and a custom border.
MOQ works differently for samples than for bulk production. A sample may follow a separate cost structure because the supplier is not optimizing for scale yet; it is proving that the spec can be made correctly. That is normal. A cheap sample is not always the most economical choice if the artwork has brand-critical detail that could fail later.
Buyers should send a complete quote packet before requesting samples. The useful pieces are artwork, final dimensions, target quantity, placement on the beanie, backing preference, and whether the label has to match an existing style or seasonal line. Leave those out and the quote usually comes back with assumptions. Assumptions slow everything down.
One practical rule saves money over the life of the program: spend more on the sample when the logo has small text, narrow linework, or color matching that affects the brand story. Those are the areas where hidden production issues show up first. If the sample proves the design is stable, the bulk order becomes much easier to trust.
Shipping can change the cost too. Protective sample cards, inner sleeves, and branded cartons add a little expense, but they reduce the chance that the sample arrives bent, dirty, or scuffed. That matters if the sample is being reviewed by a buying team, a merchandiser, and a quality lead who all need to see the same condition.
For teams tracking sustainability claims, ask whether cartons use recycled materials or FSC certified paper. Those details may not alter the woven label itself, but they do affect how the sample is received internally and whether the supplier's presentation matches the sourcing story.
Process, timeline, and lead time from request to approval
The process is straightforward, but each step matters. First, send the specs. Then receive a proof or sample plan. After that, review the physical sample, request edits if needed, and approve the final version for production. The fastest projects are the ones where the buyer and supplier work from the same spec sheet the entire time.
Lead time depends on a few practical issues: how ready the artwork is, how busy the factory queue is, how many revision rounds you want, and whether the sample needs custom yarn colors or special finishing. A clean vector file and exact dimensions usually shorten the process because the sample team can move straight into setup instead of interpreting corrections.
There is one slowdown that is easy to prevent. Often, one person approves appearance, another approves fit, and a third approves purchase order release. If those roles are not clear, the sample waits while everyone checks with everyone else. A short internal approval chain keeps the project moving and reduces last-minute changes.
Timeline expectations should stay realistic. A simple sample may be turned quickly, but once a design includes tiny type, multiple color changes, or special backing, the clock moves differently. In practice, the gap between a simple and a complex sample is not just a day or two; it can be the difference between a clean approval cycle and a slow back-and-forth that starts eating into the production schedule.
Document each version as it arrives. Take photos under consistent lighting, measure the label, and compare it to the final beanie body. If multiple iterations are sent, label them clearly so no one approves the wrong one by mistake. A tidy review process is worth almost as much as the sample itself.
Common mistakes when comparing beanie label samples
The most common mistake is judging the sample only by color. Color matters, but readability and structure matter just as much. A woven label can match the swatch and still fail if the text collapses once it is sewn onto a stretchy, textured hat body. Buyers who stop at color often miss the part a customer will actually notice in hand.
Scale errors are another frequent problem. A label can look balanced when it is flat on a table, then feel too wide or too crowded once the beanie is folded and photographed on a person. That is why the sample should always be checked on the actual beanie style, not only on a loose swatch. The garment changes the read.
Lighting can mislead the eye, too. Warm indoor light can hide contrast issues and make two yarn blends look more similar than they are. If the beanie will be sold in retail, photographed for ecommerce, or worn outdoors, check the sample under several lighting conditions. That simple step catches more problems than most teams expect.
Wear testing is easy to skip and expensive to ignore. A sample should feel smooth, stay flat, and avoid scratchiness after repeated flexing. Beanies are not static products; they are stuffed into pockets, pulled on and off, and worn close to the skin. Comfort is part of the brand experience, so the sample has to prove it can handle real use.
Another issue appears when buyers compare too many options at once. If every sample is slightly different, the review turns into guesswork. Keep the comparison tight. Two or three well-chosen options are enough to show whether the design needs a denser weave, a softer backing, or a cleaner edge treatment.
Finally, do not treat the sample as a decorative checkpoint. It is a production decision. The more seriously you use it, the fewer surprises show up later in bulk.
Expert tips and next steps before you place production
Keep the approval checklist short and specific. Cover artwork, size, backing, placement, feel, and final color acceptance so nobody relies on memory alone. If the sample passes each point, production has a much better chance of matching the expected result.
Ask for one sample positioned exactly as it will appear on the finished beanie. That sounds minor, but it often reveals more than a loose swatch ever can. Correct placement shows spacing, proportion, and visual balance in a way flat review cannot.
Compare the sample against the actual knit style, not just a product photo. Yarn texture, cuff thickness, and stretch all change how the label reads. A label that looks perfectly sized on a smooth mockup may feel too large on a chunky rib knit. Real materials tell the truth faster than renderings.
If your team is handling several trims at once, connect label approval back to the larger trim library. Our Custom Labels & Tags page can help align beanie branding with other product lines so the visual system stays consistent across the range.
This is also a good point to review packaging and sustainability language. If the sample arrives in kraft paper sleeves, recycled cartons, or FSC certified packaging, make sure those claims are backed by documentation. Buyers talk about presentation often; stronger programs can prove it.
The best result comes from disciplined approval, not speed alone. Use the ceramic woven label Beanies Material Sample guide to lock the spec sheet, confirm the quote, and move into production only after the sample has been checked in hand, on the hat, and under normal lighting. That approach protects the brand and keeps the finished beanie looking intentional rather than improvised.
FAQ
What should I check first in a ceramic woven label beanies material sample guide?
Start with readability, because small brand details can disappear when the label is woven at beanie size. Then check handfeel, edge finish, and how the label sits against knit fabric so comfort and appearance are both covered. Confirm the sample matches the intended fold, placement, and sewing method before approving it.
How many sample options should I request for woven labels on beanies?
Request at least two options if you are choosing between a tighter weave and a softer handfeel, or between two back finishes. If the artwork is simple, one well-made sample may be enough; if it includes small text or fine lines, ask for a comparison sample. Keep the options focused so the review stays practical.
Does the material choice change comfort on cuffed beanies?
Yes, because a label with a rougher backing or thicker edge can feel more noticeable when worn at the forehead or cuff. A softer backing and clean edge treatment usually improves comfort, especially on beanies meant for all-day wear. Always test the sample in the exact placement you plan to use, since comfort can change once the label is stitched to stretch knit.
What affects cost and unit price for a sample order?
Price usually moves with artwork complexity, number of colors, label size, and any special finishing or backing. Revision rounds can add time and cost, so it helps to send clean files and exact measurements on the first pass. Sampling a high-detail design is worth the spend when the final production run depends on small text or precise brand colors.
How do I know the sample is ready for production approval?
Confirm that the artwork is correct, the dimensions match the spec sheet, and the label looks right on the actual beanie style. Check that everyone involved in the purchase agrees on color, placement, and feel before the order is released. If the sample matches your quality standard in both hand and appearance, it is ready to move into production.
Used properly, the ceramic Woven Label Beanies material sample guide turns a guess into a controlled approval step, which is usually what buyers need before they place a real order.


