Buyer Fit Snapshot
| Best fit | Custom Retail Packaging Die Cutting projects where brand print, material claims, artwork control, MOQ, and repeat-order consistency need to be specified before quoting. |
|---|---|
| Quote inputs | Share finished size, material target, print colors, finish, packing count, annual reorder estimate, ship-to region, and any compliance wording. |
| Proofing check | Approve dieline scale, logo placement, barcode or warning zones, color tolerance, closure strength, and carton packing before bulk production. |
| Main risk | Vague material claims, crowded artwork, missing packing details, or unclear freight terms can make a low unit price expensive after revisions. |
Fast answer: Custom Retail Packaging Die Cutting: How It Works for Brands should be specified like a repeatable production item. The safest quote records material, print method, finish, artwork proof, packing count, and reorder notes in one written spec.
Production checks before approval
Compare the actual filled-product size with the drawing, then confirm tolerance on folds, seals, hang holes, label areas, and retail display edges. Reserve space for logos, QR codes, warning copy, and material claims before decorative graphics fill the panel.
Quote comparison points
Review material grade, print process, finish, sampling route, tooling charges, carton quantity, and freight assumptions side by side. A quote is only useful when the supplier can repeat the same color, closure quality, and packing count on the next order.
Custom Retail Packaging Die Cutting: How It Works for Brands
The cut line controls more packaging outcomes than most people expect. With Custom Retail Packaging die cutting, a box can look polished on screen and still feel flimsy in hand if the folds, tabs, and tolerances are sloppy. The artwork gets the attention. The structure does the real work.
That is why I treat custom retail packaging die cutting as a branding decision, not just a production step. A clean cut helps custom printed boxes lock together correctly, protect the product, and hold up on a crowded shelf. A bad one does the opposite: bent corners, loose inserts, slow assembly, and a package that annoys the person opening it. Nice logo. Bad experience. Not a winning combo.
For brands selling in-store, through pop-ups, or through fulfillment-heavy channels, custom retail packaging die cutting sits right between packaging design, product protection, and brand perception. The process shapes cartons, sleeves, windows, inserts, lock tabs, and display-ready packaging that behaves the way buyers expect. If the structure is right, the package supports package branding and makes the product feel worth the price. If the structure is wrong, the box turns into an expensive annoyance.
That is the practical truth. Custom retail packaging die cutting is not decoration. It is what turns a printed sheet into a package that works.
Custom Retail Packaging Die Cutting: What It Really Means
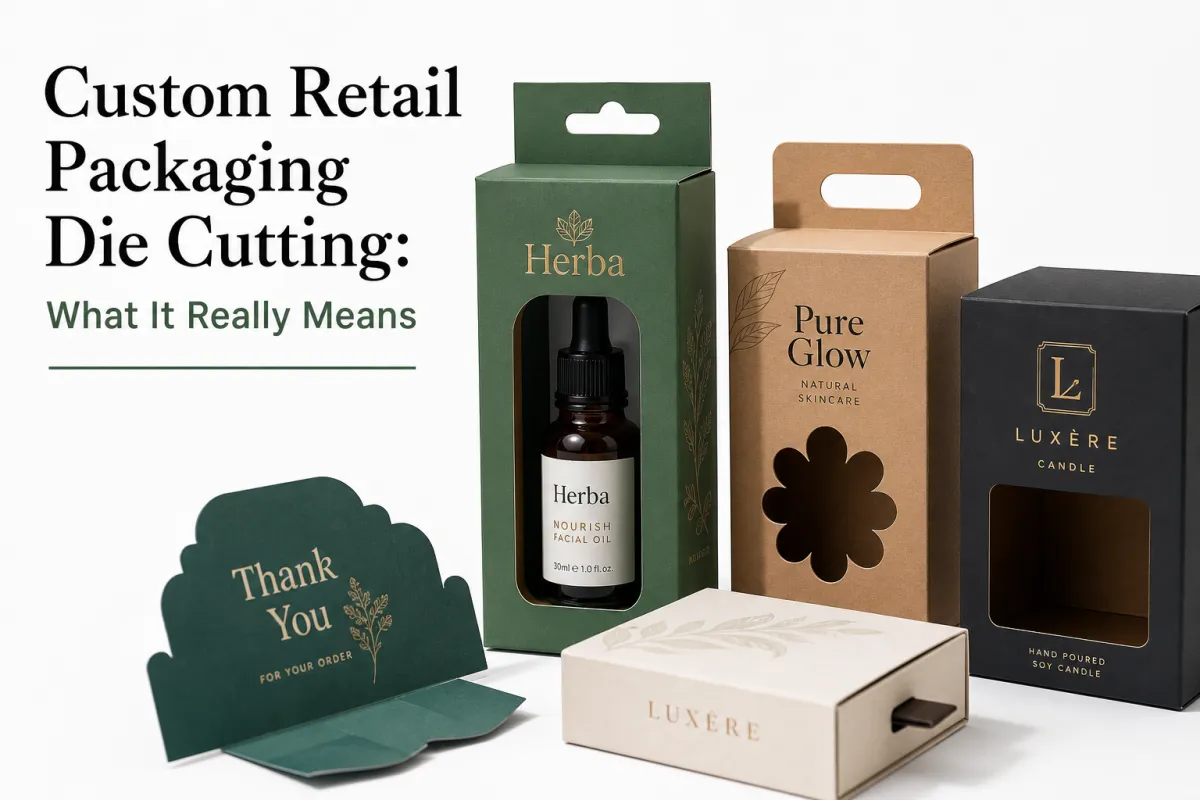
Custom retail packaging die cutting means cutting printed packaging sheets into a specific shape using a die or digital cutter. Plain English version: flat paperboard becomes a box, sleeve, insert, hanger card, window panel, or lock-tab structure that actually holds its form. A standard rectangle is easy. A retail package with cutouts, perforations, folds, and structural features needs a lot more control than a straight blade can give.
The surprising part is how often the cut line changes the whole customer impression. A package can be printed beautifully and still feel cheap if the corners crush, the flap tears, or the tabs do not register cleanly. I see this constantly in retail packaging: the visual design gets approved first, then the structural problem shows up at the prototype stage. That is why custom retail packaging die cutting belongs at the start, not after the artwork is finished.
Picture a shelf-ready skincare box with a window and an internal insert. If the window is cut off-center by a few millimeters, the product inside looks crooked. If the insert is loose, the bottle rattles during transit. If the lock tab is too tight, the store associate tears the flap while assembling it. None of those problems come from print quality. They come from structure, and structure is where custom retail packaging die cutting earns its keep.
From a packaging buyer’s point of view, the value shows up in three places:
- Brand presentation: the package opens cleanly, closes cleanly, and looks intentional on shelf.
- Product protection: the structure holds the item in place and reduces damage during shipping or handling.
- Assembly speed: a well-cut carton or insert is faster to build, which matters a lot when staff or fulfillment teams are moving quickly.
Good custom retail packaging die cutting also supports practical brand choices like matte or gloss coating, soft-touch lamination, embossing, foil, or spot UV because the structure gives those finishes a better surface to sit on. That is why brands treat the die line as part of overall branded packaging, not just the mechanical layer underneath it.
For companies that want a packaging system with multiple formats, the structure matters even more. A foldable carton, a sleeve, and an insert set can all be cut from different stocks but still need to match the same product size and handling expectations. If you are comparing formats, the range on our Custom Packaging Products page is a useful starting point, and our Manufacturing Capabilities page shows the production side of what is possible.
How Custom Retail Packaging Die Cutting Works
The process starts with a dieline. That is the flat blueprint that shows where the cut lines, crease lines, glue areas, perforations, and folds go. In custom retail packaging die cutting, the dieline is the whole job. If the layout is wrong, the rest of the project is just expensive decoration.
Here is the usual workflow. First, the structure is drawn to the product dimensions. Then the artwork is placed on top of that structure so logos, copy, and visual elements do not land on folds, seams, or glue tabs. After that, the production team chooses the cutting method. Finally, the printed sheet is converted into the finished package through cutting, creasing, stripping, and folding.
- Dieline creation: the packaging structure is mapped to the exact product size.
- Artwork placement: graphics are aligned around folds, tabs, and trim edges.
- Cut method selection: steel rule die, digital cutting, or kiss-cutting is chosen based on volume and complexity.
- Sampling: a prototype or flat sample is checked for fit and assembly.
- Full production: the final run is cut and converted into finished packaging.
The three main cutting methods behave differently. A steel rule die is a physical die board with sharp blades mounted in a wooden base. It is efficient for larger runs because once the tool is made, it can run quickly. A digital cutter uses a computer-controlled blade instead of a custom tool, which is ideal for prototypes, short runs, and projects that still change often. Kiss-cutting is used when you want to cut through the top layer but leave the backing intact, which is common for labels, seals, or certain promotional elements.
For custom retail packaging die cutting, the choice usually comes down to quantity, timeline, and how much change the project still needs. If a brand is testing a new product and expects artwork revisions, digital cutting is usually the safer route. If the order is large and the structure is settled, a steel rule die often makes more financial sense. There is no magic trick here. The right method depends on the actual job, not the sales pitch.
Bleed, safe areas, fold lines, and glue tabs all need to be mapped before the first sample is produced. A standard bleed is often around 1/8 inch, or about 3 mm, though some converters prefer a little more depending on the trim and finishing method. Safe areas should keep important copy away from folds and edges so the design does not get clipped or distorted. In custom retail packaging die cutting, that layout discipline prevents a lot of avoidable rework.
“A perfect render means nothing if the sample does not close.” That is the line buyers remember after the first prototype comes back and the closure tab is either too tight, too loose, or clearly doing its own thing.
A good supplier usually checks fit before the full order runs. That check may be a flat proof, a dummy sample, or a printed prototype with the final material. For retail-ready work, I prefer a physical sample whenever the budget allows it. Paper on screen cannot tell you how a 20-point SBS board will react to a window cut, or whether the insert will survive assembly without cracking. Custom retail packaging die cutting rewards proofing discipline. Skipping it is how expensive surprises happen.
Key Factors That Affect Quality, Fit, and Performance
Material choice is the first thing I look at in custom retail packaging die cutting. Paperboard, SBS, corrugated board, and specialty stocks all behave differently under pressure. A 14 pt C1S carton cuts and folds one way. A 24 pt board behaves differently. A corrugated insert behaves differently again, especially if you are asking it to carry product weight or survive shipping abuse. The stock has to match the structure, not the other way around.
Thickness matters, but so does grain direction. If the grain runs against the fold, the board is more likely to crack. If the coating is heavy or brittle, the edge can flake. If the stock is too soft, the cut edge may look fuzzy or compressed. That is why custom retail packaging die cutting is as much about material behavior as it is about the blade itself.
Here are the common material ranges I see in retail packaging work:
- Paperboard: 14 pt to 28 pt for folding cartons, sleeves, and inserts.
- SBS: a clean, bright option for premium printed cartons and consumer-facing branding.
- Corrugated: E-flute and B-flute are common when more crush resistance is needed.
- Specialty stocks: textured, recycled, or coated materials used for stronger visual identity or sustainability goals.
Structural complexity is the next variable. Windows, handles, tuck flaps, display cutouts, perforations, and multi-point locking systems all add risk. A simple straight tuck carton is usually easier to cut and assemble than a carton with thumb notches, a clear window, and an internal locking insert. More moving parts mean more chances for misalignment. That is just how custom retail packaging die cutting behaves in practice.
Nesting efficiency also affects performance and cost. If the dieline is laid out poorly on the sheet, more material gets wasted. That waste can push up price and slow down production. When a supplier nests multiple boxes across a press sheet, even a small structural change can reduce how many pieces fit per run. In custom retail packaging die cutting, a tiny design decision can affect yield by several percentage points.
Then there are shipping requirements. A package that looks great in the warehouse may still fail if it cannot pass transit stress. For that reason, some brands run package samples against standards like ISTA transport tests or ASTM methods for material performance. The point is not to make the project academic. The point is to make sure the package can handle real-world abuse. The International Safe Transit Association publishes useful guidance at ISTA, and the packaging industry association at packaging.org has practical resources on structure, sustainability, and material choices.
Finally, there is the human factor. Retail staff, fulfillment teams, and customers all interact with the package differently. If the box is hard to assemble, the team will force it. If the insert is fragile, someone will tear it. If the closure is too clever, the consumer will get annoyed. In custom retail packaging die cutting, a structure that saves ten seconds per unit can matter more than a fancy panel nobody notices.
Custom Retail Packaging Die Cutting Costs and Pricing
Pricing in custom retail packaging die cutting is not random. It follows a few predictable drivers: tooling, setup time, material waste, finishing complexity, and order quantity. If someone gives you a price that looks suspiciously simple, ask what is actually included. Sometimes the quote is real. Sometimes it is a bait number with half the job missing.
The biggest split is between tooling-based and digital work. A steel rule die usually requires setup or tooling cost, often somewhere in the $150-$600 range for a straightforward carton, and more if the structure is large or unusually complex. A digital cutting job may not need that tooling, but the per-unit cost is often higher because the machine time is doing more of the work. That tradeoff is normal in custom retail packaging die cutting.
Small runs almost always cost more per unit. That is not a conspiracy. It is just math. If you only need 250 pieces, the setup, proofing, and handling costs are spread across a small quantity. If you need 5,000 or 10,000 pieces, those same setup costs get diluted. For many folding cartons, a small-run digital job may land in the $0.80-$3.50 per unit range depending on size, stock, and print coverage, while larger production runs can drop much lower. The exact number depends on structure and finish, but the shape of the pricing curve is consistent.
Structural changes can raise price fast. Add a window, and you may add a cutout and a separate film application. Add a custom insert, and you add cutting, nesting, and assembly time. Add tight tolerances for a premium product, and you may increase sampling and quality checks. In custom retail packaging die cutting, the headline design idea is often only a small part of the total cost. The structure underneath is what moves the number.
| Cutting Option | Best For | Setup Cost | Typical Strength | Tradeoff |
|---|---|---|---|---|
| Digital cutting | Prototypes, short runs, frequent revisions | Low to none | Fast changes, no custom tool | Higher unit cost on larger quantities |
| Steel rule die | Mid to high volumes, repeat orders | Moderate tooling fee | Lower unit cost once the tool exists | More upfront planning required |
| Kiss-cutting | Labels, seals, peel-away elements | Varies by setup | Useful for layered applications | Not the right fit for full structural cartons |
If you are comparing quotes, compare more than the price line. Ask what material is being used, what finishing is included, whether sample approval is included, and whether the quote covers shipping and packaging. A lower quote can hide higher waste, weaker board, or extra labor later. For custom retail packaging die cutting, the cheapest number is not always the cheapest job.
A simple quote checklist helps:
- Material type and thickness
- Print coverage and finishing
- Tooling or digital cut method
- Sample and revision allowance
- Assembly or gluing requirements
- Shipping method and carton count
Brands That Sell FSC-certified products should ask about certified board options early. FSC matters for some retail programs, and it is easier to plan for certification from the start than to retrofit it later. The same goes for recycled content requirements and store-specific compliance rules. If your packaging program has sustainability goals, build them into the quote instead of treating them like an afterthought. That is usually where budgets go sideways.
One more practical point: custom retail packaging die cutting often becomes more efficient as the structure stabilizes. The first job on a new design may feel expensive because you are paying for development. Repeat orders usually look better because the tooling is already in place and the supplier has learned where the tolerances live. Packaging is like that. The first version teaches you what the second one should have been.
Step-by-Step Process and Timeline for Approval
The approval process for custom retail packaging die cutting usually moves in a predictable order. The project starts with a brief, then moves into dieline creation, artwork placement, sampling, revision, approval, and full production. If the steps are respected, the schedule stays manageable. If someone skips a step because they are “pretty sure” the dimensions are right, the project tends to wander off a cliff.
Here is the timeline I would expect for a straightforward retail carton:
- Spec gathering: 1 to 2 days for product dimensions, stock preference, and finish requirements.
- Dieline creation: 1 to 3 days depending on structure complexity.
- Artwork placement: 1 to 2 days if the brand assets are ready.
- Sample or proof: 2 to 5 business days for digital or flat samples; longer for tooling-based samples.
- Revision and approval: 1 to 4 days, usually depending on how many people need to sign off.
- Full production: often 10 to 20 business days after approval, with more time needed for complex finishing.
That is a real-world estimate, not a promise. Some jobs move faster. Some stall because the artwork arrives before the structure is ready, which is backwards and expensive. In custom retail packaging die cutting, the order of operations matters. Final artwork belongs on a final dieline, not a guessed one.
The approvals that matter most are these:
- Dieline sign-off: confirms the structure, closure, and dimensions.
- Print proof approval: confirms the artwork, color intent, and copy placement.
- Sample fit check: confirms the product actually fits and closes as expected.
- Final production release: confirms no more changes are coming.
For packaging programs with transit risk, a sample should be checked against actual product weight and handling. If the brand is shipping into retail distribution, it can also make sense to test against transit methods tied to ISTA or internal distribution standards. That is not overkill. That is basic risk management. A package that fails in the warehouse is not a packaging success just because it looked nice on screen.
Custom retail packaging die cutting also benefits from a clean project brief. Before you request quotes, have these details ready:
- Product dimensions and weight
- Desired pack format: carton, sleeve, insert, display, or hybrid
- Material preference and thickness range
- Quantity and reorder expectation
- Artwork format and brand guidelines
- Assembly method and shipping expectations
If you already know that the package needs custom printed boxes, a tuck-in tray, or a display-style window, say so early. Vague briefs create vague quotes, and vague quotes create awkward delays later. The more specific the input, the better the fit, especially in custom retail packaging die cutting.
Common Mistakes That Waste Money and Delay Launches
The biggest mistake is designing graphics before the dieline is approved. That is how logos end up on folds, legal copy lands in the glue area, and brand marks disappear into a tab after folding. In custom retail packaging die cutting, art and structure need to move together. Treat them like two halves of one job, because they are.
Another common mistake is making the structure clever instead of useful. Fancy folds look impressive in a concept deck. They look less impressive when the assembly team needs three hands and a small miracle to close each box. The more complex the structure, the more you risk slower assembly, more waste, and more damaged corners during shipping. I have yet to see a buyer celebrate a package because it was confusing.
Product tolerance gets ignored all the time. A bottle that is “roughly” 2.4 inches wide is not the same as a bottle that measures 2.4 inches exactly. If the insert is too tight, the product scuffs or refuses to seat properly. If it is too loose, the product rattles. That is especially important in custom retail packaging die cutting because the cut size controls real fit, not just visual appearance.
Skipping a physical sample is the classic expensive mistake. A flat proof shows layout. It does not show assembly behavior, closure tension, or how the board cracks when creased. A sample reveals the truth. That is why I push for sample checks on any job with tight tolerances, window cutouts, or internal supports. You do not want the first real test to be on a production line with 8,000 units already in motion.
Here are the mistakes I see most often:
- Art placed before structure approval
- Too many special cuts on a simple product
- Ignoring product size variation
- Choosing a stock that cracks on folds
- Skipping a fit sample to save a little time
There is also a tendency to underthink shipping. A package can pass an on-desk inspection and still fail once it is stacked, palletized, or dropped. If the product is fragile, ask whether the board weight and closure style are strong enough for the route it will travel. Custom retail packaging die cutting should support the real distribution path, not just the photo shoot.
If you are using branded packaging to support retail launch timing, build in one extra review loop. Not because the process is slow, but because one small structural mistake can move production by days. A package that is right twice is cheaper than a package that is wrong once and reprinted twice.
Expert Tips and Your Next Steps
If you want better results from custom retail packaging die cutting, simplify the cut path wherever possible. Fewer special cuts usually means fewer setup issues, fewer weak points, and better yield. That does not mean boring. It means selective. A strong package can still look premium without turning the dieline into a geometry puzzle.
Design for assembly speed if the packaging will be built in-store or by a fulfillment team under time pressure. A package that saves 12 seconds per unit might not sound dramatic, but multiply that across 2,000 units and the labor savings become hard to ignore. In retail packaging, little efficiencies add up fast. So does bad design, unfortunately.
Request at least two or three quotes with the same specs. Same size. Same stock. Same finish. Same quantity. If the specs differ, the prices are not comparable, and the cheapest quote may just be quoting a different job. That is one of the easiest ways brands get fooled by packaging pricing. Custom retail packaging die cutting deserves apples-to-apples comparison, not apples-to-boxes-that-look-similar.
One more tip: ask the supplier how they handle tolerances. A good converter should be able to explain acceptable variation in cut size, fold accuracy, and registration. They should also explain whether the job is best suited to a digital prototype first or a direct-to-production steel rule tool. If they cannot discuss those tradeoffs clearly, that is a warning sign.
From a practical buying point of view, the smartest next move is usually simple:
- Audit one current pack that is causing trouble.
- Measure the product accurately, including any inserts or accessories.
- Ask for a sample-ready dieline before artwork is finalized.
- Confirm board thickness, finish, and assembly requirements.
- Lock the approval checklist before production starts.
If you are building a broader packaging program, this is also the time to review adjacent formats like sleeves, cartons, and inserts so the system stays consistent across product lines. That is where Custom Packaging Products can help shape the structure, and where Manufacturing Capabilities can tell you what production methods fit your timeline and budget.
There is nothing glamorous about getting the cut line right. Good custom retail packaging die cutting disappears when it works, and shouts when it does not. That is exactly why it matters. If you want the package to protect the product, support shelf impact, and reinforce the brand, the structure has to be right before the artwork ever gets printed. The actionable takeaway is simple: lock the dieline first, sample the fit second, and only then move to full production. Skip that order, and you are basically betting the launch on a pretty mockup.
FAQ
What is custom retail packaging die cutting, exactly?
It is the process of cutting printed packaging sheets into a precise shape using a die or digital cutter. It is used for boxes, sleeves, inserts, windows, tabs, and other structural features that standard cutting cannot handle cleanly. The main value is fit: the package looks better, assembles faster, and protects the product more reliably.
How much does custom retail packaging die cutting usually cost?
Cost depends on material, complexity, order quantity, and whether the job uses steel rule tooling or digital cutting. Small runs usually carry a higher unit price because setup gets spread across fewer pieces. Ask for a line-item quote so you can see die setup, material, print, finishing, and shipping separately.
How long does the die cutting process take for retail packaging?
Simple digital cut jobs can move faster, while tooling-based jobs need more time for setup and sampling. Most delays happen during dieline approval, sample revisions, or artwork corrections, not during the actual cut. Build in time for one fit check before full production unless you enjoy expensive surprises.
Is digital die cutting better than a steel rule die?
Digital cutting is usually better for prototypes, short runs, and frequent design changes. Steel rule dies are often better for larger quantities because the tooling cost gets diluted over more units. The right choice depends on volume, design complexity, turnaround, and budget.
What files should I send for custom retail packaging die cutting?
Send a vector dieline file, usually AI, PDF, or EPS, with clearly labeled cut, crease, and bleed layers. Include product dimensions, material preference, artwork placement notes, and any required assembly instructions. If possible, add a physical sample request or reference pack so the supplier understands the intended fit.

