Dad hat sample approval for boutique buyers starts with a simple reality: the sketch, mockup, and actual cap are often three different products. The digital proof may look clean, but the physical sample is where the decisions become expensive. A front panel that sits too deep, a brim that curves too much, or embroidery that crowds the seam can turn a promising order into inventory that never quite feels right on the rack.
The dad hats Sample Approval Checklist for Fashion Boutique Orders is less about paperwork and more about control. It helps a buyer separate what is cosmetic from what affects sell-through. The cap has to fit the customer, hold its shape, match the intended price point, and survive reorder after reorder without drifting. That sounds basic. In practice, it is where many small-batch orders slip.
A boutique order is not judged like a mass-market run. Small differences stand out more, not less. A half-inch shift in logo placement can look sloppy. A crown that is slightly too tall can make the hat feel generic instead of considered. The safest approvals are the ones tied to measurable specs, clear photos, and one actual sample that matches the intended finish.
The sample should answer one question: will the hat you approve be the hat you can reorder?
Dad Hats Sample Approval Checklist for Fashion Boutique Orders
Start with the hat itself before you look at the logo. That order matters. Buyers often get pulled toward decoration first because it is the most visible part of the design, but the blank cap determines most of the wear experience. If the base shape is wrong, the best embroidery in the world will not fix it.
A practical approval checklist should cover three layers. First is the physical construction: crown depth, panel softness, brim curve, closure, sweatband feel, and fabric hand. Second is decoration: embroidery size, patch finish, thread color, stitch density, and placement. Third is the commercial side: sample cost, MOQ, bulk price, lead time, and remake responsibility. If any of those are vague, the order is not ready.
For boutique buyers, specificity saves money. “Low profile” can mean different things to different factories. “Washed cotton” may refer to several finishes with different drape and color behavior. “Premium embroidery” is not a measurable spec. A useful approval sheet names the exact style, notes the measurements, and locks in what can be repeated on the next run.
Approving a sample also means deciding what variation is acceptable. No production run is perfect. A slight thread shade shift or a millimeter of placement drift can be normal. The problem begins when nobody defines the range. Then one person sees a minor difference and another sees a defect.
Keep the language direct. Write down the approved blank, the exact decoration method, the placement point, and the packaging method. If the sample passes, it should pass for reasons a production team can follow. If it fails, the reason should be specific enough to correct without guesswork.
One useful habit is to compare the sample against the final retail plan, not just the art file. A cap can look fine in a flat mockup and still fail on display if the closure is bulky, the crown collapses oddly, or the logo disappears on the chosen fabric. Boutique shelves and customer selfies are unforgiving in that way.
Fit, Crown Shape, and Wearability Checks That Matter
Fit is where many dad hats quietly miss the mark. Two caps can both be labeled one size fits most, yet one sits low and soft while the other rides high and looks more structured than expected. That difference changes the whole silhouette. For a boutique program, the silhouette is part of the product, not a side detail.
Measure crown depth and compare it to the intended profile. A shift of only 0.5 to 1 inch can change how much forehead shows, how the brim frames the face, and how much room the front panel gives the logo. Low-profile dad hats usually work best when the front panel does not stand up too aggressively. If the cap begins to feel closer to a mid-profile trucker shape, the buyer should pause and ask why.
Brim shape matters nearly as much as crown depth. A gently curved bill reads relaxed and familiar. A flatter bill feels more fashion-forward, but it also changes how the cap sits in photographs and on different head shapes. Neither is wrong. The issue is inconsistency. If the sample’s brim curve differs from the spec, the whole line can drift.
Try the sample on more than one person if possible. Adjustable closures are usually expected to cover roughly 2.5 to 3.5 inches of usable range, though the actual comfort depends on where the strap sits and how much tail is left hanging. A cap that adjusts fine in theory can still look sloppy in practice if the excess strap sticks out or the closure digs into the back of the head.
Comfort checks should be practical, not theoretical. Wear the sample for 10 to 15 minutes. Feel the sweatband. Check the inner seams. Notice whether the front panel collapses in a flattering way or folds awkwardly at the seam. Then photograph it under the same lighting the customer will likely see in-store or in product images. Strong products hold their shape in ordinary light.
There is also a resale question hidden inside fit. A softer, broken-in cap often sells well for casual boutiques, while a cleaner shape may work better for a more elevated brand. The decision should be intentional. If the sample feels wrong in the hand, it will probably read wrong on the display wall too.
Embroidery, Patch, and Stitch Placement Checks
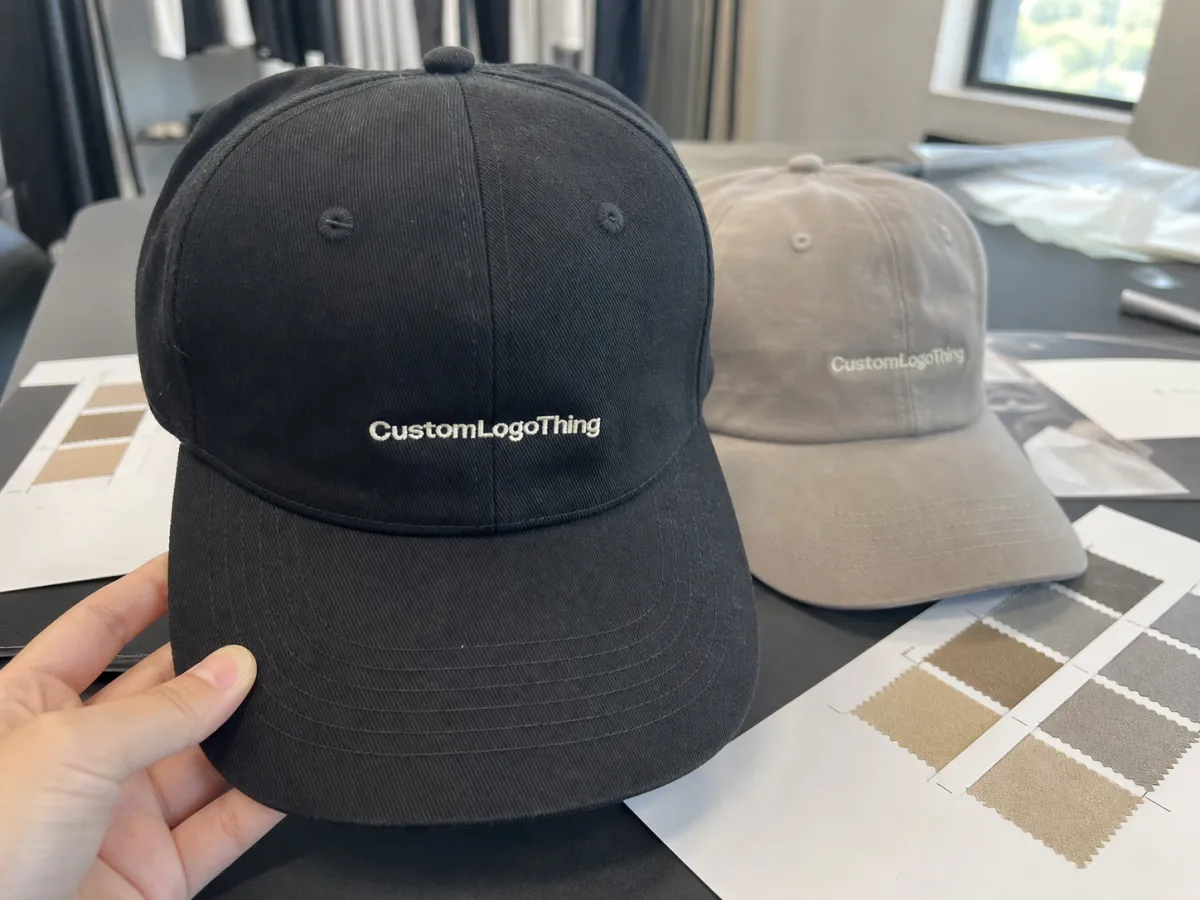
Decoration is where caps move from blank merchandise to branded inventory. It is also where a sample can look acceptable from three feet away and still fail once you handle it. Check the decoration at production size, not as a tiny proof on a screen. Thin lettering, tight curves, and small details often need simplification before they work on a soft crown.
For embroidery, confirm the width, height, stitch density, and edge clean-up. Dense stitching gives the logo definition, but too much density can stiffen an unstructured front panel and pull the fabric. Sparse embroidery may look washed out or fuzzy. On boutique dad hats, front embroidery often lands around 2.0 to 2.75 inches wide for compact marks and 3.0 to 4.0 inches for broader artwork, but the right size depends on panel shape and thread detail.
Placement needs its own measurements. A center-front logo shifted by 1/8 inch may not matter on a large graphic, yet it becomes visible on a small wordmark. Side embroidery and back hits should be measured from a fixed point, not just described as “centered” or “balanced.” That wording is too loose for production. If the supplier cannot repeat the reference point, the second order will probably wander.
Patches add another set of variables. Leather patches, woven patches, and embroidered patches behave differently on a curved, soft cap. Edge thickness, corner finish, and application method all change how the patch sits. A patch that looks crisp on a flat sample can buckle slightly once it is sewn onto a rounded crown. This is normal. The question is whether the distortion stays within the look you intended.
Color also deserves a hard look. Washed cotton and pigment-dyed caps soften contrast. Dark threads on dark fabric can disappear faster than expected. On black or charcoal caps, a navy logo may read almost like black under store lighting. If the brand depends on color contrast, ask for a physical sample in the exact fabric and thread combination, not a stand-in.
Ask for a production photo before bulk production begins. A reliable supplier should be able to show the decoration from the same angle every time. That photo is more useful than a vague promise. It tells you whether the logo sits where the approved sample placed it, and whether the thread color still matches the approved reference.
Pricing, MOQ, and Unit Cost Before You Commit
Price matters, but only if you know what is included. A low sample quote can hide extra charges for digitizing, revisions, freight, packaging, or remake work. Boutique buyers usually feel that gap later, when the finished cost is already pinned to a margin target. The safer move is to look at landed cost, not just the sticker price of the sample.
For custom dad hats, a plain sample may land around $25 to $45 if it is mostly for checking fit and fabric. An embroidered sample often runs about $45 to $90, depending on digitizing and revision needs. Patch samples tend to sit higher, often $55 to $120, because there are more material and finishing variables. Retail packaging can add another $10 to $30, especially if you need hangtags, inserts, or protective folding.
| Option | Typical Cost | Best For | Tradeoff |
|---|---|---|---|
| Plain sample with no decoration | $25-$45 | Checking fit, crown, closure, and fabric hand | Does not prove logo placement or decoration quality |
| Embroidered sample | $45-$90 | Verifying stitch density, size, and placement | Higher sample cost if digitizing or revisions are needed |
| Patch sample | $55-$120 | Testing patch shape, border, and contrast | More variables in finish and application method |
| Sample with retail packaging | $10-$30 extra | Confirming hangtag, insert, polybag, or carton style | Adds cost, but avoids pack-out mistakes later |
MOQ changes more than volume. It changes how the supplier allocates setup costs. A move from 300 units to 500 units may reduce the per-unit price enough to matter, especially if the same blank style and decoration setup can be run without additional changes. On the other hand, a small MOQ can push the unit cost up fast if the order requires custom color matching or multiple decoration locations. The numbers deserve a side-by-side comparison.
Bulk pricing for custom dad hats often ranges from about $2.75 to $6.50 per unit for larger straightforward orders. Smaller runs, more complex embroidery, premium fabric, specialty washes, or custom packaging can push the number higher. That is normal. What matters is whether the supplier explains the cost drivers clearly enough for you to decide where the margin should live.
Before approving the sample, confirm the blank style, decoration method, thread count or patch type, packaging, remake policy, and who pays if the sample needs to be rebuilt. That line on the approval sheet saves more money than a minor unit discount ever will.
If your order includes cartons or shelf-ready packaging, ask for dimensions and pack counts. For shipping performance, ISTA test standards are a useful reference when you want to know whether boxes can handle transit without crushing the cap shape. For packaging materials, FSC-certified cartons or inserts are a clean option if sustainability is part of the brief. Those details do not win attention in a product photo, but they protect the merchandise before it gets there.
Production Process, Timeline, and Lead Time Controls
A clean production timeline matters more on boutique orders than many people expect. Smaller programs usually have tighter launch windows, fewer units to absorb delays, and less room for guesswork. If the sample approval drifts by a week, the rest of the order often follows.
The usual sequence is straightforward: artwork review, sample build, buyer sign-off, bulk production, final inspection, and shipping. Problems start when the sequence compresses. A missing file or an unconfirmed color swatch can freeze the line. A last-minute packaging change can push the order back even if the caps themselves are ready.
Typical sample timing is often 5 to 10 business days after artwork confirmation. Revisions can add more time, especially if the first sample needs changes to logo placement or crown shape. Bulk production for a simple embroidery run is commonly 12 to 20 business days after approval. Patch jobs, special washes, or sourced materials may take longer. Shipping sits on top of that. Domestic transit may take 3 to 7 days, while overseas freight can run from 1 to 4 weeks depending on service and route.
Build a buffer into the plan. Five to seven extra business days is a sensible minimum if the launch date is fixed, and more is wiser if the order depends on a market, pop-up, or seasonal drop. Production does not care that a launch is scheduled. It only responds to complete approvals and clear instructions.
A buyer can speed things up by making decisions early. Thread colors, closure style, packaging, and label placement should be settled before the sample lands whenever possible. The more questions left open, the more the schedule expands. That is not supplier drama; it is how manufacturing works.
The best suppliers make dates visible. They tell you when the sample is due, when approval is needed, when bulk starts, and when inspection photos will be sent. That level of clarity gives the buyer a real planning tool instead of a hopeful estimate. It also makes the Dad Hats Sample Approval Checklist for fashion boutique orders easier to use because every decision has a deadline attached to it.
Fabric, Closure, and Label Details That Keep Reorders Consistent
Fabric changes the mood of a dad hat more than many buyers expect. Washed cotton gives a softer, older feel. Brushed twill looks cleaner. Pigment-dyed fabric adds character but also brings natural shade variation. That variation can be a feature or a headache, depending on whether the brand is selling lived-in charm or expecting a precise color match.
Check the hand feel, surface finish, and panel consistency on the sample. Then ask whether the bulk order will use the same fabric lot. If the lot changes, ask what level of shade difference is considered acceptable. Some variation is normal in garment-dyed and washed products. A lot of variation usually signals weak control, even if the cap looks attractive in isolation.
Closures deserve the same discipline. A metal buckle tends to feel more substantial. A fabric strap keeps the cap lighter and often feels more casual. Plastic snaps are easy to adjust and can suit a lower price point, but they do not always align with a polished boutique presentation. The closure should match the brand position and stay comfortable after repeated wear.
Labeling also affects the final impression. Inside neck labels, side woven labels, sweatband prints, and hangtags all change the way the product presents in-store and on arrival. A small shift in label placement may not look like a defect, but it can matter if the brand wants a clean interior finish or a consistent packing routine. The sample should show exactly where those labels sit.
If the order includes polybags, inserts, or shelf-ready pack-out, confirm how the hat is folded and whether the packaging distorts the crown. A cap can arrive looking compressed if the carton size is too tight or if the insert is wrong. It is a small issue with big consequences. Customers tend to notice shape problems faster than they notice a thread color that is one shade off.
For repeat programs, tolerances should be written plainly: acceptable color range, acceptable stitch shift, acceptable label movement, and acceptable closure variation. The goal is not perfection. It is repeatability. That is what keeps reorders stable and reduces the amount of explaining everyone has to do later.
What a Reliable Cap Supplier Should Document on Every Run
A reliable cap supplier acts like the order will be repeated. That means the sample is not just a one-off object; it becomes the reference for the next run. The supplier should keep the style code, artwork files, placement notes, and packaging details tied to the exact order. Without that record, small changes creep in and the buyer is forced to rediscover old decisions.
Ask for a spec sheet that lists the blank style, fabric, closure, decoration method, logo dimensions, placement points, thread colors, packaging method, and carton count. The sheet does not need to be long. It needs to be exact. A short, clean spec is more useful than a polished deck that says very little.
Photo documentation matters too. Front, side, and back sample images should show the hat as it will be sold, not as it looks staged under ideal lighting. Better still, the supplier should mark the image with measurements or reference points. That makes placement disputes much easier to resolve. “Looks centered” is not a production standard. A marked photo is.
Inspection notes help even on small orders. Pre-production approval, in-line checks, and final inspection are all useful, even if the order is only a few hundred units. For higher-value packaging, it is fair to ask whether the cartons or inserts follow a known test standard. If the order needs extra protection, transit testing aligned with a recognized parcel test program is more useful than hoping the box survives. None of that is glamorous. It is just good control.
Record keeping also shortens the next buy. A boutique that reorders the same cap should not have to rebuild the spec from scratch. If the sample approval thread includes the quote, photos, and final notes in one place, there is far less room for confusion when the next season comes around. That is the practical payoff of doing the approval work carefully the first time.
Next Steps to Approve the Sample and Release the PO
Send the supplier the final logo files, target quantity, preferred blank color, closure choice, packaging preference, and delivery deadline. Then ask for a written approval path before bulk production begins. That keeps the order from stalling in the gap between “looks okay” and “go ahead.”
Once the sample arrives, check it in order. Fit first. Decoration second. Packaging and commercial terms last. If the sample passes, confirm the quote, timeline, and pack-out details in one reply so there is no confusion about what was approved. If it fails, identify the exact issue. “The logo is 3/8 inch too high” is useful. “It feels off” is not.
The strongest boutique orders usually come from a simple habit: approve one sample, lock the spec, and stop reopening settled choices. The dad hats Sample Approval Checklist for fashion boutique orders exists to protect margin, reduce remake risk, and keep the launch from sliding. Once the spec is clean, the purchase order becomes a record, not a negotiation.
What should be included in a dad hats sample approval checklist for boutique orders?
Fit, crown shape, brim curve, closure type, logo size, stitch quality, fabric finish, and color match should all be reviewed on the physical sample. The buyer should also confirm pricing, lead time, packaging, and tolerance limits before approval.
How many dad hat samples should a fashion boutique approve before placing a bulk order?
Most boutique buyers can approve one strong sample if the spec is clear and the supplier is experienced. A second sample is usually worth the time only when the order changes in fit, decoration method, or fabric finish.
What affects the unit cost on boutique dad hat orders the most?
Decoration complexity, blank quality, order quantity, and packaging usually drive the largest price swings. Small MOQ orders often cost more per unit, so buyers should compare landed cost instead of focusing only on the sample price.
How long does sample approval and production usually take for dad hats?
Sample timing often runs 5 to 10 business days after artwork confirmation, while bulk production commonly takes 12 to 20 business days for straightforward runs. Revisions, special materials, and freight can add more time.
What should I confirm before approving dad hat embroidery for a boutique order?
Check logo scale, stitch density, placement, thread color, and how the embroidery sits on the actual hat shape. Approve only after you have seen the sample in the same blank color and finish you plan to sell.


