Fitness cuffed knit Beanies Logo Placement sounds like a narrow production detail, but it controls how the whole product reads. On a spec sheet, a logo can look perfectly centered. On a real beanie, the cuff folds, the knit stretches, and the mark shifts just enough to change the balance. A placement that feels clean on screen can land too low, disappear into the fold, or look smaller once the fabric relaxes.
That is why experienced buyers treat placement as a production decision, not just a design preference. It affects visibility from across a gym floor, the amount of stitch detail that survives on ribbed knit, and whether the beanie feels like a finished branded item or a blank cap with something added later. For team programs, retail lines, and event merch, the best results usually come from measuring the cuff first and fitting the artwork to it, not the other way around.
The practical question is simple: how will the beanie be worn, seen, and washed? A snug training fit exposes a different amount of front space than a loose, slouchy one. A black-on-black retail piece behaves differently than a high-contrast gym giveaway. Those differences are where the real work starts.
What fitness cuffed knit beanies logo placement really means
A cuffed knit beanie is not a flat imprint surface. The fold changes the visible area, the front edge creates a visual break, and the knit itself introduces movement. That makes placement part geometry and part fabric behavior.
For fitness Cuffed Knit Beanies logo placement, the target is usually fast recognition. The mark needs to read in a few seconds, hold up in motion, and survive repeated wear without looking distorted. On knit headwear, that means thinking about three things at once: where the logo sits, how much of it stays visible after the cuff is folded, and whether the artwork can tolerate the texture under it.
The main placement zones buyers usually compare are:
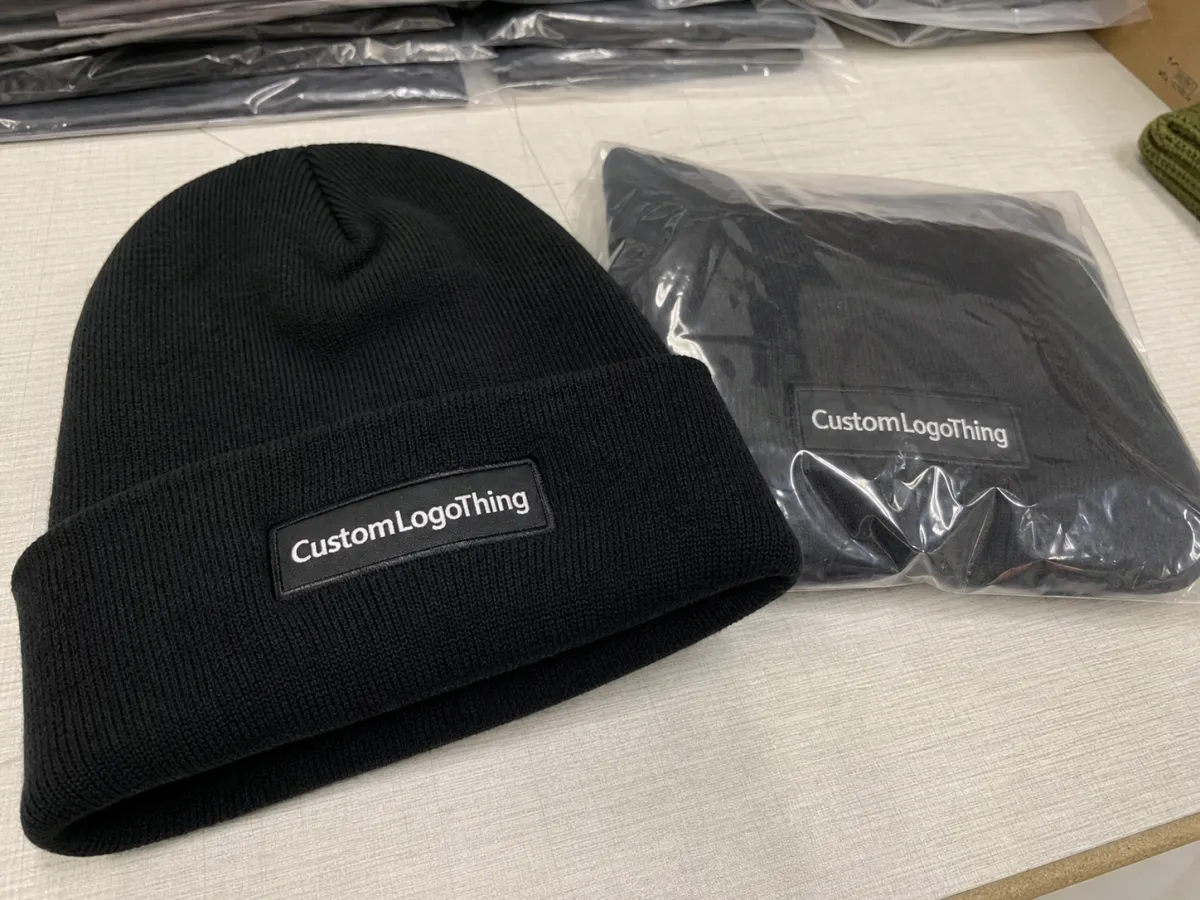
- Front-center cuff - the default choice for clear visibility and balanced branding.
- Raised cuff placement - useful when the cuff is tall or the logo needs more air above the fold.
- Above-cuff crown area - better for certain fits, especially when the wearer exposes more of the body than the cuff.
- Side placement - good for a quieter brand mark, though it is easier to lose in wear.
- Stacked branding - a primary logo plus a woven label or small patch for a more layered retail look.
Centered placement usually wins because it is easy to repeat and easy to read. The problem shows up when buyers center the logo on the flat blank instead of on the worn beanie. Once the cuff is turned, the visual center moves. A logo that is technically centered can still feel low or heavy if the fold line cuts through it.
Material choice matters too. Most fitness beanies are built from acrylic, acrylic-poly blends, or acrylic with wool added for warmth and a slightly softer hand. Rib knit, often in 1x1 or 2x2 construction, gives the cuff enough recovery to hold shape. That recovery is helpful for wear, but it also means the surface can pull at small letters and tight borders if the artwork is too delicate. Knit density is not a side note; it is part of the placement decision.
Some brands want a bold front hit that reads immediately next to hoodies, shakers, and training bags. Others want a restrained retail piece that leans closer to lifestyle than performance. Both can work. The mistake is assuming the same placement logic fits both.
How to position embroidery on the cuff and crown
The fold line is the first thing to respect. On a cuffed beanie, the visible decoration zone changes once the cuff is turned up, so a logo placed too low can fall into the fold or compress against the edge. The safe area is usually a measured band that stays visible on the table and on the head.
Front-center placement on the cuff is the most common choice because it gives a direct, symmetrical read. It works well for initials, short wordmarks, and simple symbols. A slightly higher placement is often better on a tall cuff because it prevents the artwork from sitting too close to the fold and getting visually trapped.
Off-center placement can work, but it needs a reason. A long wordmark may need horizontal room. A side label may already occupy the main panel. A streetwear-inspired line may want a less obvious position. If none of those are true, off-center decoration usually looks accidental rather than intentional.
Embroidery behaves differently from a woven patch or a label on knit fabric. Stitches sink slightly into the surface, which is good for durability, but fine lines can get swallowed by the texture. A woven patch keeps detail cleaner and gives sharper edges. A woven label is even better for tiny branding, though it works best as a secondary element rather than the only front mark.
The best way to judge placement is to look at the beanie in the same state it will be worn. Fold the cuff, stretch it lightly, then check the logo from arm's length. That simple test shows whether the mark is sitting in the right window or drifting toward the fold when the fabric relaxes. It also reveals whether a tall logo is better than a wide one, or whether the art should be moved up a fraction of an inch.
Decoration limits, fabric density, and logo size
Not every logo survives knit decoration equally well. The surface is usually the limit, not the brand file. A tight rib knit can hold cleaner edges than a loose, chunky stitch. Yarn gauge, tension, and fiber blend all affect whether the logo reads crisp or fuzzy once it is stitched, pressed, or applied.
Thin text is the first thing to simplify. Hairline strokes, tiny legal lines, and narrow letter spacing can disappear on a beanie because the surface moves. If the design depends on small internal details, expect a production version that is cleaner and slightly stronger than the original artwork. That is not a downgrade. It is how knit decoration stays legible.
Oversized logos are not a free pass either. If the art gets too wide for the cuff, it can pull the knit, curl at the edges, or create a stiff zone that feels out of place on a soft beanie body. For many front-cuff applications, a logo around 2.0 to 3.5 inches wide is common, but that range shifts with cuff depth, beanie width, and whether the design is a symbol, a short wordmark, or a full name. Taller wordmarks may need more vertical space, while a compact icon can sit lower and still read clearly.
Contrast matters more than a lot of buyers expect. Dark thread on a light beanie, or a light patch on a dark body, improves recognition fast. That matters for fitness customers who see the logo while moving, not while studying a product page. Low-contrast branding can still look premium, but it is slower to read and usually works better for lifestyle lines than for activewear programs.
As a rule, simplify before you enlarge. Reduce tiny type, keep color changes limited, and test whether the logo still reads from 3 to 6 feet away. If it does not, the artwork probably needs cleanup before approval. That is especially true for embroidery, where stitch count, density, and pull can change the look even when the digital proof looks fine.
A good beanie logo works with the knit instead of fighting it. It stays legible in motion, survives folding, and still looks deliberate after the cuff has been worn, handled, and packed.
There are practical production constraints worth keeping in view. Simple embroidered marks often hold up best when the stitch count stays modest and the smallest letters are not pushed past the fabric's tolerance. Woven patches preserve fine detail better, but they add an extra component and another approval step. Leather or faux-leather patches deliver strong shelf presence, though they are a poor choice for tiny text. None of those choices is universally best. The right answer depends on the logo and the knit.
| Decoration option | Best use case | Typical unit add-on | Strengths |
|---|---|---|---|
| Direct embroidery | Simple logos, initials, short wordmarks | $0.55-$1.25 | Durable, efficient, and clean for centered cuff placement |
| Woven patch | Fine detail, small text, retail branding | $0.70-$1.40 | Sharper edges, better detail retention, premium finish |
| Leather or faux-leather patch | Lifestyle branding, fashion-forward kits | $0.90-$1.80 | Strong texture and shelf appeal, less suitable for tiny copy |
| Patch plus embroidery | Layered branding or higher-end retail packs | $1.20-$2.20 | More depth and presence, but higher setup and labor |
Packaging can matter too, especially for retail or event programs. FSC-certified paper tags or belly bands keep the presentation cleaner without adding much cost. If the order needs carton protection for distribution, it helps to align packaging with recognized transit testing practices such as those outlined by ISTA. That keeps the program from looking polished only at sample stage.
Step-by-step: from artwork to placement proof
The cleanest projects start with a real brief, not just a logo file. Who is wearing the beanies? A winter run club, an internal gym staff program, a retail drop, and a promotional giveaway all point toward different placement choices. A subtle side mark may suit a premium retail line. A bold front-center logo is usually better for a training group or event merch.
Next, measure the cuff depth and identify the front-center reference point. Treat the fold as part of the design. A useful placement area is usually established by marking the visible cuff band, then checking whether the artwork stays inside that band after the beanie is folded and lightly stretched. That is where the first meaningful decisions happen.
After that, the artwork should be reviewed at production scale. A logo floating on a computer screen does not tell the full story. A good placement proof shows the logo on the actual beanie silhouette, with knit texture, cuff height, and approximate scale included. That context helps teams approve with confidence instead of guessing.
Color confirmation should happen at the same time. A navy beanie with black thread may look refined in a digital mockup, but on a real sample it can disappear at a distance. A light gray or white mark can also read stronger than expected on dark knit. Proofing against the actual beanie color avoids that kind of mismatch.
Before approval, a short checklist saves time and cuts down on revisions:
- Artwork is vector or cleanly editable.
- Logo size matches the cuff depth and fold height.
- Placement is shown on the beanie, not only on a flat artboard.
- Thread colors or patch colors are confirmed against the knit shade.
- Any retail add-ons, like hang tags or inserts, are listed.
That final proof step matters because fitness Cuffed Knit Beanies logo placement is really about how the logo behaves in motion. A proof can look technically correct and still fail if the mark sits too low, too small, or too close to the fold once the beanie is actually worn. The sample has to answer the real question: can someone read it quickly while moving, not just while looking at a mockup?
Cost, pricing, MOQ, and quote drivers
Pricing for decorated knit beanies moves with a small set of predictable variables. Decoration method, stitch count, thread colors, order quantity, and finishing all shape the number. Folding, hang tags, retail polybags, and carton labeling can add a little more. A simple one-color embroidered mark is usually the most efficient. A complex patch build or mixed decoration stack adds labor and setup time.
MOQ expectations vary by supplier and decoration style, but many buyers see better pricing around 300 to 500 pieces for a decorated run. Smaller quantities can work, though the per-unit cost rises because digitizing, sample approval, and machine programming are spread across fewer hats. That is the tradeoff. A 50-piece order may be perfectly workable, but it will rarely price like a 500-piece program.
Complex logos cost more for clear reasons. A design with multiple colors, tiny text, or layered decoration asks more from production and carries more risk during approval. Each extra stitch path adds machine time, and every correction takes attention. Buyers sometimes assume the logo itself is cheap because it is small. In reality, a tight, detailed mark can be more demanding than a larger, simpler one.
Useful quote details to send up front:
- Vector artwork or a high-resolution logo file.
- Beanie color and preferred yarn style.
- Exact quantity, or a realistic quantity range.
- Desired logo placement and target size.
- Decoration method, if already decided.
- Packaging needs such as folding, tagging, or retail packing.
One practical way to control cost is to standardize placement across colorways. Keeping the logo size and position consistent makes proofing faster and reduces back-and-forth. It also keeps the line visually coherent. Buyers often overlook that consistency has value beyond aesthetics: fewer changes usually mean fewer errors.
For branded packaging, FSC-certified paper tags or belly bands can support presentation without pushing the order into unnecessary premium territory. That kind of detail matters because the beanie is rarely sold alone. It is usually part of a broader branded package, and the packaging should feel like it belongs with the product rather than sitting on top of it.
Production steps, lead time, and approval timeline
A normal workflow starts with inquiry and artwork review, then moves into placement recommendation, digital proof, sample or pre-production check, bulk production, quality control, and packing. That sequence sounds basic, but it is what keeps the job on schedule. Each step confirms a different part of the work: art clarity, logo position, decoration method, and finished presentation.
Lead time depends on quantity, decoration method, and how fast approvals come back. For many decorated beanie programs, 12 to 18 business days after proof approval is a realistic planning window. Larger or more customized orders can stretch longer, especially if the program includes layered branding or retail packing. Seasonal demand matters as well. If a team launch or event date is fixed, buyers need to work backward and leave room for revisions.
Most delays happen in predictable places. The artwork may be unclear. The logo size may change after the first proof. Someone on the buyer side may need to check brand standards before signing off. None of those issues is unusual, but they slow the calendar if they show up late. A fast sample process does not help much if the approval sits in an inbox for three days.
Quality control on beanies is more than checking whether the logo is centered. A good inspection looks at stitch pull, thread tension, patch placement, loose ends, folding consistency, and color alignment across the run. If the cuff is supposed to sit at a certain depth, it should be folded the same way on each piece before packing. Small inconsistencies are easy to miss until the order is laid out side by side.
Transit planning matters too. If the order ships in cartons with retail-ready packs inside, confirm packaging strength and handling expectations early. A simple internal drop standard may be enough for some programs, while others need more formal distribution testing. Keeping that conversation open before production reduces surprises after the goods leave the factory floor.
Common mistakes, expert tips, and next steps
The most common mistake is placing the logo too close to the fold. That one choice can make a good design look cramped, hidden, or oddly compressed once the cuff is worn. The second mistake is using a font that is too thin for knit decoration. Fine lines may look elegant in vector form, but they do not always survive on ribbed yarn.
Low contrast is another frequent miss. Buyers approve a logo because it matches the brand palette, then realize the mark disappears at a distance. For fitness accessories, readability usually deserves more weight than strict color matching. A slightly stronger contrast often gives a better outcome without hurting the brand story.
There are also a few technical details that help separate a polished sample from a merely acceptable one. Thread sheen can change the perceived color under gym lighting. Patch borders can look thick if the edge treatment is too heavy. A tall cuff can swallow a logo that looked perfect on a shorter sample. These are small issues, but small issues are exactly what people notice when the beanie is worn in public.
Useful habits for smoother approvals:
- Compare the proof against the actual beanie color, not just a white-screen mockup.
- Check how the logo reads from 3 to 6 feet away.
- Keep the first proof simple instead of changing size, color, and placement at once.
- Decide whether the mark should feel subtle, athletic, or retail-forward before finalizing art.
- Confirm placement on a folded cuff, not only on the flat body.
The strongest buyers think like wearers as much as designers. If the beanie is for training, commuting, or outdoor movement, the logo has to stay clear through motion, weather, and handling. That is where fitness cuffed knit Beanies Logo Placement earns its value: not in the mockup alone, but in the way the finished hat looks after it has been folded, worn, and seen in real conditions.
If the program includes multiple colorways, hold the placement constant where possible. It helps the line feel intentional and makes QC easier. A good beanie program does not depend on luck. It depends on repeatable placement, the right decoration method, and a proof that matches the fabric people will actually wear.
Where is the best fitness cuffed knit beanies logo placement for front visibility?
Front-center on the cuff is usually the strongest visibility choice because it stays readable when the beanie is worn naturally. If the cuff is tall, a slightly raised placement can keep the logo from sitting too low or getting lost in the fold.
How big should a logo be on a cuffed knit beanie?
The safest size is one that leaves clean space around the edges so the knit does not stretch the artwork out of shape. For many cuffed beanies, a compact logo around 2.0 to 3.5 inches wide works well, but the right size depends on the cuff depth and the logo shape.
What decoration method works best for fitness beanies with a cuffed knit body?
Simple embroidery works well for clean logos, while patches or woven labels can preserve fine detail better. The best method depends on the yarn gauge, the logo complexity, and how durable the buyer wants the finished piece to feel.
What affects the price of fitness cuffed knit beanies with a logo?
Price is driven by quantity, logo complexity, number of colors, decoration method, and whether the order needs special finishing or retail prep. Lower quantities usually carry a higher per-piece cost because setup, proofing, and machine programming are spread across fewer units.
What should I send to get an accurate quote and proof?
Send vector artwork, the beanie color, desired logo location, quantity, and any notes about sizing or brand standards. If you can, include a reference image showing how you want the logo to sit on the cuff so the proof starts closer to the final result.


