Buyer Fit Snapshot
| Best fit | Lamination on Custom Mailer Boxes projects where brand print, material claims, artwork control, MOQ, and repeat-order consistency need to be specified before quoting. |
|---|---|
| Quote inputs | Share finished size, material target, print colors, finish, packing count, annual reorder estimate, ship-to region, and any compliance wording. |
| Proofing check | Approve dieline scale, logo placement, barcode or warning zones, color tolerance, closure strength, and carton packing before bulk production. |
| Main risk | Vague material claims, crowded artwork, missing packing details, or unclear freight terms can make a low unit price expensive after revisions. |
Fast answer: Lamination on Custom Mailer Boxes: What Really Matters should be specified like a repeatable production item. The safest quote records material, print method, finish, artwork proof, packing count, and reorder notes in one written spec.
Production checks before approval
Compare the actual filled-product size with the drawing, then confirm tolerance on folds, seals, hang holes, label areas, and retail display edges. Reserve space for logos, QR codes, warning copy, and material claims before decorative graphics fill the panel.
Quote comparison points
Review material grade, print process, finish, sampling route, tooling charges, carton quantity, and freight assumptions side by side. A quote is only useful when the supplier can repeat the same color, closure quality, and packing count on the next order.
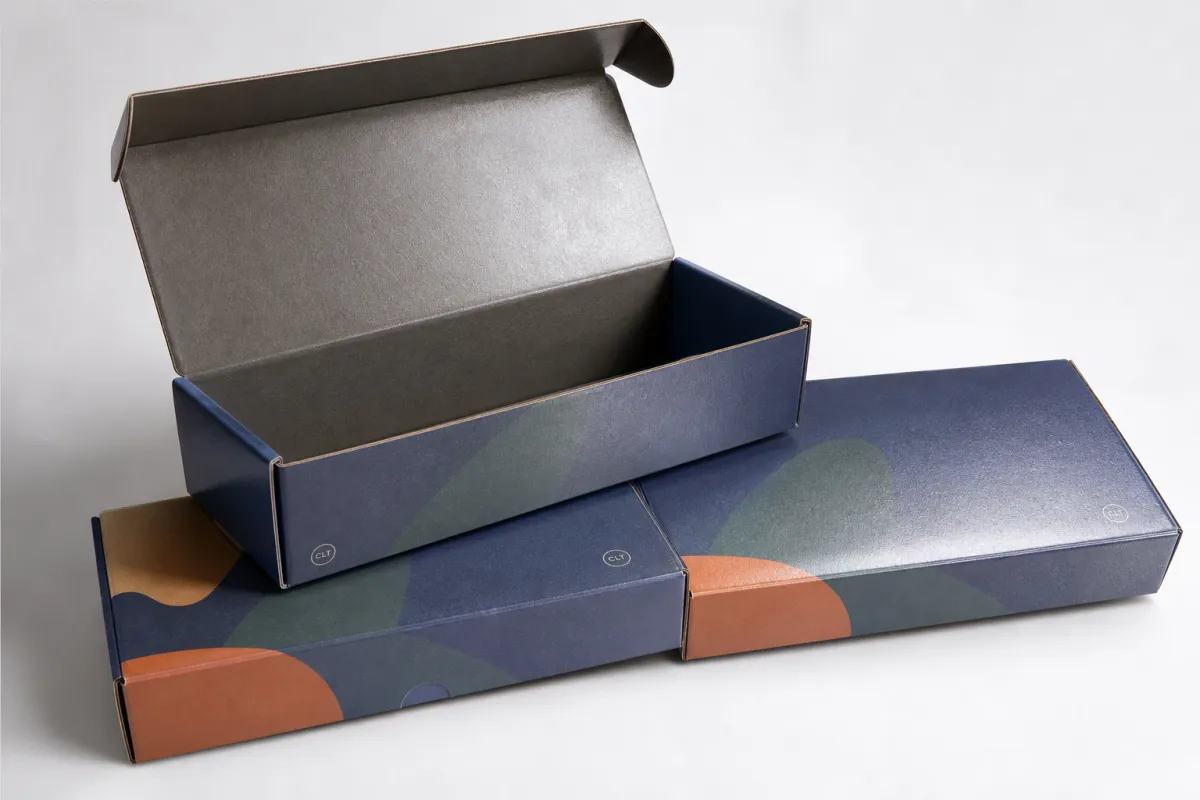
Lamination on Custom Mailer Boxes often looks like a small production decision right up until a shipment lands with rubbed corners, fingerprinted panels, and artwork that has lost its crisp edge somewhere between the press and the porch. That is usually the moment the choice starts feeling expensive. If a box has to carry a brand, protect a printed surface, and still look decent after actual handling, lamination on Custom Mailer Boxes should be treated as a real packaging spec, not a line item to wave through because the mockup looked nice.
The short version is pretty straightforward: lamination on Custom Mailer Boxes changes more than the surface shine. It changes how the board resists scratches, how color reads under real light, how the printed art feels in hand, and how long the box stays presentable once it starts moving through warehouses, courier belts, and customer homes. There is a tradeoff, of course. Better surface protection usually brings added cost, an extra production step, and some added complexity if recyclability is part of the brief. Still, lamination on Custom Mailer Boxes can make an ordinary mailer look sharper without changing the structure itself, as long as the finish fits the job.
A polished mockup does not matter much if the real box arrives with worn edges and handling marks. Packaging has to survive the warehouse before it ever reaches the camera.
What lamination on custom mailer boxes actually changes
The most obvious shift is durability. Unlaminated board picks up scuffs, fingerprints, and rub marks faster than most people expect, especially on custom printed boxes with dark coverage or dense artwork. Lamination on custom mailer boxes slows that wear down by adding a protective film over the print, which helps the box stay cleaner through storage, transit, and repeated handling.
That protection is not only about appearance. Lamination on custom mailer boxes changes the way the package feels when someone picks it up. A surface that feels smoother, more sealed, or slightly softened tends to read as more deliberate. Matte can make a brand feel quieter and more controlled. Gloss can push color higher and make graphics feel brighter. Soft-touch adds a tactile finish that can move a basic mailer closer to high-end retail packaging. The same box shape can carry a very different impression once the surface changes.
Some buyers think lamination on custom mailer boxes exists mainly to make artwork look nicer. That is part of it, but the functional side matters just as much. A shipping mailer may need to handle warehouse stacking, tape contact, repeated touch points, and the friction that comes from moving through a supply chain. If the goal is a box that reaches the customer still looking clean, the finish deserves as much attention as the artwork file.
The main finish options are straightforward:
- Gloss adds shine, boosts color impact, and suits bold artwork or retail-style presentation.
- Matte cuts glare, softens contrast, and usually gives the box a calmer, more refined look.
- Soft-touch creates a velvety surface and usually signals a higher-end presentation, though it typically costs more.
No finish is automatically right. Lamination on custom mailer boxes always sits at the intersection of protection, appearance, budget, and end-of-life handling. A transport-only mailer may not need an upscale tactile finish. A box that acts as the first physical brand moment usually benefits from one.
The real question is not whether the box can be laminated, but what job it has after the press run ends. If the answer is “stay clean, protect the print, and arrive looking intentional,” lamination on custom mailer boxes is doing meaningful work. If the answer is “look premium in a presentation slide,” the finish may be doing more for the quote than the packaging.
That is where custom printed boxes and retail packaging overlap. A mailer can ship like logistics packaging and present like a brand object. Lamination on custom mailer boxes lives right in that gap, which is why the finish has a bigger impact than many buyers expect. I have seen more than one otherwise good design get dragged down simply because the surface treatment was chosen for the render instead of the real handling conditions.
How lamination on custom mailer boxes is applied
The usual sequence starts with print and ends with conversion. The artwork is printed on the board or liner first, then lamination on custom mailer boxes is applied to seal the printed surface. Once that layer is in place, the sheet is die cut, folded, and glued into the finished structure. That order matters because the film needs to sit cleanly across the print before the box is formed.
In practice, the process often uses a thin film, sometimes in the 18-25 micron range for many box applications, though the actual specification depends on the board and the supplier’s equipment. Adhesion matters more than many buyers realize. If the bond is weak, edges can lift, bubbles can appear, and the surface can look uneven long before the box reaches the customer. Corner peel is the kind of defect nobody wants to discover after delivery.
Board choice matters as well. Lamination on custom mailer boxes behaves differently on coated paperboard, corrugated mailers, and heavier foldable cartons. A smoother surface tends to accept film more evenly. A rougher board can show more texture through the finish or reveal small inconsistencies if the application is not tightly controlled. The same gloss or matte finish can look excellent on one structure and only average on another. That is why a sample on the exact board stock matters more than a mood board full of references.
The finish also has to be planned with the rest of the decoration stack. Spot UV, foil, and embossing all interact with lamination on custom mailer boxes in different ways. Spot UV needs a clean base so the highlight does not look muddy. Foil needs precise pressure and registration to keep the edges crisp. Embossing alters the surface itself, which means the film and the raised details have to work together. Push the wrong combination and cracking, uneven shine, or awkward surface buildup can follow.
For brands that want a strong package branding effect, that interaction is where the budget is either well spent or quietly wasted. Lamination on custom mailer boxes should support the artwork, not compete with it. A thick film over dense, busy print can make the whole surface feel overworked. A softer matte finish over a stripped-back layout can make the same box feel expensive without trying too hard. The trick is not to pile on effects just because the catalog makes them easy to choose.
Quality control carries real weight here. Poor lamination on custom mailer boxes can create bubbles, scuffed panels, dull patches, or corner lift where pressure was uneven. Those defects stand out quickly in natural light. If you are ordering custom printed boxes for a launch, ask how the supplier checks adhesion, finish consistency, and board compatibility before the run is cleared. In a press check, even a small inconsistency can look harmless on the table and glaring once the boxes are stacked under real lighting.
For transit performance, many suppliers refer to ISTA testing methods for package durability, and FSC certification matters if board sourcing has to align with forest stewardship goals. Two useful references are ISTA packaging testing standards and FSC certification information. They do not pick the finish for you, but they do help define what acceptable performance should look like.
Cost and pricing factors for lamination on custom mailer boxes
Pricing for lamination on custom mailer boxes usually comes down to a handful of clear variables: finish type, box size, print coverage, board grade, and order quantity. Bigger boxes consume more material. Dense artwork can add handling time. Better board costs more. Smaller runs spread setup expenses across fewer units. None of this is mysterious, just the same production math that keeps packaging quotes from staying neat for long.
As a planning range, standard matte or gloss lamination on custom mailer boxes often sits in a similar cost band, while soft-touch usually lands higher. On many runs, matte or gloss may add roughly $0.05-$0.18 per box at mid-size quantities, while soft-touch may add around $0.12-$0.35 per box depending on size, coverage, and the supplier’s method. Those are not quotes. They are practical ranges that help you avoid sticker shock during quoting.
Here is a buyer-friendly comparison of the common choices:
| Finish | Look and Feel | Protection | Typical Added Cost per Box | Best Fit |
|---|---|---|---|---|
| Gloss | Bright, reflective, strong color pop | Good surface resistance, fingerprints can show | $0.05-$0.15 | Bold retail packaging, vivid artwork |
| Matte | Clean, low glare, restrained | Good everyday protection, softer visual wear | $0.06-$0.16 | Premium branding, minimal layouts |
| Soft-touch | Velvety, upscale, tactile | Strong feel, can show rubs if abused | $0.12-$0.35 | High-value product packaging, luxury feel |
MOQ changes the picture quickly. A 500-piece order of lamination on custom mailer boxes can look expensive on a per-unit basis because setup, testing, and waste are spread over fewer boxes. Once the order reaches 3,000, 5,000, or 10,000 pieces, the unit cost often improves. That is why a quote for 1,000 units and a quote for 5,000 units can feel like they belong to different production worlds. A buyer who is only comparing the unit price without the setup line is gonna miss the real story.
Hidden costs show up too. Extra proof rounds take time, and time has a price. Rush fees appear when files come in late. Custom dielines can add setup work. Tight color matching may slow approvals. Add foil, embossing, or a second finishing step and the quote can rise quickly. Lamination on custom mailer boxes is rarely the only line item with real weight.
The better question is not “what is the cheapest finish?” It is “what finish protects the design and the brand without creating waste later?” A slightly higher unit price can still be the cheaper choice if it prevents damaged boxes, reprints, or packaging that looks undercooked. If your product packaging is part of the sale, the math should include what happens after delivery.
For brands comparing formats, the whole packaging mix helps frame the decision. Our Custom Packaging Products page is useful if you are weighing mailers against other structures, and Custom Poly Mailers can serve as a useful benchmark if you are comparing print presence against shipping efficiency. Lamination on custom mailer boxes is not always the cheapest route, but it is often the better one when the box needs to carry both protection and presentation.
A simple planning rule helps keep the process grounded: matte or gloss for most standard branding jobs, soft-touch for premium presentation, and specialty effects only when the box itself is part of the sales story. That keeps lamination on custom mailer boxes tied to the business goal instead of the mood board.
Production steps and timeline for lamination on custom mailer boxes
Production begins before the first sheet is printed. File prep comes first, then proofing, then approval. If the dieline is off or the bleed setup is messy, the schedule starts slipping right away. Once the files are approved, the shop sets up print, applies lamination on custom mailer boxes, die cuts the sheets, folds and glues the box, then packs and checks the finished goods. That is the tidy version. The untidy version includes corrections, color questions, and someone realizing too late that the logo sits too close to a fold.
A realistic production flow looks like this:
- Artwork and dieline review
- Digital proof approval
- Print setup and color matching
- Lamination on custom mailer boxes
- Die cutting and creasing
- Folding, glueing, and assembly checks
- Packing, carton labeling, and shipment
For a straightforward order, proof approval to ship often lands around 12-18 business days. Special finishes, multiple sampling rounds, and late file corrections all add time. Lamination on custom mailer boxes is not usually the step that creates the first delay. It is the step that exposes earlier mistakes. A weak file makes the finish look worse. A late correction can push the entire run back.
That is why rushed jobs tend to work best with fewer finish choices and cleaner files. Keep the structure simple if the deadline is tight. Reduce unnecessary special effects. Cut down on back-and-forth over artwork. Confirm the finish before the press starts. Lamination on custom mailer boxes is manageable when the plan is clear; it becomes a headache when the file keeps changing. The smoother the brief, the less everyone has to improvise under pressure.
Timing also shifts depending on the surface treatment. Lamination adds handling and inspection, so the line has to stay aligned from print through conversion. If the finish is applied before die cutting, the sheet needs to remain stable enough to cut cleanly. If the lamination stage lands too close to conversion, adhesive behavior and curing time matter a lot. Miss that window and bubbles or edge lift can show up later.
Late-stage defects are the expensive ones. If lamination on custom mailer boxes is checked only after the box is fully formed, a defect can mean rework, scrap, or a partial rerun. Nobody wants to pay twice for the same packaging. The best production schedules catch issues while the sheets are still flat and easy to inspect.
Buyers often ask how much the timeline changes between finishes. The short answer is that it does change, but not wildly. Gloss and matte are often easier to move through production. Soft-touch can take longer if the process is more specialized or the board needs different handling. Add embossing or foil and the timing gets tighter. That is normal. Good packaging usually asks for a little patience, and rushing it rarely makes the result prettier.
Common mistakes with lamination on custom mailer boxes
The first mistake is choosing a finish because it looked good on a screen. Screens do not show everything. Lighting changes everything. Mockups can be helpful, but they still flatten texture and overstate consistency. Lamination on custom mailer boxes is a physical decision, which means glare, texture, and hand feel should be checked in real light. A finish that seems polished in a render can look heavy or muddy once it is actually printed.
The second mistake is forcing the wrong visual effect. Too much gloss on dense, detailed artwork can make the package feel noisy. Heavy shine can flatten hierarchy and make strong branding harder to read. On the other side, very dark matte artwork can lose contrast if the type is too small or the ink coverage is too thick. Lamination on custom mailer boxes should support the artwork rather than compete with it.
The third mistake is ignoring usability. A finish that photographs well can still show fingerprints, scuff easily, or feel slick in transit. If your mailers move through a warehouse, stack inside cartons, and get opened by people who are not thinking about your brand story, durability matters more than a pretty sample. Lamination on custom mailer boxes has to survive real handling, not only the approval deck.
The fourth mistake is assuming every board, adhesive, and print method will react the same way to heat, pressure, and folding. That is rarely true. Material compatibility matters, especially on custom printed boxes with heavy ink coverage or structures that get cut and folded aggressively. If the supplier has not tested the combination, the production run becomes a guess. That is not where you want to be with a launch on the calendar.
The fifth mistake shows up constantly: skipping the sample and then acting surprised when the production run looks different from the mockup. A sample is not extra decoration. It is the cheapest way to check whether lamination on custom mailer boxes is actually delivering the look and feel you expected. If the box carries a high-value item, a sample should be part of the plan.
- Do not choose gloss just because it is loud.
- Do not choose matte just because it sounds premium.
- Do not choose soft-touch if the brand needs a tougher shipping surface than a tactile one.
- Do not approve art without checking how the finish changes contrast and edge detail.
The useful rule is plain: if the box will be touched a lot, stacked hard, or shipped through rough channels, performance comes first. If the box is part of a reveal moment, feel and visual polish matter more. Lamination on custom mailer boxes is not a one-size-fits-all choice, and pretending it is usually wastes money.
If a supplier says every finish is perfect for every box, they are selling convenience, not packaging expertise.
Expert tips for choosing the right lamination finish
Brand position is the cleanest place to start. Matte or soft-touch usually fits an understated premium look. Gloss works better when a brand wants stronger contrast, brighter color, or more shelf presence. If the box is part of retail packaging rather than a hidden shipping shell, the finish should reinforce the way the product is meant to feel. Lamination on custom mailer boxes is one of those specs that quietly tells people what kind of brand they are dealing with.
Testing needs to happen in the real world. That means real handling, not a handoff from one polished desk to another. Put the sample in a warehouse stack. Tape it. Slide it across a table. Let someone open it with a box cutter. Check it under warm light and daylight. Lamination on custom mailer boxes should be judged in use, because that is where the weak points show up. A finish that survives the first five seconds but looks tired after an hour of handling is not doing the job.
Pay close attention to the artwork system too. Thin type, dark backgrounds, and fine line work all react differently once the finish is applied. A very shiny surface can distract from detail. A very soft surface can mute contrast. Lamination on custom mailer boxes should make the design easier to read, not more dramatic than it needs to be. Good packaging design knows where to stop, and sometimes the strongest move is the quieter one.
Ask for a sample run when the stakes are high. That matters especially when the box carries a valuable product, when you need a very specific black tone, or when foil, embossing, and multiple ink layers are all part of the design. Lamination on custom mailer boxes can behave differently once all the layers come together. A clean sample is far cheaper than a full rerun.
Think about the unboxing path as well. If the customer sees the box for only a few seconds before tossing it, a mid-tier matte or gloss finish may be enough. If the package is photographed, gifted, or kept on a shelf, tactile quality matters more. Lamination on custom mailer boxes should match the box’s job, not the wish list attached to it. That sounds obvious, yet it gets missed often.
One practical shortcut helps a lot: if the box has to arrive pristine and still feel premium in the hand, prioritize scuff resistance and tactile feel over squeezing out the last few cents. That is especially true for branded packaging built around first impressions. A cheap-feeling box can quietly weaken the product inside, even when the product itself is excellent.
For teams comparing lamination against other packaging formats, use the same lens you would use for custom printed boxes, custom mailers, or product packaging more broadly. Ask what failure looks like. Is it a scratch? A dull photo? A weak first touch? Once that answer is clear, the finish choice gets much easier. Lamination on custom mailer boxes stops being a style debate and starts becoming a business decision.
If you need a simple reference point, keep this in mind:
- Matte is usually the safest all-around choice.
- Gloss is better when color impact matters most.
- Soft-touch is best when feel is part of the value story.
That does not mean every matte box is dull or every gloss box is loud. It means lamination on custom mailer boxes should be chosen with purpose. Fancy for its own sake is how budgets disappear.
What to do next before you order lamination on custom mailer boxes
Before you place the order, lock down the basics in this order: choose the finish, confirm the board stock, review the dieline, and decide how many samples you need. Do those four things early and lamination on custom mailer boxes becomes far easier to price, schedule, and approve. Leave them for later and you usually pay for the privilege of being disorganized.
Ask for a quote that separates print, lamination, setup, and shipping. A bundled number may look tidy, but it hides where the money is going. Separate lines make it easier to compare suppliers and see the real cost differences. Lamination on custom mailer boxes can look inexpensive until the setup charge appears. That is usually the point where everyone starts saying they need to check one more thing.
Confirm lead time before artwork approval, not after the deadline is already close. That sounds basic because it is basic, yet it gets missed all the time. If a supplier says proof to ship is 12-18 business days for a standard run, build the launch plan around that number rather than a hopeful version of it. Lamination on custom mailer boxes rewards clean timing.
Prepare a short internal checklist so nobody is arguing from vibes alone:
- Branding goal for the box
- Budget ceiling per unit
- Target quantity
- Preferred finish
- Sample approval requirement
- Sustainability target, if any
That last point matters more than some teams like to admit. If recycled content, FSC sourcing, or recycling compatibility is important, say so early. Do not assume every laminated box behaves the same way at end of life. Lamination on custom mailer boxes can change recyclability depending on the film or coating used, and local systems vary. If sustainability is part of the pitch, the supplier needs to know before production starts. Honest limitations here build trust and save a lot of awkward explaining later.
After that, compare the finish against the actual use case. If the box is shipping-heavy, choose durability. If it is shelf-facing, choose visual clarity. If it is giftable, choose touch. If it needs to do all three, expect to pay a bit more. Good packaging rarely comes from pretending every constraint is cheap.
The last step is also the simplest: look at the sample and ask whether it feels like the brand. If the answer is yes, you are close. If the answer is no, do not blame the box size first. Look at the finish. Lamination on custom mailer boxes is often the reason a package finally feels finished, or the reason it never quite gets there.
Lamination on custom mailer boxes is not a decorative extra. It is the surface layer that decides whether the packaging looks polished after transit, feels right in hand, and still holds up in the real world. Pick the finish for the job rather than the mockup, and you will usually spend less over time even if the first quote seems a little higher.
Is lamination on custom mailer boxes better than aqueous coating?
Lamination on custom mailer boxes usually gives stronger surface protection and a more premium feel. Aqueous coating is often lighter and may cost less, but it does not always resist scuffs as well. If the box needs to survive shipping abuse or keep a crisp look in transit, lamination on custom mailer boxes is often the safer choice.
Which finish works best for lamination on custom mailer boxes: matte, gloss, or soft-touch?
Matte is usually the safest all-around choice for lamination on custom mailer boxes because it looks clean and cuts glare. Gloss is better if you want color to hit harder and the artwork is bold. Soft-touch feels more upscale, but it usually costs more and can be less forgiving with very dark artwork.
How much does lamination on custom mailer boxes add to pricing?
The cost increase for lamination on custom mailer boxes depends on finish type, size, quantity, and print complexity. Standard matte or gloss usually adds less than soft-touch, and small orders feel the increase more because setup is spread over fewer units. For planning, many buyers use a rough range of a few cents to a few tenths of a dollar per box, depending on spec.
Does lamination on custom mailer boxes affect recycled packaging?
Yes, lamination on custom mailer boxes can affect how the board is processed depending on the film or coating used. If recyclability matters, ask the supplier which finish options fit your sustainability target and whether the structure uses FSC-certified board. Do not assume every laminated box behaves the same way once it enters the waste stream.
What should I prepare before getting a quote for laminated mailer boxes?
Have the box size, quantity, artwork files, and preferred finish ready before requesting a quote for lamination on custom mailer boxes. Also know whether you need samples, rush production, foil, embossing, or other finishing steps. The cleaner the brief, the less likely the pricing will drift after the first conversation.

