Printed Matte Zipper Bags Cosmetics Packaging Insert Checklist: What Buyers Actually Need
The serum sample kit looks beautiful online. Then the customer opens it, the usage card has slipped behind the sachets, and the hero shade label is hidden under a wrinkle near the zipper. That is not a design detail. That is a packaging failure.
A Printed Matte Zipper Bags cosmetics Packaging Insert Checklist helps beauty teams connect bag structure, artwork, inserts, and fulfillment before ordering. Not after packing. Not after the first influencer unboxing, when everyone suddenly develops strong opinions about zipper placement.
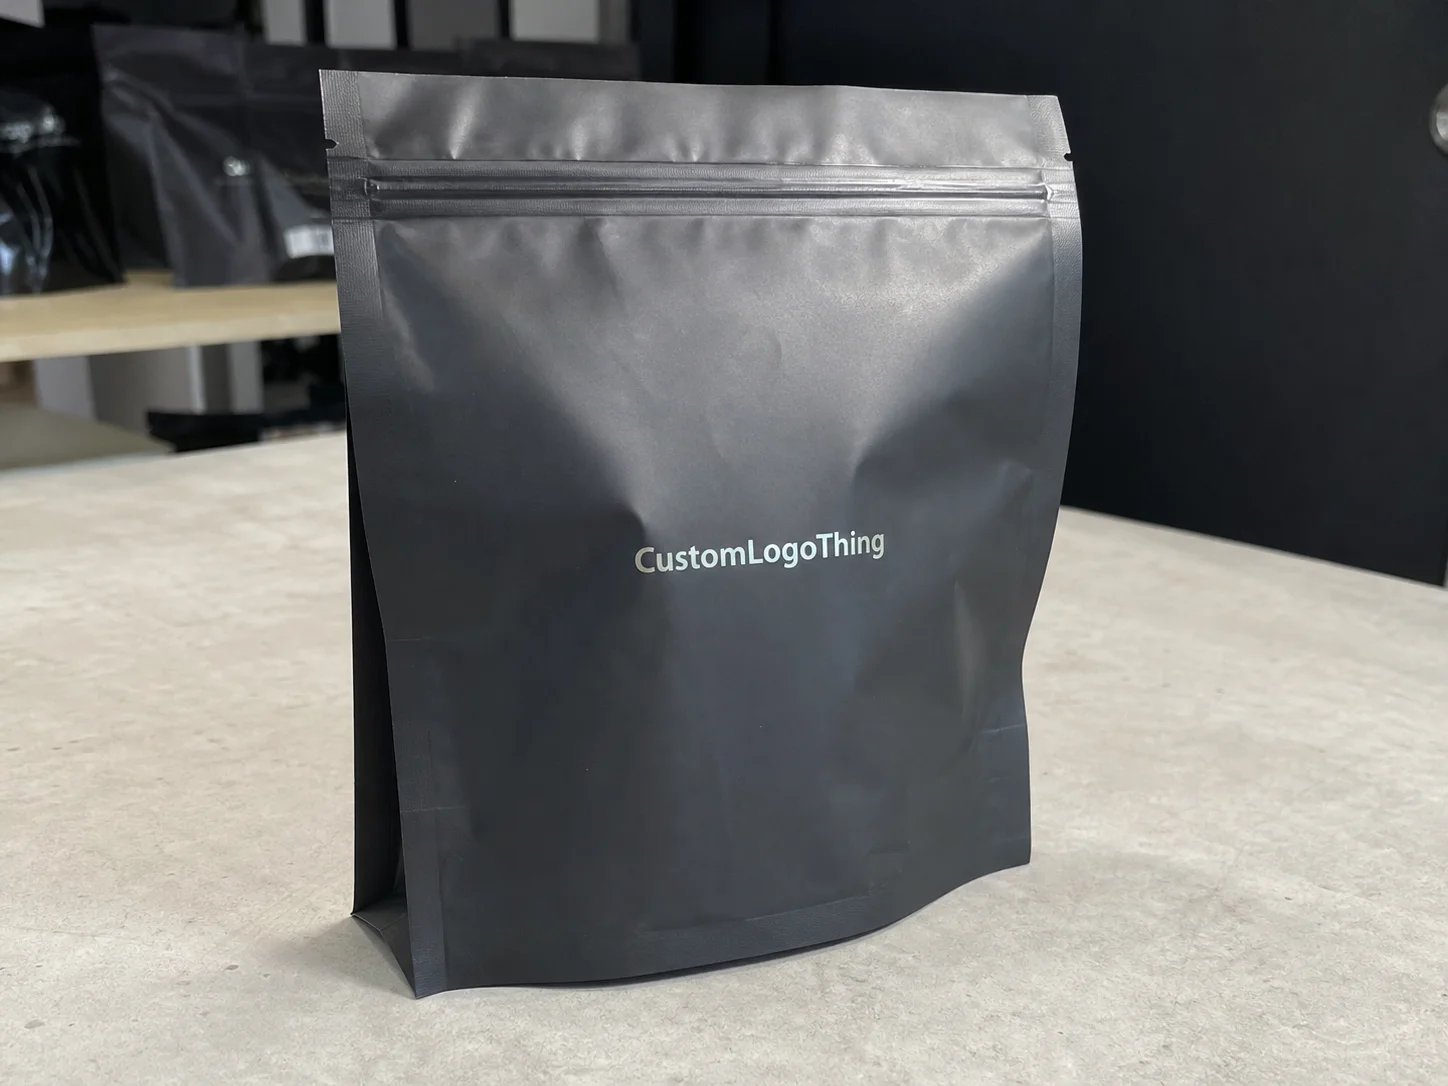
Printed Matte Zipper bags are resealable flexible pouches with a low-gloss surface, custom branding, and optional inserts such as cards, sachets, mini labels, regulatory leaflets, QR cards, or sample vials. In cosmetics, they sit in a strange middle ground. They are not just mailer packaging. They are not quite retail cartons either. They often act as a miniature display, compliance carrier, and storage pouch at the same time.
Beauty buyers use them for trial kits, refill packs, spa take-home products, influencer mailers, travel-size bundles, retail sampling programs, and e-commerce add-ons. The format makes sense. A resealable pouch can hold mixed components without the rigid footprint of a box, and it gives brand teams more visual control than a plain polybag or stock zipper pouch.
The sharp bit most people miss: the bag often costs less than the product inside, but it controls the first impression. It affects whether required copy is visible, whether the barcode scans, and whether the customer keeps the packaging after opening. A $0.32 pouch around a $6 sample set can lift the perceived value. Or it can make the whole kit feel like leftovers from a promo bin.
A practical checklist prevents the usual avoidable failures: wrong film thickness, unreadable matte printing, zipper misalignment, insert crowding, barcode placement problems, and artwork approvals arriving after the production window has already narrowed. Think of it as a buyer’s field guide, not a catalog page.
Buyer reality: a pouch should be judged packed, scanned, handled, photographed, and opened. A flat rendering only proves that the artwork file exists.
How Matte Zipper Cosmetic Bags Work From Film to Insert
A matte cosmetic zipper bag has more anatomy than it appears to. The front and back panels carry the brand story. The zipper track controls reclosure. The tear notch affects first-open behavior. Heat-sealed edges protect the contents. A bottom gusset can help the pouch stand, although small sample kits often stay flat. Some packs add a hang hole, euro slot, or reinforced seal area for retail display.
Film choice drives much of the result. Frosted PE can create a soft, semi-transparent look for simple dry goods or lightweight samples. Laminated PET/PE usually feels crisper and can support better print definition. Recyclable mono-material PE structures are available in some supply chains, but performance depends on barrier needs, sealing conditions, and local recycling access. Higher-barrier laminates may be needed for powders, oils, fragrance-adjacent products, or anything that can stain, transfer odor, or clump.
Cosmetics create odd stress points. Cream sachets need seals that resist pressure during transit. Bath salts need puncture resistance if the crystals are sharp. Sample cards need a pouch that stays flat enough for a clean photograph. Mini jars or vials may need spacing so they do not grind against printed matte film. That is why the bag spec has to connect product behavior with film, size, insert layout, and shipping method.
Printing method matters too. Digital printing can work well for short runs, shade variations, limited kits, and fast versioning. Flexographic or rotogravure printing usually makes more sense at higher quantities, where setup costs spread across thousands of units and color control becomes more predictable. For brand colors, especially nude, blush, black, white, or metallic palettes, ask how the supplier controls color on matte film. Do not assume the file will match the pouch. It rarely behaves that politely.
Inserts are not passive. Cards slide. Sachets bulge. Folded leaflets distort the front panel. A rigid sample can stress the zipper if it sits too high. Matte cosmetic pouches behave less like envelopes and more like tiny retail displays that must survive shipping, handling, shelf placement, and photography.
- Zipper feel: test open-close action for at least 5 to 10 cycles if customers are expected to reuse the bag.
- Rub resistance: matte ink and coatings can scuff during carton movement or kitting.
- Drop performance: ask whether the packed pouch can tolerate common parcel handling and light compression.
- Odor transfer: fragrance, oils, and certain laminates can interact in ways that are not obvious from a visual proof.
- Leakage risk: liquid or semi-liquid formats need compatibility checks, not just attractive artwork.
For broader package testing context, the International Safe Transit Association publishes protocols many packaging teams use to think through distribution hazards. Cosmetic sample pouches will not always require formal ISTA testing, but the logic is useful: test the packed item, not the empty component.
Key Specs That Decide Whether the Bag Looks Premium
Start with size. Measure the product plus the full insert stack, not the product alone. Then allow room for hand packing, zipper clearance, and a smooth front panel. A pouch that is technically large enough may still look cheap if the insert presses into the film and creates ridges across the logo.
For a flat sample kit, a common clearance target is roughly 5 to 10 mm above the tallest insert before the zipper track, plus enough width so cards can be inserted without bending. For thicker kits, check packed thickness in millimeters and decide what the pouch should do. Stay flat? Stand with a gusset? Tolerate a soft bulge? Those are different design problems.
Thickness is easier to understand if we drop the jargon. Thinner films can feel flexible and economical. Thicker laminates feel more substantial, resist wrinkles better, and often photograph cleaner, but they may increase cost and complicate recyclability. Many cosmetic pouches fall somewhere around 80 to 150 microns total structure, depending on laminate, product weight, and barrier needs. Not every product needs the top end.
Finish choices change perceived value quickly. Full matte can look quiet and refined. Spot gloss over a logo adds contrast without shouting. Soft-touch effects feel premium but may scuff if cartons are tight. Frosted transparency windows help customers see shade cards or sachets, while metallic ink accents can work for limited drops. Test dark backgrounds carefully. Black matte often shows rub marks faster than buyers expect.
Artwork priorities are not glamorous, but they decide whether the bag can actually sell. Ingredient copy, shade names, batch codes, cruelty-free icons, QR codes, warnings, retail barcode quiet zones, and recycling statements need space. Barcodes should sit on a flat, low-wrinkle area and be checked with the final substrate. A pretty barcode on a curved pouch corner is a bad bargain.
Insert compatibility should be written into the spec. Include card dimensions, paper weight, fold style, sachet count, vial protection, and whether inserts must face forward. A 350gsm card may look premium, but three cards plus two sachets can make a small pouch feel stuffed. A 170gsm folded leaflet may pack neatly, then wrinkle after shipping. There is no universal answer, which is annoying but true.
| Spec Decision | Typical Buyer Choice | Premium Risk to Check |
|---|---|---|
| Film structure | Frosted PE, PET/PE laminate, or mono-material PE | Barrier, stiffness, recyclability, and odor transfer |
| Thickness | About 80-150 microns, depending on use | Wrinkling, scuffing, seal strength, and hand feel |
| Finish | Full matte, spot gloss, frosted window, soft-touch | Muted colors, visible scuffs, higher setup cost |
| Insert paper | 170gsm leaflet to 350gsm card | Bulging, sliding, blocked copy, or zipper interference |
| Closure | Standard zipper, heavier zipper, tear notch | Inconsistent reclosure or difficult opening on packing lines |
Before asking for quotes, create a one-page spec sheet. List pouch size, material, finish, print method, zipper type, quantity tiers, insert count, packing requirements, and launch date. Suppliers give better answers when they compare the same bag instead of guessing from a reference photo. This is especially true if your broader product packaging program also includes Custom Packaging Products such as sleeves, labels, or custom printed boxes.
Cost, MOQ, and Unit Pricing Drivers for Custom Cosmetic Pouches
Cost usually starts with bag size, film structure, thickness, print coverage, number of colors, finish effects, zipper type, gusset style, and insert complexity. Then the quiet costs appear: artwork revisions, color matching, sample freight, plate or cylinder fees, insert collation, packing method, carton labeling, and inspection requirements.
For simple custom printed matte zipper pouches, a short digital run might land around $0.45 to $1.20 per empty bag at lower quantities, depending on dimensions and print coverage. Higher-volume plate-based production can drop the unit price significantly, sometimes into the $0.18 to $0.45 range for moderate cosmetic pouch sizes, but setup costs and minimums matter. Add inserts, hand collation, or special finishes, and the math changes again.
Digital printing can make sense for low MOQs, seasonal kits, shade variations, and fast testing. Flexo or gravure can reduce unit cost at volume, improve repeatability, and support larger production runs. The tradeoff is commitment: plates, cylinders, longer setup, and much less tolerance for late copy changes.
MOQ is not always about the bag itself. It may be driven by film roll width, zipper material, print setup, lamination batch size, or factory scheduling. A supplier saying “5,000 pieces minimum” may be protecting setup economics, not being difficult for sport. Ask what part of the MOQ is flexible and what part is structural.
Quote the bag and insert together if the insert affects size, hand labor, or final packed thickness. That single rule prevents a surprising number of budget shocks. A pouch that costs $0.24 empty may become a $0.55 packed component once someone has to orient a card, add two sachets, align a QR insert, and carton the final kit.
The cheapest unit cost can backfire. A smaller pouch may wrinkle around the insert stack. A thinner film may scuff in cartons. A low-cost zipper may feel inconsistent, which is a strange but real brand problem for cosmetics. Customers notice tactile flaws before they read half the claims.
- Ask for three quantity tiers: for example, 2,500, 5,000, and 10,000 pieces.
- Separate setup from unit cost: plates, proofs, freight, and insert labor should not hide inside one blended number.
- Check landed cost: product damage, repacking labor, freight cube, and missed launch dates can outweigh a $0.03 unit saving.
- Confirm packing assumptions: loose bags, pre-packed kits, orientation rules, and carton labeling all affect cost.
For sustainability and waste considerations, the U.S. Environmental Protection Agency recycling resources are a useful starting point, although local infrastructure varies sharply. A recyclable claim should be reviewed against actual material structure and market rules, not borrowed from another pouch.
Process and Timeline From Artwork Brief to Packed Bags
A clean process starts before design gets too attached to a layout. Define the use case, confirm dimensions, select material, prepare the dieline, approve artwork, produce a proof, manufacture the bags, inspect, pack, and ship. Each step sounds ordinary. The problem is sequence. If the insert size changes after the dieline is approved, the pouch may need to be reworked.
Before contacting a supplier, gather product dimensions, insert dimensions, target quantity, launch date, artwork files, compliance copy, and reference packaging photos. Include the packed stack height, not just length and width. If you have a preferred shelf posture, say so. Flat counter sample, peg-hung retail pouch, refill pack, and influencer mailer all pull the design in different directions.
Proofing usually happens in layers. A digital mockup checks layout and basic placement. A physical fit sample checks size, zipper clearance, packing ease, and whether the insert stays visible. A printed proof or press proof helps when color accuracy matters. For matte beauty packs, color is often the argument. Matte surfaces can mute bright shades, soften contrast, and make pastel palettes drift.
Timelines depend on print method, material availability, quantity, finish, and whether the supplier also handles inserts. Short-run digital projects may move faster, sometimes around 10 to 15 business days after proof approval for straightforward empty bags. Custom films, special coatings, press proofs, high-volume print runs, or packed kits can stretch into 4 to 8 weeks or more. Supplier capacity and freight can change the range, so treat any timeline as planning guidance rather than a promise carved into stone.
Common bottlenecks are painfully predictable: late ingredient copy, unapproved barcodes, brand color disputes, insert size changes, undecided fulfillment method, and missing carton requirements. Approving a pretty mockup is not the same as approving a packable, scannable, shelf-ready pouch.
Build a reverse calendar from the launch date. Give artwork lock its own deadline. Give sample approval its own deadline. Give production approval, freight booking, and kitting separate checkpoints. Then ask the supplier which decisions become expensive or irreversible after proof approval. Size, zipper placement, print plates, film structure, and special finishes usually belong on that list.
The printed Matte Zipper Bags cosmetics packaging insert checklist earns its keep here because it makes timing visible. If compliance has not approved the warning copy, purchasing should not assume the dieline is final. If fulfillment has not tested the insert orientation, design should not assume the front panel will photograph cleanly.
Common Mistakes That Make Matte Beauty Bags Feel Cheap
The most common failure is designing the bag flat on a screen without testing how the product and insert distort the front panel. Cosmetic packaging is tactile. It bends, catches light, wrinkles, and gets handled by people packing hundreds or thousands of kits in a shift.
Artwork mistakes show up fast on matte pouches. Ingredient text gets too small. Low-contrast colors disappear. Logos sit too close to heat seals. QR codes land on curved areas. Barcodes drift near wrinkles. A 6 pt line of regulatory copy may look acceptable in a PDF and become miserable on frosted film.
Insert mistakes are just as common. Paper that is too flimsy curls inside the pouch. Cards that are too tall interfere with zipper clearance. Folded leaflets create a lumpy silhouette. A sample vial without a protective sleeve can press a hard shape into the matte face. The customer does not diagnose the issue as “insert engineering.” They just feel that the branded packaging is cheap.
Material shortcuts create deeper problems. Choosing film based only on price can ignore oil transfer, fragrance retention, puncture risk, or seal performance. A dry powder refill has different needs than a cream sachet assortment. A spa take-home salt pouch faces different abrasion than a flat shade-card mailer.
Overbranding is another quiet killer. Too many claims, icons, instructions, seals, and slogans can make a premium matte pouch look like a crowded medicine label. The better approach is hierarchy: one primary brand moment, one product identifier, required compliance copy, and only the support icons that earn their space.
Fulfillment can also damage the premium effect. Bags that are hard to open slow packing lines. Inserts that require manual orientation add labor exposure. Cartons that are too tight crush the pouch finish. Every extra manual touch multiplies the chance of scuffing, misalignment, or missed components. At 500 kits, that is annoying. At 20,000 kits, it becomes a measurable cost center.
Here is the buyer takeaway: judge the pouch packed, handled, scanned, and photographed. Not just rendered. Require a physical fit check before production, especially if the kit includes multiple inserts or mixed product formats.
Build a Supplier-Ready Bag and Insert Brief
Start with the physical kit. Gather product samples, measure the full insert stack, choose the desired shelf posture, and define whether the bag is for retail, mailers, refills, spa samples, or sampling. Then decide whether the customer should reuse the bag after first opening. Reuse changes the zipper expectation and sometimes the film choice.
Create a simple specification table before quoting. Include size, material, finish, print method, zipper type, quantity tiers, insert count, packing requirements, carton requirements, and launch date. Add notes for barcode location, QR code destination, required warnings, and insert orientation. If the same brand program also uses labels, sleeves, or custom printed boxes for beauty kits, keep dimensions and color standards consistent across the set.
Prepare artwork files early. Suppliers typically need an editable vector logo, brand color references, regulatory copy, barcode files, icons, QR links, approved claims, and any product photography used on the pouch. If FSC-certified paper inserts are part of the plan, confirm sourcing and claim rules through suppliers familiar with FSC requirements. Do not place certification marks casually.
Ask for three supplier outputs before committing: a dieline, a physical fit sample, and an itemized quote. The quote should separate bag cost, insert handling, setup fees, sample charges, freight, and lead time. Blended quotes are easy to approve and hard to audit.
- Color tolerance: define acceptable variation for matte film and repeat orders.
- Zipper function: confirm opening force, reclosure feel, and tear notch placement.
- Scuff level: review carton packing, rubbing, and dark color performance.
- Seal strength: match seals to product weight, shape, and transit risk.
- Insert orientation: document whether cards, sachets, or leaflets must face forward.
- Carton packing: specify count per carton, inner protection, labels, and stacking limits.
A small pilot or pre-production sample is not overkill for a new cosmetic kit. It is cheap insurance. Even 25 to 100 packed samples can reveal whether cards slide, sachets bulge, barcodes scan, and the matte finish survives handling. If the launch calendar cannot support that, at least run a physical fit sample with the actual insert stack. Guessing from dimensions is how buyers end up with gorgeous bags nobody wants to pack.
The strongest beauty packaging teams treat the pouch as part of the product experience, not a disposable wrapper. Use the checklist as the working document that keeps design, purchasing, compliance, and fulfillment aligned before production starts. Fewer surprises. Better bags. Less emergency rework disguised as “just one quick change.”
FAQ
What should a printed matte zipper bag cosmetics checklist include?
A good checklist should include bag dimensions, film type, thickness, zipper style, finish, artwork requirements, insert size, compliance copy, quantity tiers, proofing steps, lead time, and packing instructions. Add acceptance criteria such as barcode scanability, zipper function, scuff resistance, seal strength, and whether the insert stays visible after packing.
How do I size printed matte zipper bags for cosmetic inserts?
Measure the product and every insert together, including folded leaflets, sachets, cards, or sample vials. Then add clearance for the zipper and hand packing. Ask for a physical fit sample before production because matte pouches can wrinkle, bow, or bulge when the insert stack is too tight.
Are matte zipper bags more expensive than glossy cosmetic pouches?
They can be slightly higher in cost when special matte laminates, soft-touch coatings, spot gloss, or premium ink effects are used. The bigger cost drivers are usually size, material structure, print setup, MOQ, and whether inserts require manual collation.
What is the typical lead time for custom matte zipper cosmetic bags?
Lead time depends on print method, material availability, proofing, quantity, and whether inserts are packed by the supplier. Straightforward short-run bags may take around 10 to 15 business days after proof approval, while custom films, special finishes, or packed kits can take 4 to 8 weeks or more.
Can printed matte zipper bags be used for refill cosmetics packaging?
Yes, if the film structure, seal strength, and zipper are suitable for the product format, such as powders, bath salts, wipes, or certain dry beauty refills. For creams, liquids, oils, or fragrance-heavy products, confirm compatibility, leakage risk, barrier needs, and regulatory labeling before ordering.


