Why Matte Zipper Bag Specs Matter Before You Order
A matte pouch can look expensive and still feel cheap the second the logo lands too low, too small, or halfway into a zipper seam. That is why you need to Get Printed Matte Zipper Bags Logo Print Specification details right before approving a quote or sample. Factories print what you specify, not what you meant.
Fancy finish, sloppy spec. That combination wastes money fast. A matte black stand-up pouch with a soft surface still looks amateur if the brand mark sits 8 mm from the tear notch, the barcode wraps into the side gusset, or the white logo prints weak because nobody called out an ink backing layer.
A useful print specification is not “put my logo on this bag.” It includes the finished bag size, material structure, thickness, matte finish type, zipper placement, print area, logo colors, artwork format, bleed, safe zones, tolerances, and finishing notes. Flexible pouches bend, fill, seal, ship, and get handled. Paperboard is polite. Film is not.
Matte Zipper Bags are common for snacks, supplements, coffee, pet treats, cannabis products, cosmetics, and sample kits because they feel premium and reseal well. Typical retail pouch sizes range from small 3 x 5 inch sample bags to 7 x 11 inch stand-up pouches for coffee or dry goods. Material thickness often sits around 3.5 mil to 5 mil, depending on barrier needs, product weight, and how much abuse the pouch will take in shipping.
Most problems start before production. The artwork file is low resolution. The color expectation comes from a glowing laptop screen. The bag size is chosen flat, not filled. The logo is approved without checking zipper clearance. None of that is dramatic. Just expensive.
Good pouch specs start with production limits, then build the design around them. Not the other way around.
How Matte Zipper Bags Are Printed and Finished
A matte zipper bag has more moving parts than it shows from the front. The structure can include a front panel, back panel, bottom gusset, zipper track, tear notch, top seal area, side seals, rounded corners, hang hole, and sometimes a valve or clear window. Each feature affects print placement. Put important copy into a fold area and it may curve, wrinkle, or disappear after filling.
The main print methods are digital printing, flexographic printing, and rotogravure. Digital printing usually makes sense for lower runs, often a few hundred to a few thousand pieces, because setup is lighter and plates are usually not required. Flexographic printing improves at larger quantities and is common for commercial flexible packaging. Rotogravure is used for high-volume packaging where color consistency and long-run efficiency matter, but cylinders are not cheap. Nobody sensible sets those up for a tiny test run.
Matte effects can come from matte film, matte varnish, or matte lamination. Matte film gives the surface its low-glare look. Matte varnish can be applied over print. Matte lamination adds a finished layer that can improve feel and scuff resistance. Soft-touch coatings add a velvety feel, though they may scuff more easily depending on the material and handling.
Each finish changes logo contrast. Matte reduces glare, which helps shelf photography and gives a quieter premium look. It can also mute bright colors. A neon-style orange on screen may print more restrained on matte film, especially over kraft, metallized structures, or darker backgrounds.
Color control matters. Pantone references help with brand marks and spot color matching. CMYK is practical for photography, gradients, and full-color graphics. If your brand red must match cartons, labels, and pouches, call out the Pantone number and ask what tolerance the supplier can realistically hold. If the answer is “close enough,” ask better questions.
Practical rule: digital proofs confirm layout. Physical samples confirm finish, opacity, texture, zipper feel, seal appearance, and color behavior. Screens lie. Matte film does not care about your monitor settings.
Logo placement needs hard limits. Avoid zipper tracks, heat seal zones, side seams, bottom folds, and heavy ink coverage near crease areas unless the supplier confirms the structure can handle it. If printing on clear, kraft, or metallic films, specify white ink layers where needed. Without white backing, a logo can look weak, translucent, or oddly gray. That is not a mysterious production failure. That is an incomplete print spec.
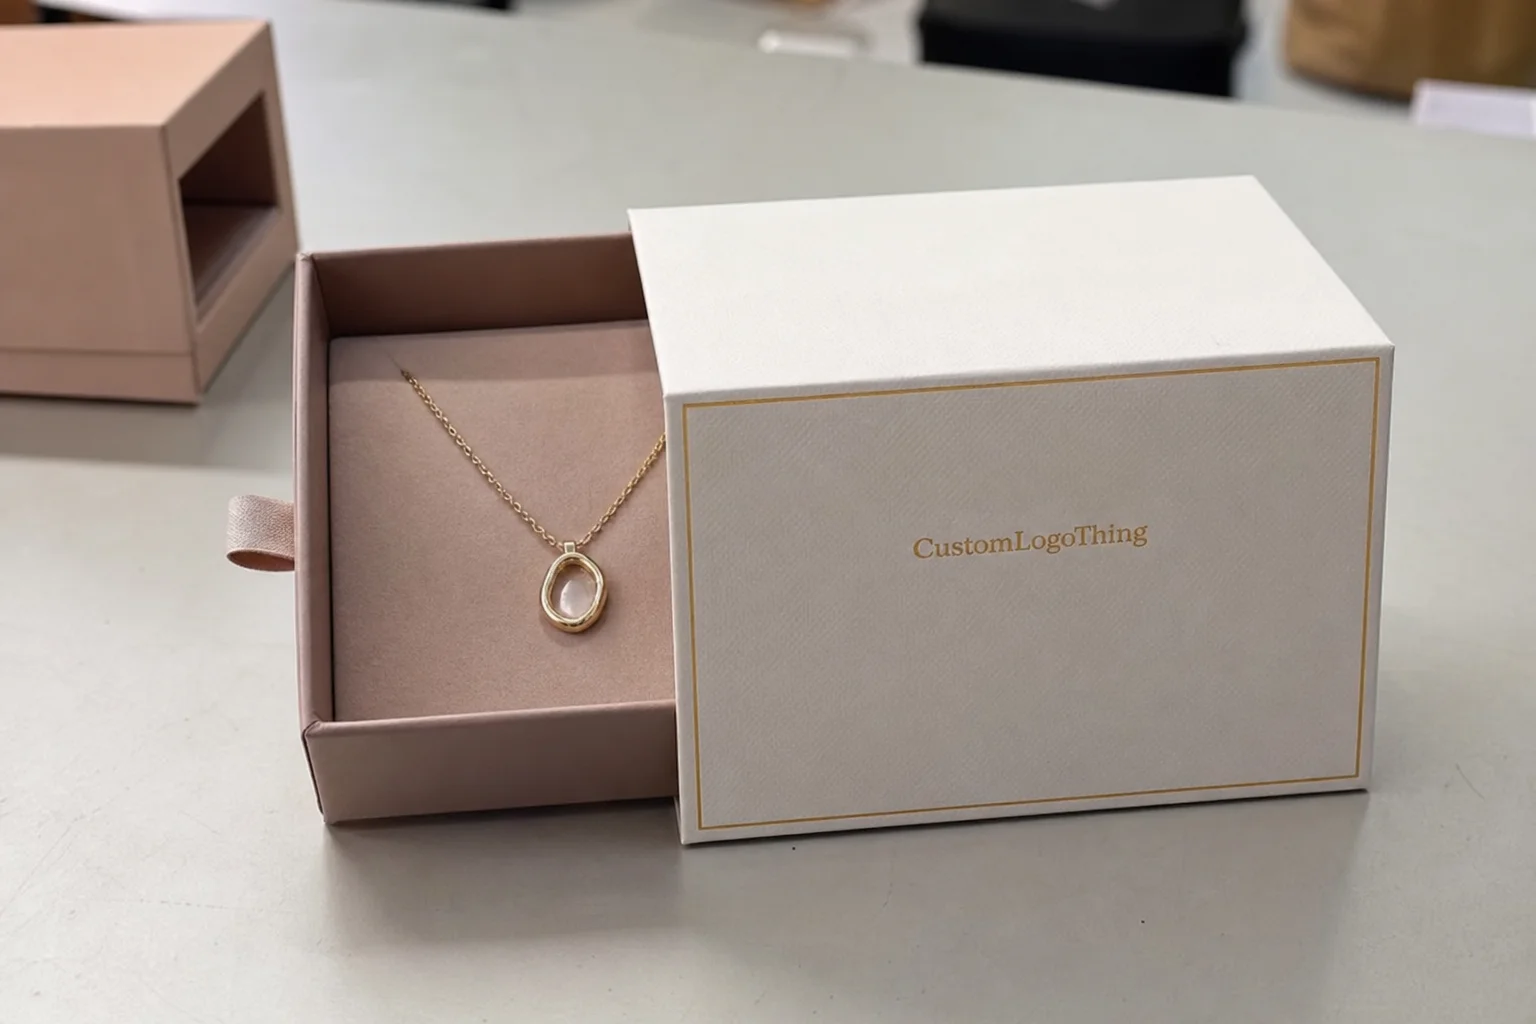
Get Printed Matte Zipper Bags Logo Print Specification Details
The cleanest way to brief a manufacturer is to prepare one spec sheet before pricing. Do not send five emails, three screenshots, and a PNG named “final-logo-final-reallyfinal.png.” That is how confusion gets laminated into plastic.
Your matte zipper bag logo print specification should include these fields at minimum:
- Bag style: stand-up pouch, flat pouch, side gusset pouch, three-side seal pouch, or shaped pouch.
- Finished size: width x height x gusset, measured in inches or millimeters.
- Fill weight or volume: useful for checking whether the pouch size works after filling.
- Material thickness: commonly 3.5 mil, 4 mil, or 5 mil for many retail zipper pouches.
- Material structure: PET/PE, kraft/PET/PE, metallized PET/PE, PET/VMPET/PE, or another barrier structure.
- Finish: matte film, matte varnish, matte lamination, soft-touch, or spot gloss over matte.
- Print method: digital, flexographic, rotogravure, or offset for related inserts or sleeves.
- Logo details: dimensions, position from top and side edges, color references, and white ink backing requirements.
For files, send vector artwork whenever possible: AI, EPS, or production-ready PDF. Outline fonts. Embed linked images. If raster artwork is required, keep it at 300 DPI at final print size. A 900-pixel logo stretched across a 6 inch panel is not “minimalist.” It is fuzzy.
Bleed and safe zones deserve respect. Artwork that reaches the edge should usually extend beyond trim by about 2 mm to 3 mm, depending on the supplier’s dieline. Logos, legal text, nutrition panels, warning icons, and QR codes should sit inside safe margins, often at least 3 mm to 5 mm away from trims, seals, and folds. Some pouch styles need wider margins because converting tolerances are not zero. Tiny shifts happen.
Logo size needs judgment. A 1 inch logo on a 1 lb coffee pouch can look like an afterthought. A 5 inch logo jammed under the zipper can look cramped and cheap. For a 7 x 11 inch stand-up pouch, a centered front logo around 2.5 to 4 inches wide is often a practical starting range, depending on brand style, copy requirements, and how much empty space the design needs.
Barcodes and compliance copy are not decoration. UPC barcodes need quiet space, strong contrast, and a flat enough area to scan reliably. QR codes are usually safer at 0.8 inch square or larger, especially on matte film with texture or low contrast. Ingredient text, batch labels, nutrition facts, warnings, and regulatory icons should be reviewed before proof approval, not after cartons are packed.
Finish interaction can make or break the look. Matte black with a gloss black logo can look premium. Matte-on-matte low contrast can disappear under store lighting. Subtle is good. Invisible is not branding.
Ask for a dieline showing panels, zipper location, gusset folds, tear notch, seal zones, hang holes, valves, windows, and no-print zones before any quote is final. A proper dieline turns “make it centered” into measurable instructions.
Cost, MOQ, and Unit Cost Drivers for Matte Zipper Bags
Pricing depends on bag size, material structure, thickness, print method, color count, order quantity, zipper type, finish, and whether plates or cylinders are required. It also depends on how difficult the artwork is to produce. Fine lines, metallic effects, spot gloss, white ink backing, clear windows, and tight color matching all add variables.
Digital custom zipper bags often make sense for lower runs, roughly 250 to 3,000 pieces. Unit costs might sit around $0.45 to $1.80 each depending on size, print coverage, material, and finish. Flexographic printing may start making better sense around 5,000 to 20,000 pieces, with unit costs often dropping into the $0.18 to $0.55 range for common pouch sizes. Larger rotogravure runs can go lower per unit, but setup costs and MOQs are higher.
Those numbers are ranges, not promises. A small 3 x 5 inch matte sample pouch is not priced like a 9 x 13 inch high-barrier coffee pouch with degassing valve, zipper, matte lamination, and full-coverage print. Shocking, I know.
| Print Option | Typical Quantity Fit | Practical Cost Behavior | Best Use Case |
|---|---|---|---|
| Digital printing | 250-3,000 bags | Higher unit cost, lower setup cost, faster changes | Small launches, seasonal SKUs, test runs |
| Flexographic printing | 5,000-50,000 bags | Plate fees apply, better unit cost at volume | Growing retail lines and repeat orders |
| Rotogravure printing | Large production runs | Higher tooling cost, strong long-run consistency | High-volume packaging programs |
| Matte plus spot gloss | Varies by supplier | Adds registration control and finishing cost | Premium logos, hero SKUs, retail photography |
Lower MOQ usually means higher unit cost, fewer material options, and sometimes less exact color matching. Higher MOQ improves unit economics, but it ties up cash and storage space. If your product formula, label copy, or compliance requirements may change soon, ordering 50,000 bags to save four cents each can become a very special kind of self-inflicted problem.
Setup costs may include plate fees, dieline setup, sample fees, color matching charges, and prototype shipping. These are not factory magic fees. They are the cost of preparing equipment to print your bag. Matte finish can cost more than plain gloss, especially with laminated structures, specialty films, soft-touch coatings, or spot gloss effects.
Freight matters too. Zipper bags are lightweight but bulky. A few thousand empty pouches can take more carton space than buyers expect, so compare delivered cost, not just unit price. Quote 1,000, 3,000, 5,000, and 10,000 units if those quantities fit your launch plan. The price curve usually tells you more than one isolated number.
Process, Timeline, and Approval Steps Before Production
The standard process is simple, but each step needs a decision. Choose the bag style. Confirm size and material. Send artwork. Review the dieline. Approve the quote. Check the digital proof. Approve a sample if needed. Then production starts.
Digital jobs can often move faster because there are fewer setup steps. A straightforward low-run digital pouch project may take 7 to 15 business days after proof approval, depending on the supplier and material availability. Laminated flexographic or gravure production can take 20 to 40 business days, especially if plates, color matching, samples, curing time, inspection, and freight are involved.
The key approval documents are the quote, dieline, digital proof, color proof, pre-production sample, and final production approval. Keep them in one place. The approved proof should match the final bag specification, including logo position, Pantone or CMYK values, finish notes, zipper type, material structure, and bag dimensions.
Every revision resets part of the clock. Changing a logo size before proofing is usually manageable. Changing it after plates are made can mean new tooling and new cost. Changing legal copy after production starts is worse. That is not a revision. That is a headache with an invoice attached.
Lead time depends on artwork readiness, material availability, zipper stock, color matching, sample shipping, production queue, quality inspection, and freight method. Buyer-side delays are common. Missing Pantone numbers, low-resolution logo files, unconfirmed dimensions, and late regulatory copy changes can stall a project faster than any factory issue.
If timing is tight, approve the simplest locked spec first. Add upgrades later. Matte black film and a clean resealable zipper may be essential; spot gloss, metallic ink, or a custom hang hole might be optional. Packaging has deadlines. Your product launch does not care that the font was almost perfect.
For transit testing expectations, especially if filled pouches ship in ecommerce cartons, review standards from ISTA. For paper-based components or FSC-certified paper layers, check the basics from FSC. Flexible pouch specs are not only about print. They also affect storage, handling, and shipment performance.
Common Specification Mistakes That Make Bags Look Cheap
Low-resolution logos are the classic mistake. A blurry logo on a glossy bag looks bad. A blurry logo on a premium matte pouch looks worse because the nicer surface makes poor artwork more obvious. Send vector files. If you cannot, send raster artwork at 300 DPI at final size and ask the printer to confirm it is usable before quoting.
Placement errors are just as common. Logos placed too close to the zipper, seals, gusset folds, or tear notch can distort, wrinkle, or get cut off during converting. A safe margin of 3 mm to 5 mm is a typical minimum, but some pouch styles need more. Stand-up pouch gussets are especially sneaky because the flat dieline does not fully show how the bag behaves once filled.
Color mismatch is another favorite. Buyers approve colors from a screen and then act surprised when matte film prints differently. Screens glow. Ink sits on film. Different universe. If exact color matters, specify Pantone references, ask about tolerance, and review a physical color proof or sample.
Ignoring fill volume can also wreck a nice layout. A pouch that looks perfect flat may bulge after filling, shifting the logo visually and making front-panel text curve. Powders, coffee, granola, gummies, and pet treats all fill differently. For a 12 oz coffee bag, leave breathing room around the main logo and avoid placing tiny text near areas that flex hard when full.
Overdesign is the quiet killer. Too many colors, tiny reverse text, thin lines, crowded icons, and delicate marks can fail on flexible packaging after the bag is filled, boxed, shipped, handled, and displayed upright. A clean 2-color logo can outperform a complicated 8-color design if the contrast and spacing are better.
Barcode failures are not glamorous, but they cost time. Low contrast, small size, poor quiet zones, or placement on curved gussets can make scanning unreliable at checkout or fulfillment. Keep barcodes on a flatter back panel when possible, and test them from a printed proof if retail scanning matters.
Scuffing gets overlooked until it shows up in photos. Matte surfaces can mark during packing, carton rub, or rough handling. Ask whether the material needs a protective lamination, a different outer film, or packing instructions such as interleaving for high-end finishes. Not every pouch needs this. Premium dark matte bags often do.
Review a printed proof or sample for high-risk designs: matte black, metallic effects, clear windows, spot gloss, small typography, and heavy ink coverage. If the first production run is 10,000 bags, spending money on a sample is not being fussy. It is basic risk control.
Expert Tips for Cleaner Logo Print and Better Shelf Impact
Choose contrast first. Matte packaging rewards clean spacing, controlled color use, and strong logo separation more than busy artwork. A cream logo on matte forest green can look sharp. A dark gray logo on matte black may look “premium” in the design file and invisible on shelf. Very on-brand for a product nobody can identify.
Size the logo based on the filled bag, not only the flat dieline. Ask your supplier how the front panel changes after filling. For stand-up pouches, the lower front panel can bow outward, and the bottom gusset can pull artwork downward visually. Put the hero logo in the most stable front-panel area, usually away from the bottom fold and zipper.
Use Pantone colors for critical brand marks and CMYK for photography or complex graphics. Separate those expectations in the spec. If the logo is a spot color and the background is CMYK, say that. If the logo must match a label or carton, provide the reference and ask whether the chosen matte film will shift the appearance.
Keep fine lines, small reverse text, and delicate marks away from seams, gussets, zipper tracks, and high-flex areas. A line weight below 0.25 pt can be risky depending on print method and substrate. Reverse text under 6 pt is usually asking for trouble unless the printer confirms it can hold clearly.
Spot gloss can make a logo pop on a matte pouch, but it requires tight registration. Specify the spot gloss layer clearly in the artwork and quote. Mark it as a separate plate or finish layer, not as some vague “make logo shiny” instruction. Vague instructions are where good packaging goes to die.
Order a pre-production sample if retail launch photos, ecommerce close-ups, or strict brand color matter. A sample can reveal scuffing, zipper stiffness, opacity, logo contrast, seal appearance, and how the pouch stands after filling. Some suppliers charge $50 to $300 for samples or prototypes, depending on complexity. That can be cheaper than rejecting a full production run.
Check the zipper with the actual product if possible. Powders can get into zipper tracks. Coffee and snacks may push the front panel outward. Gummies can create weight and pressure that make a thin pouch feel flimsy. The print may be perfect, but if the zipper feels weak or the bag slumps, customers will notice.
Document every approved choice in one spec sheet. Reorders should match the first run, not become a weird cousin of the original bag. Include material, thickness, finish, print method, artwork version, logo dimensions, color values, barcode placement, zipper type, and approved proof date.
Next Steps to Prepare Your Matte Zipper Bag Quote
Before asking for pricing, build a short checklist. Confirm the finished bag size, product fill weight, stand-up or flat format, matte finish preference, zipper type, material thickness, and quantity range. If you sell food, supplements, cosmetics, cannabis products, or anything regulated, confirm the required copy and warnings before artwork starts.
Gather artwork files early. Send a vector logo, dieline if available, Pantone colors, barcode, regulatory text, icons, and product photography if the design uses images. If you only have a PNG, ask whether it is usable before approving the quote. A supplier can quote from weak artwork, but that does not mean the final bag will look good.
Choose two or three quantity tiers for quoting. Good starting points are 1,000, 3,000, 5,000, and 10,000 units, depending on your launch size. This lets you compare MOQ, unit cost, setup fees, freight, and storage impact without chasing a new estimate every few hours.
Mark must-haves versus nice-to-haves. Must-have might be matte black film, resealable zipper, 4 mil barrier material, and a centered white logo. Nice-to-have might be spot gloss, metallic ink, soft-touch lamination, or a custom hang hole. That distinction helps if budget or timing gets tight.
Send the manufacturer your product category, bag dimensions, target quantity, artwork, finish, print colors, timeline, delivery location, and whether a sample is required. Ask for proofing steps in writing. A proper quote should identify setup fees, print method, material, lead time, freight assumptions, and approval requirements.
To get Printed Matte Zipper bags logo print specification approval without drama, lock the dieline, color references, logo placement, and proof before production starts. Build a one-page print spec sheet, request quantity breaks, and confirm proofing steps before paying the deposit. Simple. Not glamorous. Very effective.
FAQ
What should be included in a matte zipper bags logo print specification?
Include bag size, style, material, matte finish type, zipper location, print area, logo size, logo placement, color references, artwork file type, bleed, safe zones, barcode requirements, and quantity. Add notes for special effects such as spot gloss, clear windows, metallic ink, white ink backing, or soft-touch finish. Attach the dieline and mark seal areas, zipper track, tear notch, gusset folds, and no-print zones.
Can I get printed matte zipper bags with a logo using only a PNG file?
Sometimes, but it is not ideal unless the PNG is high resolution and the design is simple. Vector files such as AI, EPS, or PDF are better for crisp logo edges, accurate scaling, and cleaner production proofs. If the PNG is low resolution, the printed logo may look soft, jagged, or fuzzy on the matte surface.
How much do custom matte zipper bags with logo printing cost?
Cost depends on quantity, bag size, material, thickness, print method, number of colors, finish, zipper type, and setup requirements. Lower quantities usually have higher unit costs, while larger runs reduce unit cost but require more upfront spend. Ask for quote breaks at several quantities so you can see where the pricing becomes sensible instead of accepting one number.
How long does the matte zipper bag printing process take?
Timing depends on artwork readiness, proof approval, material availability, print method, sample needs, production queue, inspection, and shipping. Digital printing is usually faster for lower quantities, while larger laminated runs often need more setup and approval time. The biggest avoidable delay is usually incomplete artwork or late changes after proofing.
What logo colors work best on matte zipper bags?
High-contrast colors work best, especially light logos on dark matte bags or strong dark logos on light matte film. Use Pantone references for critical brand colors and request a proof if exact matching matters. Avoid tiny low-contrast details, especially matte-on-matte designs, unless subtle branding is the point.


