Custom Ribbon Handle Paper Bags for chocolate gift sets do more than move a box from shelf to hand. They frame the purchase as a gift, set expectations before the seal is broken, and influence how finished the assortment feels the moment a customer picks it up. A good bag quietly does several jobs at once: it supports the weight, protects the presentation, and makes the whole purchase feel considered.
That sounds simple until the packaging has to work in real life. The bag needs to fit the packed chocolate set cleanly, survive handling by staff and shoppers, and still look sharp beside printed cartons, tissue, inserts, and seasonal wrap. If the dimensions are off by even a little, or the handle is chosen for looks rather than load, the effect changes fast. Premium packaging is usually won or lost in those small decisions.
For retail launches, holiday assortments, and corporate gift programs, the bag should be planned as part of the full packaging system, not as an accessory added at the end. The most effective specs combine structure, print, and finishing in a way that suits the product weight, the sales channel, and the brand story. A well-made bag does not need to shout. It just needs to feel right in the hand and hold up from packing bench to checkout.
What Are Custom Ribbon Handle Paper Bags for Chocolate Gift Sets?
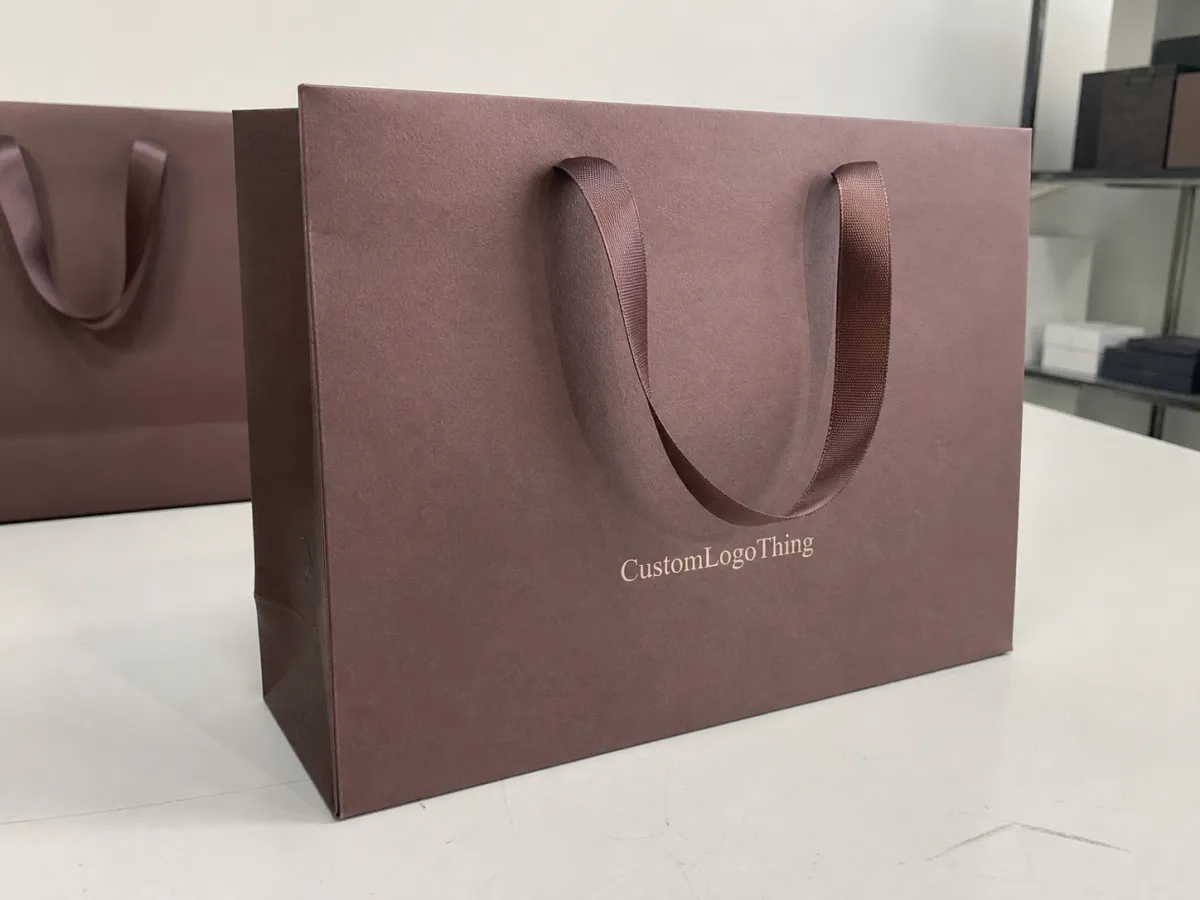
At a practical level, these are Paper Gift Bags sized for boxed chocolate assortments and finished with ribbon handles, reinforced openings, and printed surfaces that match the brand. The ribbon is the most visible detail, but the bag body carries the real burden. A strong one stands upright, keeps its shape when loaded, and presents the chocolates as a gift rather than a routine takeaway item.
That first impression matters because packaging is read before the product is opened. A bag with balanced handles and a clean top edge signals care. A bag that sags, twists, or creases at the base has the opposite effect, even if the chocolates inside are excellent. Buyers often focus on artwork first, but the feel of the structure is what customers remember when they leave the counter.
Ribbon handles are popular for a reason. They look polished, but they also distribute the carry more comfortably than thin twisted paper cord on heavier sets. That helps when the chocolate box includes a rigid tray, a magnetic closure, or an insert that adds weight. In many cases, Custom Ribbon Handle Paper Bags for chocolate gift sets solve both appearance and function without forcing the structure to feel bulky.
A gift bag should feel ready to carry, not so fragile that the customer hesitates before lifting it.
Before placing an order, it helps to separate the visual decision from the structural one. The bag color, ribbon finish, and print treatment shape the look. The board thickness, handle anchoring, and base reinforcement determine whether that look survives daily use. Buyers who treat both sides as one spec usually avoid the most expensive mistakes.
How Ribbon Handles, Paper Weight, and Inserts Work Together
These bags are built in layers, even when they appear simple from the outside. A common construction uses printed outer paper, paperboard or greyboard for the body, a reinforced top fold, and ribbon handles fixed through the upper panel or tucked under a folded lip. For lighter chocolate sets, that is often enough. For heavier assortments, the top edge and base need a more deliberate build.
The handle attachment deserves special attention. If ribbon is glued only into a thin fold, the bag may pass a visual check but fail under repeated lifts. Better options include doubled top boards, hidden reinforcement strips, stitched anchor points, or eyelets concealed inside the fold. The exact method depends on the load, but the goal is the same: the handle area should tolerate real use without tearing or deforming.
Paper weight also matters more than most first-time buyers expect. For outer wraps, coated art paper often sits around 157 to 200 gsm, while a premium rigid feel usually comes from mounting on board in the 1.5 to 2 mm range. Heavier chocolate sets may need more than visual thickness; they need a body that resists bending when the bag is lifted from the side. That extra stiffness can also keep the sides from bowing outward and making the package look tired on shelf.
Inserts become important once the packed product is more than a simple rectangular box. A base insert can keep the set flat and reduce movement, while side pads stop corners from rubbing through the paper during transit or store handling. If the assortment includes a windowed carton, a sampler tray, or a sleeve with uneven weight distribution, a plain bag without an internal support can twist awkwardly as soon as it is carried.
Paper finish changes both appearance and durability. Laminated or coated surfaces resist scuffs better in busy retail settings and during distribution. Uncoated stock feels softer and more natural, but it marks sooner and shows fingerprints, edge wear, and rubbing more quickly. Neither option is wrong. The right choice depends on whether the bag will spend most of its life on a shelf, in a counter area, or in customer hands during a short carry home.
For projects that will move through parcel networks or multiple handling points, it is worth borrowing test thinking from ISTA methods. The bag itself is not a shipping container, so the standard is not rough freight abuse. The question is simpler: does the filled presentation still look acceptable after normal handling, stacking, and transport vibration? That is the level most retail buyers actually need.
Design Factors That Affect Presentation and Protection
Size is the starting point, but it should be set from the filled pack rather than the empty box. Measure the full chocolate gift set exactly as it will be sold, including tissue, sleeves, inserts, closures, or any added decoration. A bag that is sized to the carton alone can end up too tight once the set is complete, or too loose once extra packing material is added.
As a rule of thumb, a packed box around 220 x 160 x 60 mm usually needs a little breathing room on width and height, often 10 to 15 mm, with enough depth to let the bag stand flat rather than bulge. That margin is small, but it prevents rubbed corners and makes loading easier for staff. Oversizing is not harmless either. If the bag is too large, the box shifts and the final presentation looks less deliberate.
Gusset depth should be matched to the actual profile of the gift set. Slim tablet-style assortments can use a narrower gusset, while layered seasonal packs often need more depth to sit evenly. If the base is underspecified, the front panel can bow outward or the bottom can tip after packing, which makes the bag feel weaker than it really is. A clean structure is part of the visual value.
Ribbon width influences the tone of the package more than many buyers expect. Narrow ribbon reads restrained and elegant. Wider ribbon gives more presence and usually feels easier to carry on a heavier set. Satin ribbon creates a polished, classic look. Grosgrain has more texture and a slightly less formal character. Both can work well, but they speak differently. The choice should match the assortment and the brand rather than follow a trend.
Print coverage should also be decided with the shelf environment in mind. Full-bleed graphics, foil accents, and layered decoration can look striking, but they raise cost and do not always improve retail clarity. If a brand already has strong color recognition and a clean logo, a simpler system can be more effective. Soft-touch lamination gives a restrained, premium feel; gloss makes seasonal colors pop more aggressively. Neither finish is universally better. The right answer is the one that survives handling and supports the intended mood.
For brands that use multiple formats, it helps to compare the bag with other Custom Packaging Products in the line. Matching finish, logo placement, and palette across the bag, box, and insert creates a more coherent retail set and reduces the chance of one piece looking out of place. That consistency often does more for perceived quality than a single expensive decoration.
If sustainability claims are part of the brief, material labels should be specific. Recycled content, FSC-certified fiber, and other sourcing statements need to be grounded in the actual paper used, not in general marketing language. The FSC framework is useful because it gives buyers a clear way to check whether the sourcing story matches the documentation.
Cost, MOQ, and Unit Price Drivers
Pricing for custom ribbon handle paper bags for chocolate gift sets usually comes down to a handful of variables: board grade, ribbon material, print coverage, finish, reinforcement, insert complexity, and quantity. A simple one-color bag with standard ribbon is very different from a fully wrapped presentation piece with foil, soft-touch coating, and a custom support insert.
MOQ affects price because setup costs sit at the beginning of the job. Artwork prep, cutting dies, proofing, ribbon sourcing, and assembly checks do not scale evenly. A 500-piece order can look expensive per unit because the setup is spread across fewer bags. At 3,000 or 5,000 pieces, those same fixed costs are distributed more efficiently and the price usually settles into a better range.
| Spec Level | Typical Use | Approx. Unit Price | Notes |
|---|---|---|---|
| Simple printed bag | Short runs, local gifting, basic retail packaging | $0.85-$1.35 at 1,000 pcs | Single or limited color print, standard ribbon, basic reinforcement |
| Mid-range branded bag | Premium chocolate assortments, seasonal gifting | $0.62-$1.05 at 3,000 pcs | Better board, fuller print coverage, improved handle anchor, optional lamination |
| Premium presentation bag | Luxury launches, corporate gifts, flagship retail | $0.48-$0.92 at 5,000 pcs | Foil, soft-touch, custom insert, stronger top reinforcement, higher decoration cost |
Those numbers are only directional. A special ribbon color, heavier board, or second decoration method can move pricing up quickly. Shipping method and destination also matter, especially for bulky packaging that takes more carton space than the product itself. Buyers can often save money by standardizing bag sizes across several gift sets, choosing a stock ribbon color that already fits the brand palette, and simplifying decoration to one strong finish instead of layering every possible effect.
For quote accuracy, the supplier needs more than a rough bag size. Packed dimensions, target quantity, box weight, artwork count, finish preference, shipping destination, and storage conditions all help shape the price. If the chocolates will sit in warm retail displays or be packed with extra tissue and filler, that should be stated early. A clean quote depends on the whole use case, not just the outer dimensions.
For larger packaging programs, combining the bag with matching Custom Packaging Products can make sourcing simpler and sometimes improves overall production planning. The benefit is less about a discount and more about keeping colors, materials, and reorder specs consistent across the full line.
Production Steps and Lead Time From Proof to Ship Date
The process should begin with specification review, not with printing. A careful supplier will confirm dimensions, board thickness, ribbon style, and the intended load before preparing artwork. Only after that should the proof stage start. From there, the usual path is proof approval, sample review if needed, printing, cutting, finishing, assembly, inspection, and packing for shipment.
Delays usually show up in familiar places. Artwork that is not print-ready can hold up proofing. A custom ribbon shade may take longer than a stock color. If the bag dimensions are changed after approval, the die line, reinforcement, and carton pack-out all need to be checked again. Each change is small on paper and expensive in the schedule.
For a standard run, 12 to 18 business days after proof approval is a reasonable planning window if materials are available and the decoration is straightforward. Add time if the order needs a preproduction sample, if foil coverage is heavy, or if the project lands in a seasonal rush. Holiday work can move fast on paper and still slip in practice because factory capacity, ribbon supply, and inspection queues fill early.
Rush production can reduce some waiting, but it does not erase curing, inspection, or packing time. That is one of the reasons compressed schedules carry more risk. A buyer may save a few days and still end up with color variation, weak handle anchors, or a finish that looks rushed under retail lighting. In packaging, the final inspection matters more than the promise of speed.
If the order will travel through several handling points, ask for a check against a simple shipping test plan. That is especially helpful for heavier chocolate gift sets, which can compress top folds or loosen handle anchors if the packed cartons are stacked hard. It is easier to catch that during sample review than after the bags arrive at the customer service desk.
Step-by-Step Guide to Specifying Your Bag Order
Start with the finished product, not the empty box. Measure the fully packed chocolate set exactly as it will be sold, including tissue, inserts, sleeves, and any decorative tie or closure. That avoids the most common sizing mistake, which is designing the bag around a carton that no longer reflects the real pack.
Then choose the structure. Decide on paper weight, body stiffness, gusset depth, ribbon width, and reinforcement at the top edge. Lighter assortments can often use a cleaner build. Heavier sets need stronger base support, more secure handle attachment, and a test lift with the actual product inside. If the bag will be handled repeatedly in a retail environment, the handle area should be treated as a load-bearing part, not a decorative one.
After that, lock the brand details. Confirm logo placement, print method, finish, and color count before pricing is finalized. If the inside of the bag or the base can be seen in store, decide whether those zones should stay plain or carry a small mark. Small touches can help, but they should be intentional. Unplanned printing in hidden areas usually adds cost without adding value.
Operational notes matter too. Quantity, carton pack-out, storage conditions, and delivery location all affect the final result. A bag intended for shelf display has different needs from one that will go straight into ecommerce parcels. If the packaging will be stored for several months before use, moisture resistance and edge protection deserve more attention than they would for an immediate launch.
A practical order checklist looks like this:
- Measure the packed chocolate set.
- Confirm bag size and gusset depth.
- Select ribbon type and reinforcement.
- Approve artwork, finishes, and color counts.
- Test one filled sample before production.
That sequence is basic, but it prevents most of the mismatch problems that turn an elegant idea into awkward retail packaging. If a second packaging format is being developed at the same time, it is smart to keep the bag spec aligned with the carton and insert spec so the full gift set reads as one system rather than three separate purchases.
Common Mistakes That Cause Damage, Delays, or Reprints
The most common mistake is sizing the bag to the box alone. Once tissue, sleeves, ribbon, or a slightly taller lid are added, the finished set can outgrow the bag by just enough to cause rubbing, crowding, or a loose presentation. A few millimeters can decide whether the package feels tailored or merely close enough.
Weak handle reinforcement comes next. Ribbon handles look refined, but they still carry the load. If the anchor point is shallow or the top fold is too thin, the bag can fail the moment a shopper lifts it. That kind of failure is avoidable, and it usually traces back to a spec that treated appearance as more important than structure.
Print errors are another common source of rework. Low-resolution artwork, off-brand color values, or a finish that looks muddy on the chosen stock can all force a correction. A screen preview does not substitute for a physical sample. The same logo can look crisp on coated paper and dull on uncoated board, so proofs should be checked on the actual material whenever possible.
The expensive mistakes are usually small spec gaps that stack up until the final bag no longer matches the box, the brand, or the weight it has to carry.
Schedule mistakes are quieter, but they matter just as much. Approving artwork before the fill dimensions are final, skipping sample approval, or underestimating seasonal lead times can all push a project into a rushed finish. Once the calendar gets tight, buyers often have to choose between speed and the level of refinement they originally wanted.
One practical habit helps more than people expect: test the filled sample in the same way a customer will use it. Lift it twice, set it down, check the base, and inspect the handle anchors. If the bag feels strained in that simple test, it will probably feel strained in the field too. That small check catches failures early and keeps the final packaging from looking more fragile than it should.
Expert Tips and Next Steps for a First Order
For a first order, sample at least two finishes if the brand has not settled on a look. Three samples can be useful when the product line mixes seasonal and everyday assortments. The same artwork can feel warmer on soft-touch, brighter on gloss, or more understated on an uncoated sheet. A PDF cannot show that difference accurately, and the wrong surface can make an otherwise strong design look flat.
It also helps to test the bag with the actual packed chocolate set rather than a placeholder box. Hold it, set it on a counter, lift it twice, and watch how the handles sit. Check whether the base remains flat and whether the bag opens cleanly for packing staff. Those practical checks reveal more than mockups do, especially with heavier sets that need better balance.
If the order may repeat, save a master spec sheet with exact dimensions, paper grade, ribbon color code, finish notes, artwork files, and the final packed weight. That record makes reorders easier and reduces the risk of memory-based decisions drifting from the approved version. In packaging work, good documentation saves more time than a faster email thread ever will.
For brands building a wider retail system, keep the bag, carton, and insert visually aligned. Matching finishes, consistent logo spacing, and a shared color approach make the set feel deliberate. That kind of consistency often becomes visible only after it is missing. Buyers notice the difference, even if they do not put it into words.
What usually separates a polished result from a merely acceptable one is not a dramatic design move. It is a steady sequence of practical choices: the right size, enough reinforcement, a finish suited to the sales channel, and a proofing process that respects the actual weight of the product. That is the real work behind custom ribbon Handle Paper Bags for chocolate gift sets.
FAQ
How do you size custom ribbon handle paper bags for chocolate gift sets?
Measure the fully packed chocolate set, not only the box. Include tissue, inserts, sleeves, and any decorative closure so the bag has enough room to load easily without shifting after packing. Leave a little clearance for the height and width, but avoid oversizing, since a bag that is too loose makes the gift look less polished and can let the box tilt during carry.
Are ribbon handles strong enough for a heavier chocolate assortment?
Yes, if the handle area is reinforced properly and the board is selected for the load. For heavier sets, ask for a stronger top fold, secure anchoring, and a test with the real filled product. The ribbon itself is only part of the system; the hidden structure underneath is what keeps the handle from tearing when the bag is lifted repeatedly.
What affects the cost of custom ribbon handle paper bags for chocolate gift sets?
The main cost drivers are size, paper grade, ribbon type, print coverage, finish, insert complexity, and quantity. Smaller orders usually cost more per bag because setup work is spread across fewer units. If a project uses custom ribbon colors, foil, soft-touch coating, or a reinforced base, the unit price will rise accordingly.
What is the usual production process and lead time?
The normal sequence is specification review, artwork proofing, sample approval, production, inspection, and shipping. A standard order often needs about 12 to 18 business days after proof approval, though custom ribbon sourcing, sample changes, and seasonal demand can extend that. Rush work may shorten parts of the schedule, but inspection and packing still need enough time to avoid mistakes.
Which finishes work best for premium chocolate gift packaging?
Soft-touch and matte finishes often create a calmer, more giftable feel, while gloss can make seasonal color and contrast more vivid. Foil and spot accents work best when they highlight a logo or motif rather than cover every surface. The right finish depends on the brand tone, handling conditions, and whether the bag should feel more luxurious or more festive.
What should I send first if I want a quote for custom ribbon handle paper bags for chocolate gift sets?
Start with the packed dimensions, target quantity, estimated box weight, finish preference, artwork files, and delivery location. If you already have a sample carton or a die line, include that as well so the quote reflects the real structure. The more complete the brief, the less likely the price or lead time will change later.

