Most hat problems do not start in production. They start in the proof, when a logo that looked balanced on a screen suddenly reads too wide for a soft crown or too low for a relaxed front panel. That is the value of a pet treat unstructured dad hats Digital Proof Checklist: it catches the expensive mistakes while the order is still editable, not after 500 hats have already been stitched.
For pet treat brands, the review has a second layer. The hats are often tied to a launch date, a trade show, a seasonal promotion, or a retail reset, so there is pressure to approve quickly. Speed is fine. Guesswork is not. A proof checklist keeps the art, the blank, the decoration method, and the timing in one place so they are reviewed as a system instead of as separate problems.
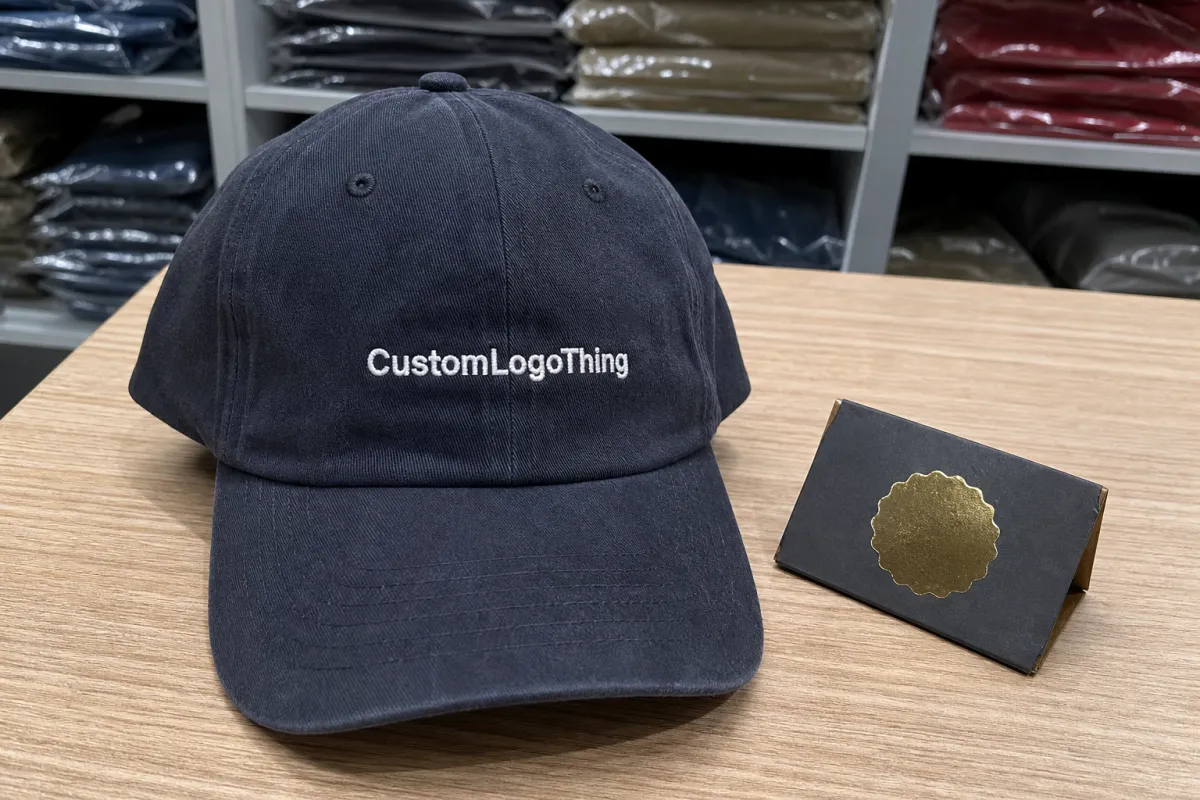
Unstructured Dad Hats are forgiving in casual wear and unforgiving in decoration. The crown collapses a little, the front panel flexes, and the visual center moves more than buyers expect. A design that looks perfectly centered on a flat mockup can appear off once it is sitting on a soft, low-profile cap. That is why proof review needs measurements, not impressions.
What the pet treat unstructured dad hats digital proof checklist covers
A strong proof checklist functions like a pre-production map. It answers what must be confirmed, what can still change, and what becomes fixed the moment approval is given. For Unstructured Dad Hats, that usually means artwork scale, thread colors, front-panel placement, bill shape, closure style, and any notes tied to a pet treat campaign or co-branded retail program.
The most common miss is not the hat blank itself. It is the way decoration behaves on a soft crown. A logo that feels clean on a digital mockup may become visually wider once it is placed on a six-panel cap with a relaxed front. A mark can also disappear if the thread color sits too close to the fabric tone. The hat is still the same size; the visual effect is not.
“If the proof looks slightly off, production will not hide it. It will repeat it across every unit in the run.”
For pet treat promotions, that matters more than it sounds. Buyers are usually balancing a launch calendar, inventory constraints, and a ship date that cannot move. A proof checklist creates a control point before the order locks. It forces the team to confirm the right blank, the right decoration method, and the right placement instead of assuming a generic mockup is close enough.
In practice, the checklist should answer four questions before anyone signs off:
- Does the logo fit the hat in both scale and proportion?
- Do the thread colors and fabric color preserve brand recognition?
- Does the placement match the approved spec, not a generic template?
- Are the buyer and supplier aligned on what changes trigger a reproof or added cost?
That last item is where budgets drift. If the icon changes after approval, the order may need a new digitizing file, a new sewout, or another proof cycle. Those are not edge cases; they are ordinary consequences of late changes. A checklist makes that cost visible before the work starts.
How the digital proof process and approval timeline works
The workflow usually begins with the art file, not the hat. Clean vector artwork gives the decorator a much better chance of setting stitch paths, smoothing small nodes, and judging whether fine detail will survive embroidery. A low-resolution JPG can still be used as a reference, but it almost always slows the process because the proof team has to reconstruct what the brand actually wants before it can show a believable mockup.
Next comes placement drafting. This is where the blank matters. A proof for a structured trucker cap should never be treated as interchangeable with a proof for a soft dad hat. The front-panel height, the amount of crown collapse, and the bill angle all change the visual balance. The best proof files name the exact hat blank, closure style, and decoration method so the buyer is approving the real product, not a general idea of it.
Most proof revisions are smaller than buyers expect. The usual requests are logo size, logo position, and thread color. Those are solvable, but they need clear direction. “Make it pop more” creates extra email traffic. “Increase the front logo width from 2.25 inches to 2.75 inches and move it up 0.2 inch” gives production a usable instruction.
Timing depends on the artwork and the decoration method. A simple embroidery proof with clean vector art can often be turned in within one or two business days. More detailed orders, especially those with patches, multiple colorways, special finishes, or retail packaging notes, take longer because the mockup, stitch map, and approval language all need to match before the file is locked.
Delays usually come from the buyer side rather than the machine side. Missing source files, unclear brand standards, weekend signoff gaps, and late-stage design changes all extend the schedule. If the launch date is fixed, the safest move is to approve the proof as soon as the art is right, then save the final spec in the same folder as the order confirmation. That is not housekeeping; it is risk control.
For buyers who manage multiple decoration types, a supplier capabilities sheet can help clarify what changes with embroidery, patch application, or print-based decoration. The point is not marketing. It is making sure the proof reflects the actual production path, not a generic presentation.
Cost, pricing, MOQ, and quote drivers
Pricing for custom dad hats usually comes from four places: the blank hat, the decoration method, setup or digitizing, and any premium finishing. That breakdown matters because two quotes can look comparable while hiding very different scopes. One may include art cleanup and packing; the other may bill those items later.
For moderate runs, a plain unstructured blank often lands around $2.25-$4.50 per hat before decoration, depending on fabric weight, wash treatment, and closure style. Basic embroidery usually adds a modest per-unit cost. A woven patch or leather patch changes the number more sharply because it adds material, setup, and another production step. The exact figure depends on stitch count, art complexity, and how many decoration locations are involved.
MOQ changes the math quickly. A 48-piece order usually carries a higher unit price than a 300-piece run because the fixed costs are spread across fewer hats. That is normal. The buyer is still paying for digitizing, proofing, machine setup, and inspection whether the run is small or large. Larger orders simply absorb those costs more efficiently.
| Decoration option | Best use | Typical cost impact | Proof risk to watch |
|---|---|---|---|
| Direct embroidery | Simple logos, short text, clean icons | Lowest setup; usually the most economical | Small lettering may fill in if stitch density is too high |
| Woven patch | Fine detail, sharper edges, multi-line marks | Moderate setup and unit upcharge | Patch size and border width must still suit the soft crown |
| Leather or faux leather patch | Simple premium branding | Higher unit cost than embroidery | Dark-on-dark contrast can disappear on brushed or pigment-dyed fabric |
A careful pet treat unstructured dad hats Digital Proof Checklist also helps buyers compare quotes on equal terms. Ask whether digitizing is included, whether revisions are billed, whether freight is covered, and whether packaging is part of the line item or a separate charge. A low quote that adds setup, sample, and shipping later is not really low. It is just delayed.
If the order includes inserts, retail sleeves, or outer cartons, material specs matter as much as the hat itself. Recycled stock, FSC-certified paper, and carton handling requirements may all affect the final budget. For shipments entering distribution centers, it is sensible to check the packing plan against industry handling guidance such as the material published by ISTA. These details rarely get attention in the mockup, yet they shape the landed cost.
Production steps that shape fit, structure, and turnaround
Unstructured hats behave differently from structured caps because the crown drapes. There is less internal support behind the front panels, so the same logo can appear softer, lower, or slightly wider once it is on the cap. That is why proof placement has to be measured. A visual guess is not enough.
The production sequence also changes the result in small but meaningful ways. First comes blank preparation, then digitizing or stitch mapping, then embroidery or patch application, followed by trimming, steaming, inspection, and packing. Each stage can affect the final appearance by a little. Thread tension, backing material, and seam finishing all influence whether the hat sits cleanly or puckers near the front panel.
Turnaround is not driven only by sewing time. If the correct blank is in stock, the order can move quickly. If the hat color needs to be pulled from a limited inventory pool, or if a special wash or closure is requested, the schedule may stretch before stitching even starts. A buyer can approve a proof in the morning and still miss the desired ship date if the blank is not available.
Shipping deserves the same attention. Hats crush if they are packed badly, and once the crown is misshapen, there is only so much a customer can do with it. For retail distribution, the outer carton should be chosen for handling, not just fill efficiency. Some buyers focus only on decoration lead time and forget that packing quality can undo the value of a careful approval.
There is also a difference between a proof that looks right and a production run that stays right. A good supplier will use the approved file, the same thread references, and the same placement notes throughout the job. If the proof is vague, the chance of variation rises. If the proof is specific, the production floor has fewer opportunities to improvise.
Step-by-step review checklist for art, color, and placement
Use the pet treat unstructured dad hats Digital Proof Checklist as a line-by-line signoff tool, not a quick glance. Start with the file itself. Is the art vector-based? Are the edges crisp? Is the smallest type readable at the final size? A logo can look excellent at 300 percent on a monitor and still fail once it is reduced for embroidery.
Then verify placement with actual measurements. Do not rely on “centered” or “slightly above the seam.” Ask for front logo width, distance from the bill, and any side or back hit positions in inches or clear proportions. On a relaxed cap, a quarter-inch matters. The crown shifts as it is worn, and a design that is technically centered can still feel visually heavy on one side.
Color review needs its own pass. Brand colors, thread chart colors, and fabric colors are not the same thing, and they rarely read the same under indoor lighting. A soft cotton twill blank can mute bright thread. A pigment-dyed cap can make a neutral mark look warmer or cooler than expected. If color is brand-critical, compare the proof against a Pantone reference and the actual hat blank, not just the screen.
Text also needs careful checking. Verify spelling, punctuation, trademark marks, and any product claims tied to the pet treat campaign. If there is legal copy, a retailer note, or a co-branding line, read it twice. Tiny text is especially risky. What looks clean in a mockup may fill in once the stitches land on fabric.
A practical review sequence looks like this:
- Open the proof on a desktop screen, not only on a phone.
- Check the hat blank name, crown style, and closure style.
- Confirm logo size, location, and number of colors.
- Review spelling, punctuation, and trademark marks.
- Save the final approval with the order number in one folder.
That last step is easy to skip and hard to recover from later. The approved proof becomes the reference for reorder matching, so recordkeeping matters almost as much as the visual review. If the team keeps the approved proof, the quote, and the item number together, future runs are much easier to reproduce accurately.
Expert next steps after approval: sample, order, and launch
Once the proof is approved, move immediately to the handoff. Save the final file, confirm the production quantity, verify the hat color, and check the shipping address in writing. Small errors here can undo a careful review, especially when the launch team assumes everyone is working from the same version of the file.
For larger programs, ask for a stitched reference photo or a pre-production sample if the design is detailed, the supplier is new to the brand, or the hat needs a premium patch finish. That extra checkpoint can be worth the time when the order is tied to a retail reset, a trade show, or a pet treat giveaway that only happens once. The sample does not replace the proof; it confirms that the proof translated correctly into thread, patch, or print.
It also helps to align the schedule with actual production time instead of the best-case scenario. Proof approval is only one step. Manufacturing, inspection, carton packing, freight booking, and transit all need room. A simple embroidery order may move in roughly 10-15 business days after approval, but detailed jobs with specialty decoration or limited blanks can take longer. Build around the longest realistic step, not the shortest optimistic one.
The broader lesson is simple. A good checklist makes a vague approval into a controlled process. It keeps the artwork consistent, the blank consistent, and the reorder history readable. Attach the proof, the quote, and the final item number to the same record, and the next round starts from the approved spec instead of a fresh guess.
For procurement teams that handle repeat merch, that discipline saves more than time. It reduces rework, prevents avoidable color drift, and keeps the production record clean enough that the next buyer or designer can pick up the order without reconstructing the history from scattered emails.
What should I verify on a pet treat unstructured dad hats digital proof?
Check logo size, placement, and spelling first, then review thread colors and any small text that could fill in during embroidery. Confirm the hat color, closure style, and crown shape match the approved product so the proof reflects the real blank, not a generic mockup.
How long does the digital proof process usually take for unstructured dad hats?
Simple proofs can move quickly when the art file is clean and the buyer responds fast, while complex artwork or multiple revisions take longer. Weekend requests, missing source files, and color matching questions are the most common reasons approval stretches.
What affects cost and MOQ for custom pet treat dad hats?
Blank quality, embroidery complexity, and setup fees shape the quote, while MOQ usually determines how low the unit cost can go. Rush production, custom labels, and extra decoration locations can raise pricing even when the hat style stays the same.
Can I approve one proof for multiple pet treat hat colors?
Only if the artwork placement and decoration details stay identical. Color changes can alter how the logo reads on each blank, so different hat shades or thread colors usually deserve separate proof review.
What happens right after I approve the proof checklist?
The approved file usually locks the production spec, and the order moves into manufacturing, inspection, and packing. Keep the approval email and final proof together, because those documents are the fastest way to handle reorders or settle questions later.


