Why the sample matters before you print 500 caps
The event merch embroidered baseball Caps Sample Checklist exists because mockups are optimistic by nature. A polished render can hide a logo that stretches across a seam, a thread color that looks dead under indoor lighting, or a cap profile that photographs well but sits oddly on real heads. For a sponsor event, golf outing, conference booth, team launch, or giveaway table, those details are not cosmetic. They decide whether the cap feels like a smart branded item or a rushed throwaway.
A PDF approval can make everyone feel efficient. A physical sample exposes the things that do not show up in a file: crown height, brim curve, stitch density, the weight of the blank, and whether the embroidery reads cleanly at three feet instead of only in a close-up. That is a meaningful difference. A cap can look polished on a screen and still miss the mark once someone puts it on.
Judge the sample in real light. Put it on a head, not just on a desk. Check it under the kind of lighting the event will actually use. Step back and look at it from the distance guests will see it from. The goal is not to admire the sample; the goal is to find the weak points before they become 500 weak points.
A sample that only works in a mockup is not approval. It is a warning.
That is the practical value of the event merch embroidered baseball caps sample checklist: it keeps the order tied to the real object, not the idealized version. It protects the budget, the timeline, and the brand signal at the same time.
What a solid embroidered cap sample should include
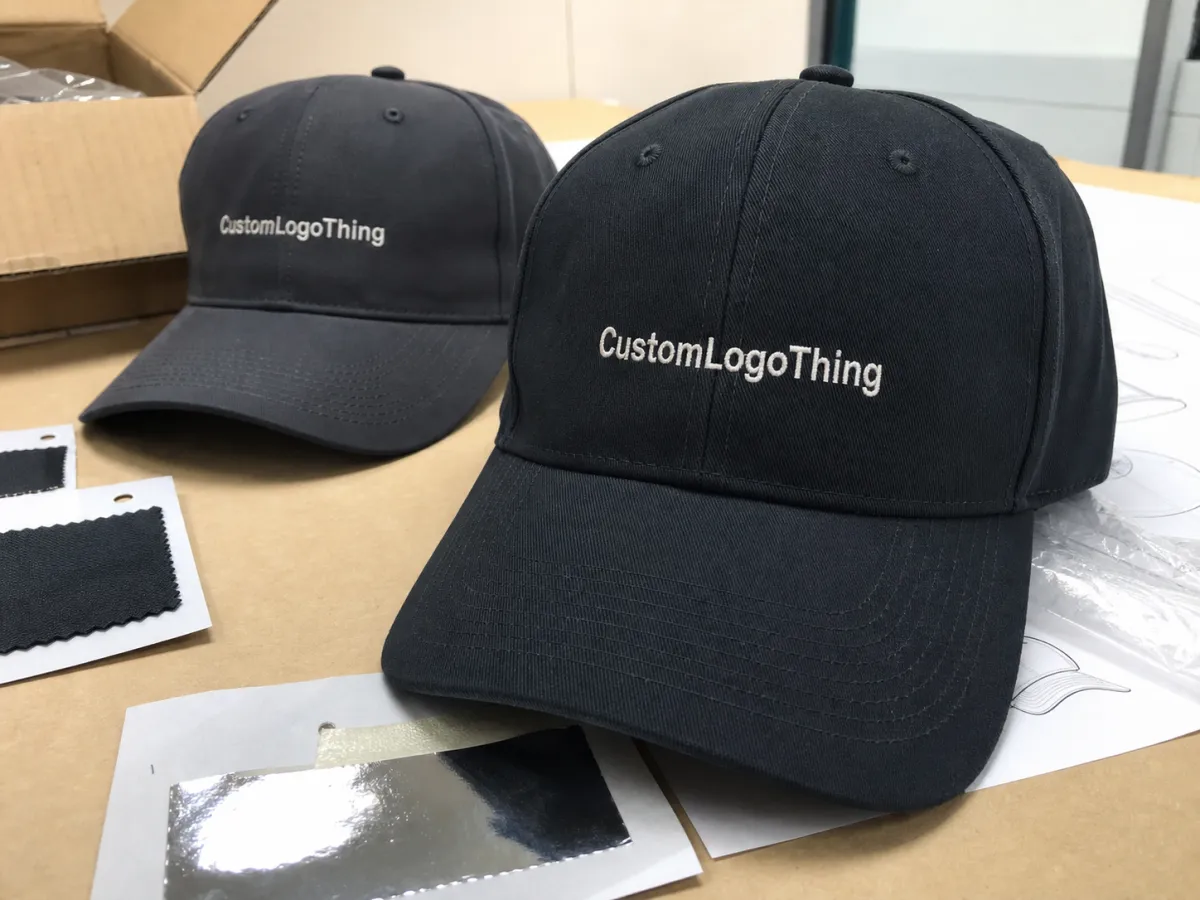
A useful sample starts with the blank cap, not the logo. The spec should clearly identify the profile, panel count, crown height, closure type, brim shape, and fabric. A low-profile unstructured cap behaves very differently from a mid-profile structured one. A six-panel cap is not the same as a five-panel build. Those differences affect fit, shape, and the way embroidery lands on the front panel.
For event merch, lock the cap construction before anyone starts arguing about thread colors. Is the closure snapback, strap, buckle, or Velcro? Is the brim pre-curved or flat? Is the fabric cotton twill, brushed chino, performance polyester, or washed canvas? These choices change the look more than most buyers expect, and they change the cost too. A cap that feels premium in one build can feel generic in another, even if the logo is identical.
Decoration details matter even more. Ask for the exact logo width, height, placement, stitch direction, backing type, and whether the artwork crosses a seam. A 3.5-inch mark centered on the front panel is not the same as a 4.25-inch mark pushed too wide for the crown. Small text deserves extra scrutiny. Once lettering gets very small, clean digitizing and controlled stitch density become the difference between crisp copy and a fuzzy band of thread.
The sample should also come with proof assets, not just the cap itself. Front, side, back, and inside photos help catch problems that one flattering angle can hide. If there was a substitution - thread shade, blank color, backing, or trim - it needs to be written down. Quiet substitutions are how buyers approve the wrong thing twice.
Fit and finish are part of the spec, not an afterthought. Check the sweatband, the inside seams, the firmness of the crown, and whether the cap sits comfortably after a little handling. A cap that feels light and tidy on a display hook may still feel flimsy in hand. For an event giveaway, that matters more than people like to admit.
For buyers who want a process reference, industry groups like ISTA and packaging.org are useful for understanding handling and shipping expectations around branded goods. Cap orders do not need laboratory language to be well managed, but the better the receiving and packing standards, the fewer surprises show up at the venue.
Sample process and turnaround: what happens after art approval
The sample process usually begins with art upload, but the real work starts at digitizing. A logo file is not an embroidery file. It has to be translated into stitch paths, direction changes, underlay, pull compensation, and density settings. That is why the same logo can look tight and clean on one cap and puffy on another. Good digitizing is technical, not glamorous. It simply prevents ugly borders, misread text, and lumpy fills.
After digitizing, the factory usually produces a first sew-out. That test run is often done on a swatch or panel rather than a finished cap. It checks placement, tension, stitch count, and whether small type survives the conversion. Buyers who ask for this step are usually saving themselves time later. Fixing a stitch file is cheaper than explaining a visible defect to a marketing team after production has already started.
Then comes the physical sample. This is the moment to compare the cap against the approved spec, the artwork, and the brand expectations on the table. If the sample is close but not quite right, revise it. Sometimes the fix is small: move the logo up 3 mm, reduce density, or adjust the thread sheen. Sometimes the issue is bigger: the crown is too tall, the blank is wrong, or the artwork is too large for the front panel.
Turnaround depends on artwork quality, cap availability, and how crowded the factory schedule is. A straightforward sew-out can move in a few business days after art approval, but a physical sample usually takes longer once digitizing, revisions, sourcing, and shipping are added in. One to three weeks is a realistic planning window for many orders. Specialty blanks, custom trims, and color-matched components can stretch that further. Rush work exists, but rush work always costs more and leaves less room for correction.
If the caps are shipping to a live event, packing deserves attention too. A crushed crown or bent brim can ruin the first impression before the box is even opened. If cartons will be stacked, reloaded, or handed off more than once, the shipping plan should be checked with the same discipline as the decoration. That is where a sample is doing more than approving appearance; it is testing whether the product survives real handling.
Cost, MOQ, and quote factors that move the price
A good quote should separate the major pieces: sample fee, digitizing, setup, shipping, and any revision charges. If all of those are buried in one tidy number, the price may look simpler than it really is. Clean line items make comparison easier and expose where one supplier is cheaper because they are missing a cost the other supplier already included.
MOQ changes the math quickly. Some suppliers keep sample pricing low because they expect the bulk order to carry the real margin. Others credit sample costs back to the final production run if the order clears a minimum threshold. Ask about that rule early. A sample that is not credited can still be the right decision if it prevents a bad 500-piece order, but the cost should be visible from the start.
Embroidery complexity also moves the price in predictable ways. More stitches mean more machine time. More thread colors mean more changes and more handling. Fine outlines, tiny lettering, and dense fills require better digitizing and closer quality control. Raised 3D foam pushes the price up again because it changes both materials and production time. That is not a markup trick; it is labor and machine capacity showing up where they should.
| Option | Typical cost | Typical timing | Best for | Watchouts |
|---|---|---|---|---|
| Basic sew-out sample | $25-$60 | 3-7 business days | Simple logos and quick visual checks | May not show final cap fit or crown shape |
| Physical pre-production sample | $45-$120 | 1-3 weeks | Event merch that needs sign-off | Shipping and revision time can add up |
| Revised sample after changes | $30-$80 | 4-10 business days | Fixing placement, scale, or stitch density | Multiple revisions can push the schedule back |
Three questions usually clarify the real price fast: Is the sample fee credited later? How many revisions are included? What triggers a rush charge? Those answers reveal more than the headline price. For branded merch, the cheapest quote is often only the first bill, not the final one.
Event merch embroidered baseball caps sample checklist
Here is the practical version, trimmed to the checks that actually catch expensive mistakes. The event merch embroidered baseball Caps Sample Checklist should be short enough to use quickly, but specific enough to stop a bad order from moving forward.
- Cap body: Confirm style, panel count, closure, crown height, brim curve, and fabric color against the approved spec sheet.
- Logo size: Measure the embroidery width and height instead of trusting the eye test alone.
- Placement: Check center alignment, distance from the brim, and spacing from seams on every visible panel.
- Stitch quality: Look for density, thread sheen, clean edges, proper underlay, and whether fine lines hold their shape.
- Small text: Read it from normal viewing distance. If it closes in or fuzzes out, it needs adjustment.
- Thread colors: Match them to Pantone notes or an agreed thread chart, especially if brand colors matter in photos.
- Inside finish: Inspect backing, trims, sweatband comfort, and any scratchy areas that could bother wearers.
- Photography check: Review front, side, back, and inside photos so one flattering angle does not do all the work.
Then do the part people skip: put the cap on a real head. Not a display form if you can avoid it. Check fit, balance, and how the cap reads from a few feet away. A logo can be technically correct and still look wrong if the crown is too tall or the embroidery sits too low. That is why the event merch Embroidered Baseball Caps sample checklist needs both measurements and a wear test.
If you are comparing multiple samples, write the differences in plain language. Better thread tension. Brim too flat. Logo too wide. Closure feels cheap. Those notes are not style commentary; they are production instructions. The clearer the feedback, the less likely the next sample will drift into a fresh set of errors.
Common mistakes that turn a good sample into a bad order
The easiest mistake is approving from one compressed image. That is a trap. Photos are useful, but they can hide texture, stitch tension, and how the cap sits once worn. A sample deck can look fine in a PDF and still fail in hand. For an order with real budget attached, the physical piece matters more than the polished preview.
Another common problem is ignoring how the cap behaves on actual heads. A structured cap may hold the logo beautifully but sit too high for the audience. A low-profile cap may feel better but lose visual presence on stage or in group photos. That tradeoff is not theoretical. It changes whether the hat reads as premium, casual, athletic, or awkward.
Thread color drift is another frequent headache. Without a Pantone reference or a thread chart, color memory gets unreliable fast. One person sees a blue as correct. Another sees it as dull. A third says it is close enough, which is usually code for not checking carefully. For brand-heavy event merch, close enough is usually not close enough.
The event environment matters too. Heat, sweat, motion, shipping, and repeated wear all expose weak material choices. Embroidery that looks fine in a clean office can start to show rough edges after a long day outside. If the cap is being handed out with sponsor expectations attached, durability belongs in the brief. That includes the carton, the brim, the backing, and the thread finish.
For outer shipping, recycled board can be a perfectly reasonable choice, especially if the buyer needs a recyclable carton stream or has sustainability targets. If that matters, check whether the board or paper carries a credible chain-of-custody mark. FSC certification is one straightforward signal to verify. Packaging does not have to be fancy to be sensible, but it does need to protect the cap shape.
Approve, revise, or rerun before bulk production
If the sample is close, do not reject it just because one detail is annoying in isolation. Make a precise revision list. Move the logo 3 mm. Lower stitch density. Swap thread color. Reduce crown height. The cleaner the notes, the less likely the next version will inherit the same problem in a different form. Vague feedback creates vague results.
If the shape, material, or embroidery scale is actually wrong, stop and reset the spec before bulk production locks in. Changing direction after production starts is where budgets get burned. It also creates confusion when different people believe different versions were approved. One written sign-off should identify the final cap style, art file, color references, sample photo set, quote, and lead time.
Good buyers keep the approved sample as the reference piece. The supplier should be told in writing that this exact cap is the production standard. That matters if someone in the factory tries to substitute a different blank or shave time off the embroidery setup. Copy this sample, not a rough near-match.
It also helps to attach the Event merch embroidered baseball caps sample checklist to the receiving file. If the bulk order arrives short on placement, color, or finish, the same checklist becomes the inspection tool. Problems are always easier to catch at receiving than after the giveaway table is already set.
My practical rule is simple: approve only when the cap looks right, fits right, and photographs right. If it fails any one of those, revise before release. That is the difference between a usable event cap and a box of branded regrets.
What should be on an embroidered baseball cap sample for event merch?
Check the exact cap style, closure, crown height, brim shape, and color against the approved spec. Inspect logo size, placement, stitch density, backing, and any small text that could fill in or break apart. Ask for front, side, back, and inside photos so you can judge the cap like a buyer, not a rendering.
How long does an event merch cap sample usually take?
Simple sew-outs can move in a few business days after art approval, but physical samples usually take longer. Most buyers should budget one to three weeks once digitizing, revisions, and shipping are included. Rush timelines are possible, but they usually cost more and leave less room to fix mistakes.
How much does a sample cost, and is it credited later?
Expect a sample fee plus digitizing or setup charges if the logo has not already been converted into stitches. Some suppliers credit the sample cost against the bulk order, but only if the order meets their rules. Extra revisions, specialty blanks, and rush shipping usually raise the final number.
Can I approve the sample from photos instead of the physical cap?
Photos are fine for placement, color checks, and basic shape review. They are weak on texture, stitch tension, crown structure, and how the hat actually fits. For higher-value event merch, a physical sample is the safer sign-off before bulk production.
What if the sample looks good but the bulk order is larger?
Reconfirm MOQ, size runs, and any blank substitutions before production starts. Lock the approved sample as the reference piece so the factory knows exactly what to copy. Keep written approval notes and revision limits on file so later changes do not quietly expand the order.

