Buyer Fit Snapshot
| Best fit | Custom Die Cut Inserts for Sustainable Packaging Brands projects where brand print, material claims, artwork control, MOQ, and repeat-order consistency need to be specified before quoting. |
|---|---|
| Quote inputs | Share finished size, material target, print colors, finish, packing count, annual reorder estimate, ship-to region, and any compliance wording. |
| Proofing check | Approve dieline scale, logo placement, barcode or warning zones, color tolerance, closure strength, and carton packing before bulk production. |
| Main risk | Vague material claims, crowded artwork, missing packing details, or unclear freight terms can make a low unit price expensive after revisions. |
Fast answer: Custom Die Cut Inserts for Sustainable Packaging Brands should be specified like a repeatable production item. The safest quote records material, print method, finish, artwork proof, packing count, and reorder notes in one written spec.
Production checks before approval
Compare the actual filled-product size with the drawing, then confirm tolerance on folds, seals, hang holes, label areas, and retail display edges. Reserve space for logos, QR codes, warning copy, and material claims before decorative graphics fill the panel.
Quote comparison points
Review material grade, print process, finish, sampling route, tooling charges, carton quantity, and freight assumptions side by side. A quote is only useful when the supplier can repeat the same color, closure quality, and packing count on the next order.
Custom Die Cut Inserts for Sustainable Packaging Brands are often the quiet fix behind cleaner shipments, fewer claims, and a better first impression. I've seen boxes arrive with perfect corners and a crushed product inside, which is exactly the kind of mismatch that makes operations teams sigh and customers ask for a replacement. That gap between outer appearance and inner performance is where custom die cut inserts earn their keep: they control movement, not just empty space. For brands trying to sharpen product packaging, strengthen package branding, and cut waste at the same time, that is a bigger advantage than it looks from the shelf.
From a packaging buyer's point of view, Custom Die Cut inserts do three jobs at once. They protect the product, simplify pack-out, and create a more deliberate unboxing moment inside Custom Printed Boxes or other retail packaging formats. If you are comparing structural options for a launch, you can also review our Custom Packaging Products alongside the carton spec so the outer box and the insert are designed as one system, not two separate purchases. That sounds obvious, but plenty of projects still treat the insert like a last-minute add-on.
Custom die cut inserts: the overlooked packaging fix
The same packaging failure shows up in warehouses all the time: the carton looks fine, the seal is intact, the fulfillment team did its job, and the product inside still shifts just enough to scuff a coated surface or crack a corner. Custom Die Cut inserts exist for that exact problem. They are not flashy, yet they often outperform loose fill, paper shreds, and generic foam blocks because they stop motion instead of merely filling volume.
The sustainability angle is stronger than many teams expect. If custom die cut inserts cut breakage by even a small percentage, they can reduce replacement shipments, customer service tickets, and the mixed-material waste that usually follows a return. A brand shipping 20,000 units a month does not need perfection to see value. A 1% damage reduction can still shift cost and carbon in a meaningful way. Less overpacking follows, along with fewer do-overs and a cleaner story for branded packaging.
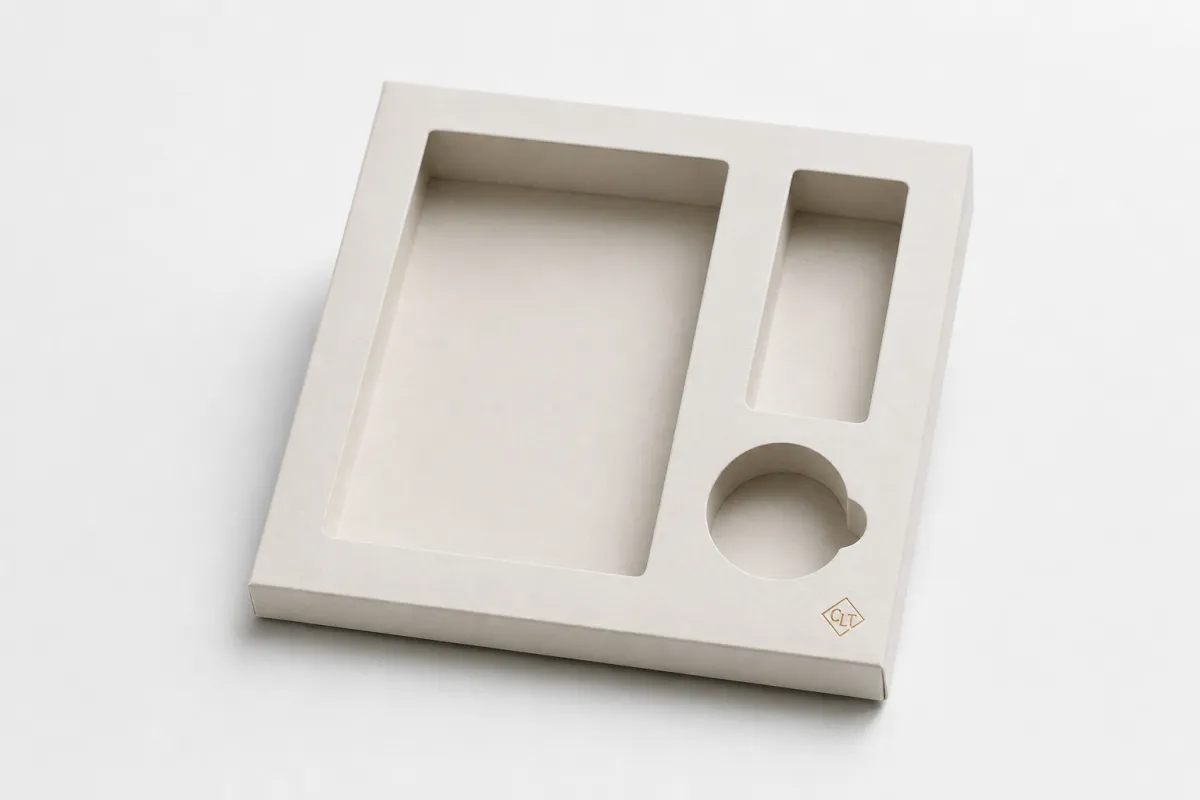
Custom die cut inserts are structural pieces cut to a specific shape so they cradle a product in a fixed position. The material may be paperboard, corrugated board, molded fiber, foam, or a hybrid stack, but the principle stays the same: the cavity or fold pattern matches the item closely enough to resist movement during transit. In product packaging, that precision matters more than decoration because friction, vibration, and shock do not care how polished the render looked.
I keep seeing teams underestimate how much the insert affects the whole package experience. A thoughtful insert can make a plain carton feel premium, while a weak insert can make an expensive custom printed box feel careless. That is why custom die cut inserts sit at the intersection of packaging design, operations, and sustainability. They are a protection component, yes, but they are also a control point for assembly time and customer perception.
There is also a less glamorous reality here: most damage claims do not come from dramatic impacts. They come from repeated small movements, a corner rubbing against a wall for 600 miles, or a product shifting just enough to meet the box edge over and over again. Custom die cut inserts are built to break that chain.
- Better movement control: The product stays centered and separated from hard edges.
- Cleaner presentation: The opening experience feels intentional instead of improvised.
- Lower waste: Fewer replacement shipments can outweigh a slightly heavier insert.
- Less line chaos: A repeatable insert speeds up loading and reduces packing errors.
One practical way to think about custom die cut inserts is this: they turn guesswork into a measurable fit. Define the object, its fragility, and the movement it needs to avoid, and you can usually design an insert that protects better than a pile of fillers ever will. That is the kind of change that looks small in CAD and very real in a returns report.
How custom die cut inserts work in sustainable packaging
Custom die cut inserts work because they are built around the product, not around a generic box size. Design starts with dimensions, weight, center of gravity, surface sensitivity, and the kind of shipping abuse the item will face. A glass bottle and a molded electronic accessory do not need the same support strategy, and custom die cut inserts let you tune the fit instead of forcing both products into the same cavity.
Die cutting is what gives the structure its precision. Steel-rule knives, rotary tooling, or digital cutting systems shape slots, folds, tabs, and cavities so the insert locks into place. Good custom die cut inserts often use retention points rather than excessive material; a tab can prevent a product from sliding just as effectively as a thick wall, and that can reduce board usage and simplify assembly. It also makes the insert less fussy for the person loading the line.
Material choice drives both performance and sustainability. Paperboard and corrugated board are often easier to recycle and can suit light to medium protection needs. Molded fiber can absorb shock well and is attractive for premium or home goods. Foam still protects, but it can complicate end-of-life handling and may work against the sustainability goal if the package is otherwise fiber-based. The best custom die cut inserts are not the lightest ones on paper; they are the ones that protect with the least total system cost.
Two standards show up often in serious packaging programs: ISTA for transport testing and ASTM methods for distribution simulation. A team might validate custom die cut inserts against an ISTA profile or an ASTM D4169 sequence, then refine based on actual shipment data. That is a more honest approach than relying on a visual fit check alone, because a snug cavity can still fail if the product has a fragile boss, a heavy side, or a long lever arm that amplifies shock.
For Sustainable Packaging Brands, the smartest detail is often the one buyers never see. A well-designed insert can eliminate plastic rails, twist ties, bubble wrap, and extra tape. It can also reduce the amount of dead space in the shipper, which matters because a smaller pack-out often lowers dimensional weight. Custom die cut inserts do more than stabilize a product; they can improve the whole freight profile.
"A beautiful insert that slows the line or still lets the product rattle is not a good insert. The best custom die cut inserts disappear into the workflow and only show up in lower damage rates."
There is also a branding effect that is easy to miss. If the reveal is clean, the product sits centered, and the unboxing sequence feels deliberate, the insert supports package branding without shouting about it. That matters in retail packaging and direct-to-consumer product packaging alike, because the customer reads stability as quality. A loose, noisy packout sends the opposite signal.
One more practical benefit: when the insert and carton are designed together, the whole package can be smaller than the sum of its parts. That can trim corrugate usage and sometimes shave freight spend. Not always, and not magically, but enough to matter over a year of shipments.
Custom die cut inserts cost, pricing, and MOQ basics
Pricing for custom die cut inserts depends on more than the cut shape. Material grade, board thickness, product complexity, number of cavities, print coverage, and finishing all influence the quote. A simple two-piece paperboard insert is not in the same cost lane as a multi-compartment layout for a fragile kit. If you want a meaningful estimate, ask suppliers to quote custom die cut inserts as a system, not as a vague line item.
For planning purposes, here are realistic ranges many teams see on mid-volume runs. A basic paperboard insert might land around $0.18 to $0.28 per unit at 5,000 pieces. Corrugated options may sit around $0.22 to $0.38, molded fiber around $0.30 to $0.60, and foam between $0.25 and $0.70 depending on density and cut complexity. Those numbers move with print, thickness, and board availability, but they are useful for early-stage budgeting. They are planning numbers, not a promise from a converter who has not seen your sample yet.
Tooling also matters. Straightforward steel-rule tooling for custom die cut inserts can be relatively economical, while a complex multi-part layout or a design with tight tolerances may require more setup, more trial cuts, and more sample adjustments. Some converters bundle tooling into the piece price, others list it separately. That is why the low headline quote is not always the cheapest quote.
In my experience, teams get tripped up when they compare a plain material price from one supplier against a fully loaded quote from another. That is apples to oranges, and the cheaper line item can turn into the pricier program once you add tooling, sampling, freight, and labor. Packaging budgets love to hide in the details, kinda like that last missing box on a pallet.
| Material option | Typical use case | Estimated unit cost at 5,000 | Notes on sustainability |
|---|---|---|---|
| Paperboard | Light products, cosmetic items, accessories | $0.18-$0.28 | Often recyclable and efficient for flat-pack designs |
| Corrugated board | Kits, heavier goods, products needing more stiffness | $0.22-$0.38 | Fiber-based and strong for immobilization |
| Molded fiber | Premium goods, fragile items, dunnage replacement | $0.30-$0.60 | Good fit for fiber-forward sustainability claims |
| Foam | Highly fragile or shape-sensitive products | $0.25-$0.70 | Protection is strong, but end-of-life can be harder |
MOQ, or minimum order quantity, varies more than buyers expect. Some converters will take a small test run of 250 to 500 units for a simple structure, but 1,000 to 2,500 units is more common once the shape gets truly custom. For large production programs, 5,000 and up usually improves unit economics because setup cost spreads across more pieces. Custom die cut inserts reward volume, but only if the spec is stable enough to avoid repeated revision cycles.
Hidden costs matter too. Prototype rounds, freight, on-site storage, and labor can matter more than the die cut itself. A slightly cheaper insert that takes 20 percent longer to load may cost more in labor than it saves in material. That is especially true in e-commerce, where product packaging is packed under time pressure and every extra motion adds up.
To compare quotes fairly, ask suppliers to separate tooling, production, freight, and assembly assumptions. Also ask whether the quoted custom die cut inserts were priced with your actual product sample or just with dimensions from a spec sheet. That small question often shows whether the converter has really thought through the fit.
Production steps, timeline, and lead time for custom die cut inserts
The workflow for custom die cut inserts usually follows a predictable path, even if the details change by material. It starts with a product audit, then moves to measurements, structural design, dieline creation, sample building, approval, and full production. The cleanest projects happen when the product team, operations lead, and packaging supplier agree on the risk profile before the first prototype is cut.
A simple paperboard project can move quickly. If the geometry is straightforward and the dimensions are known, custom die cut inserts may go from brief to prototype in about 3 to 7 business days, with production often landing around 12 to 15 business days from proof approval. More complex builds can take longer, especially if multiple items share one tray or the product needs very tight clearance. Any launch that depends on custom die cut inserts should carry revision time, not just manufacturing time.
The sample stage is where many problems show up early. A physical prototype lets you confirm fit, clearance, loading speed, and how the product behaves inside the outer carton. It also exposes small issues that CAD drawings hide: a sharp corner that catches on the tuck flap, a coating that changes friction, or a closure that compresses more than expected. That is why custom die cut inserts should be tested with the actual product, not only with a dummy block of the same size.
Late changes are the main timeline killer. Artwork swaps, missing product samples, and unclear test expectations can each add days. If the business wants custom printed boxes on top of the structural insert, the print team needs to coordinate early so nothing conflicts with the cavity layout. A package can be beautifully designed and still fail to assemble if the production sequence was not mapped before approval.
- Day 1-2: product audit, photos, dimensions, and risk notes.
- Day 3-5: structural concept and dieline draft.
- Day 6-10: sample build, fit check, and revisions.
- Day 11-20: approval, tooling, and full production for straightforward runs.
- Then: inbound freight, receiving, and line testing before launch.
If the project will be tested, tie the sample stage to an actual distribution plan. A retail packaging program that ships by parcel has very different stress points than a wholesale carton that moves on pallets. Custom die cut inserts need to be validated against the real route, not a generic ideal route. The closer the test is to the real shipment, the fewer surprises in the field.
One useful rule of thumb: if the product will spend most of its life inside one carton size, lock the carton first and tune the insert around it. If the product format changes often, build the insert so it can tolerate a little variation without losing retention. That keeps lead times from ballooning every time a SKU gets a tiny update.
Key design factors for fit, protection, and waste
Product geometry is the first design variable, and it is the one teams most often understate. Irregular shapes, sharp corners, glass components, and mixed-size kits each need different retention strategies. Custom die cut inserts should be built around the true weak points of the item, not just the widest and tallest dimensions. A handle, lens, nozzle, or cap can be the part that fails even when the body stays intact.
There is a difference between cushioning and immobilization. Some products need shock absorption because they are brittle or delicate. Others mainly need restraint so they do not rub against each other or the carton wall. The best custom die cut inserts often mix both functions. A central cavity may hold the item rigidly, while a small perimeter buffer absorbs vibration and handles the occasional drop.
Board caliper and stiffness deserve more attention than they usually get. Too thin, and the insert buckles or crushes under stacking pressure. Too thick, and the part may waste fiber, drive up cost, or create an over-tight fit that damages coatings. For many paper-based builds, caliper is chosen in relation to product weight and box size, not as an abstract quality upgrade. That is a packaging design decision, not a guess.
Assembly matters just as much as material. If the insert takes too long to load, a high-performing design can still fail in production. A line operator who has to force tabs, rotate products, or double-check orientation will slow down the pack-out and increase error rates. Custom die cut inserts should support a clear loading sequence, especially for high-volume product packaging where seconds matter.
Waste reduction is not only about recyclability. Efficient nesting on the sheet, fewer offcuts, and simpler structures can reduce waste before the package even reaches the consumer. A design that uses one clean fold pattern can sometimes outperform a more ornate structure with many cutouts. In that sense, custom die cut inserts are a small but practical test of whether a brand is serious about sustainable packaging or just talking about it.
Think about the insert and outer carton together. If the shell is too large, the insert has to work harder and may need extra material. If the carton is too small, the insert becomes cramped and harder to assemble. The best custom die cut inserts are designed with the outer box dimensions, print area, and closure type in mind so the whole package behaves like a single system.
One of the most useful materials for greener programs is FSC-certified fiber, especially if the brand wants a documented chain of custody. You can review the program details at FSC and use that information when building sustainability claims into package branding. The point is not to chase a badge. The point is to make sure the material story matches the actual structure.
For teams building a broader packaging line, custom die cut inserts should not be isolated from the rest of the packaging design. If you are also specifying secondary cartons, sleeves, or inserts for a display kit, align them with the rest of your Custom Packaging Products so the whole system shares the same material logic and assembly approach.
Common mistakes and expert tips for custom die cut inserts
The most common mistake is designing to the product's exact dimensions and stopping there. That sounds sensible, but coatings, sleeves, closures, tolerances, and natural variation all change the real fit. Custom die cut inserts need breathing room where the product can flex, but not so much room that it begins to rattle. A difference of 1 or 2 millimeters can matter more than a visual mockup suggests.
Another mistake is overengineering. It is easy to assume that more board, deeper walls, or tighter pockets automatically mean better protection. Often they just add weight and cost. In some cases, a simpler layout with a smarter retention point outperforms a much thicker structure. The goal is not to build the heaviest insert. The goal is to build the right one.
Testing can also go wrong. Lab results are useful, but they do not replace actual shipment testing, especially if the route includes temperature swings, long dwell times, or rough carrier handling. A structure that passes one controlled test may still fail when it is stacked with mixed parcels or stored in a humid warehouse. That is why custom die cut inserts should be checked against both a test method and the actual distribution profile.
Another pattern I see: teams approve a sample after one perfect hand-load, then discover the pack line is a different animal entirely. If the operator has to rotate the product three times to make it fit, the design is already asking for trouble. A good insert is boring in production. That is a compliment.
"The best insert is not the one with the most material. It is the one that protects the product, speeds the pack line, and still gives the customer a clean reveal."
Here is the smarter review process I recommend. Start with the shipment risk, not the unboxing mood board. Once protection is confirmed, then refine the visual language so the insert supports the brand story. That sequence keeps custom die cut inserts grounded in reality, which is usually where the savings show up. It also stops teams from approving a pretty concept that has no chance of surviving freight.
Cross-functional input helps more than most teams expect. Operations sees line speed. Procurement sees cost exposure. Sustainability sees material impact. Packaging design sees structure and presentation. Put them in the same review, and custom die cut inserts tend to improve faster. Leave one of those groups out, and the design often gets revised later under time pressure, which is where costs creep in.
A final tip: keep notes on what failed and why. A cracked corner, a scuffed finish, or a tab that tore during assembly is valuable data. Over a few runs, that information becomes a better design library than any one-off rendering. Brands that treat custom die cut inserts as a learning system usually end up with less waste and stronger product packaging overall.
Actionable next steps for ordering custom die cut inserts
Start with a packaging audit. List every product, its dimensions, its weight, its fragility level, and the ship method it will face. A parcel shipper, an e-commerce bundle, and a shelf-ready retail pack do not need the same answer. Once you map the risk, custom die cut inserts become much easier to spec because the design has a job instead of a guess.
Then gather the minimum spec package. You will usually need product samples, target carton size, annual volume, material preference, and any recycling or compliance requirements. If the product is irregular, include photos from multiple angles and note any sleeves, chargers, glass parts, or protrusions. The better the brief, the faster custom die cut inserts move from concept to usable prototype.
Ask for a prototype and a quote at the same time. That lets you compare fit, protection, cost, and lead time together instead of treating each piece separately. If a supplier can show a quick mockup and a clear line-item estimate, you can judge the real economics more easily. For many teams, that is the moment the project stops being theoretical and starts looking like an implementable packaging design change.
Test the insert in the real workflow before approving a full run. Confirm that packers can load it quickly, that the product does not shift after sealing, and that the unboxing experience still feels right. If the box will be displayed at retail, make sure the insert does not interfere with shelf presentation or opening behavior. Custom die cut inserts should simplify the process, not introduce a hidden training problem for the fulfillment team.
For brands trying to reduce waste without sacrificing performance, the best choice is usually the one that protects the product, simplifies operations, and keeps material use disciplined. That balance is what makes custom die cut inserts so useful in sustainable packaging programs. They can support package branding, reduce damage, and hold the line on unnecessary materials, all in one move.
If you are comparing structural options now, bring the insert, carton, and assembly method into one review and then map them against your Custom Packaging Products so the whole package works together. Custom die cut inserts are rarely the flashiest part of the system, but they are often the part that decides whether the program runs smoothly once real orders start moving.
Before you place the order, run one actual product sample through a mock pack-out, one drop-test sequence, and one line-speed trial. If the insert passes those three checks, you have a much better read on whether it will hold up in the field. That is the practical finish line: not a prettier mockup, but a structure that protects the product, fits the workflow, and does not waste material you do not need to spend.
What are custom die cut inserts made from?
Most custom die cut inserts are made from paperboard, corrugated board, molded fiber, or foam. Paper-based materials are usually easier to recycle and work well for light to medium protection. Heavier or more fragile items may need molded fiber or layered board structures so the product stays fixed during shipping.
How much do custom die cut inserts usually cost?
Cost depends on material, shape complexity, quantity, tooling, and whether prototypes are required. For a mid-volume run, simple paperboard custom die cut inserts may fall around $0.18 to $0.28 per unit, while molded fiber and foam can sit higher. Ask suppliers to separate tooling, production, freight, and assembly so you can see the real total.
How long does it take to produce custom die cut inserts?
Simple projects can move quickly, while highly custom builds need more time for design, sampling, and approval. A straightforward run might reach prototype in 3 to 7 business days and full production about 12 to 15 business days after proof approval. Complex structures or late revisions can extend that schedule.
Are custom die cut inserts recyclable?
Often yes, especially if they are made from fiber-based materials and do not include hard-to-separate coatings or mixed components. Recyclability still depends on local collection rules and on how the insert is finished or printed. If sustainability is a priority, ask the supplier to confirm the material stream before approving the design.
What do I need before requesting a quote for custom die cut inserts?
Share product dimensions, weight, fragility notes, carton size, and target annual volume. If the product is irregular, include photos or samples because geometry drives the design more than simple measurements alone. It also helps to include sustainability goals, assembly constraints, and any shipping test requirements so the quote reflects the real job.
Custom die cut inserts work best when they are treated as part of the full packaging system, not as an afterthought. If you get the fit, material, and workflow right, custom die cut inserts can reduce damage, cut waste, and make the whole package feel more deliberate from the first lift to the final reveal.

