A beanie proof can look finished on screen and still fail at production. One hidden seam, one mismatched cuff height, one logo that sits 3 mm too low, and the whole order changes shape. That is why the electronics Cuffed Knit Beanies Digital Proof checklist matters. It catches the quiet mistakes that turn into rework, delays, and merchandise that looks a little less intentional than the approval email suggested.
For electronics brands, internal marketing teams, and event buyers, the trap is usually the same. The artwork gets approved, but the blank, the cuff, the stitch density, and the decoration method were never checked against each other. A flat mockup cannot reveal those conflicts. A decent proof can, if someone knows what to look for.
Use this as a buyer-side filter, not a design lesson. The goal is simple: approve faster, but only after the order details actually match.
Electronics Cuffed Knit Beanies Digital Proof Checklist: What to Catch First
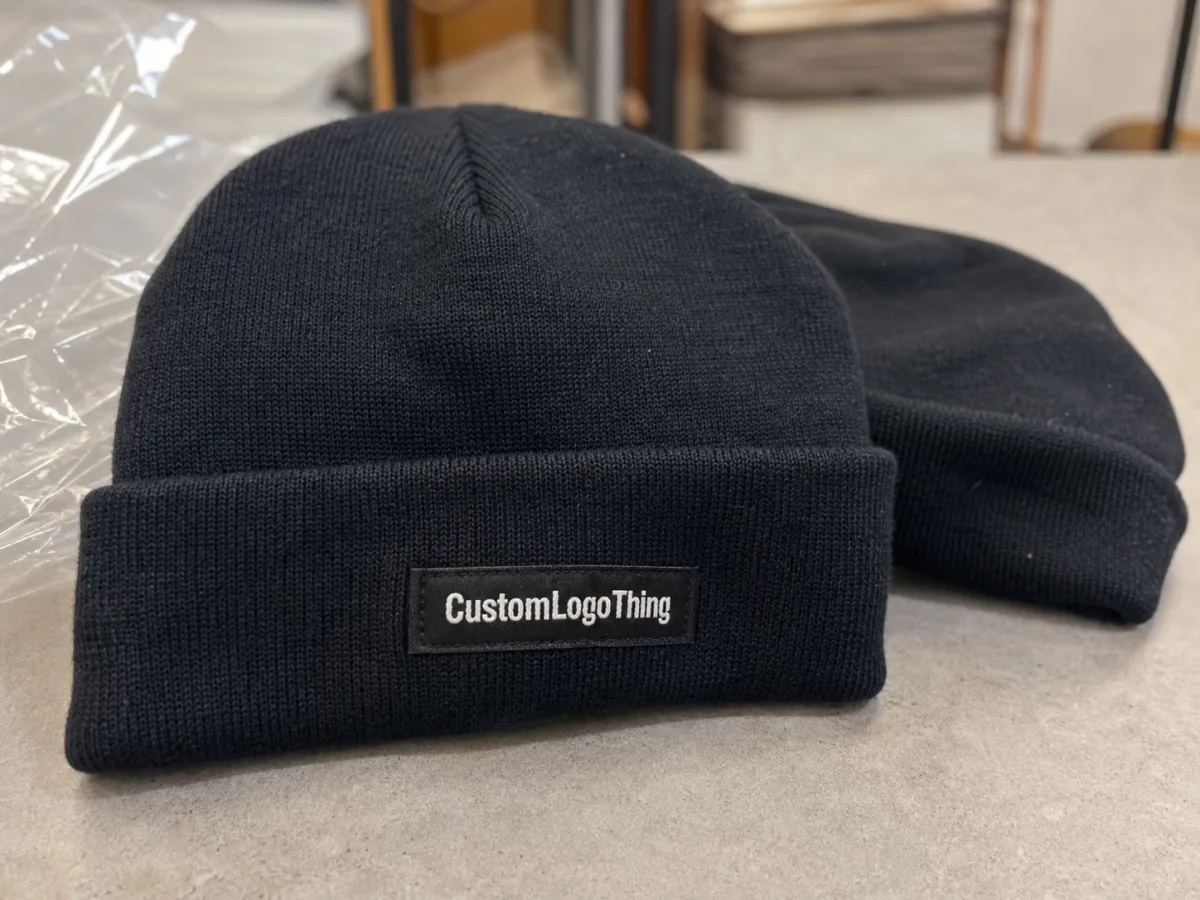
The first thing to inspect is the fold line. On a cuffed knit beanie, the cuff changes the visual center of the decoration. A logo that looks perfectly centered in a digital file can land too high, too low, or half-hidden once the cuff is folded. That happens more often than buyers expect, especially when cuff depth varies from one blank to another. A 2.5-inch cuff and a 3.25-inch cuff are not minor differences. They move the whole composition.
Most buyers start with the artwork itself. That is understandable. Still, the smarter review asks whether the art makes sense on the actual blank. Is the logo sitting clear of the seam? Does it have enough breathing room above the fold? Will the lower edge disappear into knit texture? If the proof uses a generic beanie silhouette instead of the exact blank, treat it as an approximation, not a finished approval.
"If the cuff line is unclear in the proof, assume it will be the first thing to cause trouble."
A useful proof answers three practical questions immediately: where the decoration sits, how large it is, and what it will look like on the real material. If those are fuzzy, the approval is premature. The electronics cuffed knit beanies Digital Proof Checklist is not about admiring the render. It is about refusing expensive ambiguity.
How the Proof Process Works from Art File to Approval
A clean proof process usually runs in five steps: submit artwork, build the mockup, review placement, request revisions, approve the final version. The sequence is simple. The execution is rarely simple because missing details get filled in by assumption, and assumption is a poor production spec.
Start with the source file. Vector artwork in AI, EPS, PDF, or SVG format gives the supplier the best chance of keeping edges crisp and proportions accurate. A low-resolution JPG can sometimes be used, but it often needs cleanup before digitizing or patch conversion begins. If the artwork contains thin lines or small text, the difference between vector and raster is not cosmetic. It is the difference between legible and mushy.
Color references need equal discipline. If brand standards are strict, send Pantone numbers or approved thread colors from the outset. If the beanies must match another item in a campaign, include that reference. Guessing on color is where orders drift. A supplier might get close, but close is not the same as matched.
The proof should also show the actual decoration method. Embroidery, woven patch, woven label, and leather patch all behave differently on knit. A clean mockup shows the right method in the right location. If the proof is using a generic badge just to get the artwork approved, the buyer still does not know what will land on the cuff. For deeper production context, a look at Manufacturing Capabilities can help confirm which decoration types are realistic for the run.
Delays usually come from two places. First, the artwork is too rough to scale cleanly. Second, the buyer has not decided whether the order is going to be navy with white thread, black with a patch, charcoal with a woven label, or some other combination. Every unresolved variable becomes another revision. Every revision creates another day of inbox traffic.
A solid proof should close questions, not open new ones. If someone still has to ask, "Is that the final size?" or "Which thread color is this?" the file is not ready.
Fit, Stitch, and Color Details That Change the Mockup
Cuffed knit beanies are less forgiving than they look. The fabric stretches, the cuff folds, and the yarn texture eats detail. A 9-gauge beanie and a 12-gauge beanie can carry the same logo and still read differently at first glance. That is why the same proof may feel right on one blank and awkward on another. The mockup is not lying. It is just only as accurate as the blank underneath it.
Cuff depth is the first variable to check. A deeper cuff gives more vertical room, but it also pulls the logo lower on the forehead. A shallow cuff can make the art feel crowded against the top edge. The proof should show the decoration in relation to the fold, not simply centered on an invisible template axis.
Decoration method matters just as much.
- Embroidery gives strong visibility and handles simple logos well, but small type and fine linework can break down fast.
- Woven patches preserve sharper detail than embroidery and are useful when the logo has tiny elements that need clean edges.
- Woven labels work best for minimal branding and understated placement.
- Leather patches carry a more premium feel, though they are poor choices for delicate copy or intricate icons.
Color is another place where screens distort reality. Dark charcoal on a monitor can read lighter than the actual yarn. White thread often looks cleaner digitally than it will once it sits inside knit texture. That is normal. It is also why a buyer should compare the proof against thread charts, Pantone references, or approved samples rather than relying on a laptop display at the end of the day.
Stretch changes proportion. A knitted blank is not a flat panel. If the logo is too wide, it can pull awkwardly across the fabric. If it is too small, the knit texture overwhelms it. In practice, the safest logo sizes on cuffed beanies tend to sit in a narrow middle range. Too much detail disappears. Too much scale starts to warp. The electronics cuffed knit beanies Digital Proof Checklist should always include a proportion review, not just a color review.
If packaging is part of the order, fold in that approval early. Hang tags, inserts, and cartons create extra decision points, and they often move on a different timeline than the beanies themselves. Buyers who need sustainable packaging can compare paper stock against FSC guidance. For transit durability, ISTA standards matter more than most people realize, especially when cartons are stacked, dropped, or carried across multiple handoffs.
Cost, Pricing, and MOQ Drivers That Move the Quote
Beanie pricing usually comes down to four things: quantity, decoration complexity, color count, and setup work. A larger run spreads the fixed costs across more units. A simple design keeps digitizing or patch setup light. Add more colors, more detail, or more production steps, and the quote climbs. The math is plain. The surprises come from the assumptions people make before the proof is finalized.
For custom cuffed knit beanies, small runs can look expensive because the setup cost is not diluted. A 100-piece order often lands around $6.50 to $10.00 per unit, depending on blank quality and decoration method. At 500 pieces, that may fall closer to $4.00 to $7.00 per unit. Around 1,000 units, pricing usually improves again if the artwork is straightforward and the blank is in stock. These are buyer-side ranges, not guarantees. Knit gauge, yarn blend, and patch construction can move them either way.
| Decoration Option | Typical Add-On at 500 pcs | Best Use Case | Buyer Tradeoff |
|---|---|---|---|
| Flat embroidery | $0.65-$1.10 per unit | Simple logos, strong visibility | Fine text can get crowded or lose shape |
| Woven patch | $0.85-$1.40 per unit | Sharper detail, cleaner edges | Extra setup and attachment time |
| Woven label | $0.45-$0.90 per unit | Minimal branding, low-profile look | Less visual impact than embroidery |
| Leather patch | $1.10-$1.85 per unit | Premium feel, fashion-forward merch | Poor fit for tiny details or thin copy |
There are also the costs buyers tend to forget: sampling, art cleanup, rush production, split shipping, and extra color changes. Those charges are not arbitrary. They usually map to additional labor, a second material request, or a condensed timeline. A clean proof can cut some of those costs by locking the build before the factory starts cutting, stitching, or attaching anything.
MOQ can shift by decoration type. A woven label run may allow lower minimums than a fully custom patch. Embroidery often sits in the middle. Leather patch jobs usually carry tighter minimums because the material and setup costs are less forgiving. If a quote feels high for a small order, it is often because the factory is carrying fixed setup across too few pieces. That is not a sales tactic. It is how the cost structure works.
Step-by-Step Approval Checklist Before Production Starts
Before approving the proof, compare it to the purchase order. The mockup, the email thread, and the PO should all describe the same order. If they do not, someone will discover the mismatch after production begins, which is the most expensive time to notice.
Use this order for sign-off:
- Art approval: spelling, logo proportions, line weight, and any icon details.
- Placement approval: cuff fold position, logo height, seam clearance, and overall balance.
- Color approval: beanie base color, thread color, patch material, and visible backing color.
- Pricing approval: unit cost, setup charges, sample fees, rush fees, and shipping method.
- Timeline approval: proof sign-off date, production window, transit time, and event deadline.
Ask for written confirmation when anything is ambiguous. Verbal approvals sound efficient until people remember different versions of the same conversation. If the supplier says a minor adjustment can be made after approval, get that in writing before release. Otherwise, the order will be treated as final, because production teams work from the last approved file, not from intent.
One habit saves more time than buyers expect: keep the final proof, PO, and spec notes in a single thread or folder. Scattered versions create avoidable confusion. A file name that still includes "final_v7_revised2" is usually a warning sign, not a deliverable.
The electronics Cuffed Knit Beanies Digital Proof checklist should end with one plain question: does the approved version match what the buyer actually wants to receive? If the answer is anything less than yes, revise before release. Faster approval is useful. Wrong approval is just a faster mistake.
Common Mistakes That Cause Rework or Delayed Delivery
The biggest beanie proof mistake is ignoring the cuff fold. Buyers approve a centered logo, then the cuff is folded in production and the design sinks too low or vanishes into the seam. That is not a factory surprise. It is a proofing miss.
Low-resolution artwork causes the next wave of problems. If the source file is blurry, the embroidery digitizing can come out muddy and patch edges can lose definition. Sometimes cleanup is possible. Sometimes it is not. Either way, time gets burned fixing a problem that started before the proof was issued.
Timing errors are just as common. People wait until the week before an event, then discover that custom knitwear still needs a real production window. Even a simple cuffed beanie order can take 12 to 20 business days after proof approval. That assumes the blanks are available, the artwork is ready, and nobody changes the decoration after sign-off. If the launch date matters, build in cushion. Apparel schedules rarely reward optimism.
Version control creates its own mess. Three revisions later, someone opens the wrong PDF and approves an outdated file. The easiest cure is boring discipline: one final version, one final approver, one release point. Not exciting. Very effective.
Packaging and shipping can slow the job too. A beanie packed in a polybag is not the same as one sent in a branded carton, and a domestic parcel ship is not the same as freight. If the order is tied to a launch or event, ask how the goods will be packed, how many cartons will ship, and what happens if transit slips by a few days. A small delay in the warehouse can matter more than a price difference on the front end.
Next Steps After Approval: Lock the Order and Timeline
Once the proof is approved, archive everything in one place: final art, PO, size notes, color callouts, and the approved mockup. Buyers should not rely on memory. Memory changes shape depending on who is asked and how urgent the question is.
Confirm the delivery window, ship method, and any buffer for holidays, weather, or event scheduling. If the order matters to a product launch, ask what happens if one step moves by two days. That is not pessimism. That is procurement behaving like procurement.
It also helps to name one internal approver. One person signs off after internal review. Multiple people can comment, but only one person should release the order. The electronics cuffed knit beanies Digital Proof Checklist works best when it has an owner, not a committee with opinions and no deadlines.
If the beanies are part of a broader merch program, keep the print, packaging, and shipping expectations aligned across all items. A quick review of Manufacturing Capabilities can help confirm what belongs in one production run and what should be split into separate steps.
The practical point is straightforward. Use the proof as the last quality gate before production, not as a decorative preview. That one habit catches the wrong cuff height, the off-center logo, the color mismatch, and the quote that quietly depended on assumptions nobody wrote down.
What should I check on an electronics cuffed knit beanie proof first?
Check the logo placement against the cuff fold first, because that is where most failures start. Then confirm the decoration size so it still reads once it sits on stretchy knit. Finish with base color, thread color, and any patch material before approval.
How long does the cuffed knit beanie digital proof process usually take?
If artwork is ready and feedback is quick, a clean proof can move fast. One or two revision rounds often add a day or two, depending on how many changes are requested. Rush timelines are possible, but only when the blanks, artwork, and approval chain are already lined up.
What affects pricing most on cuffed knit beanies with digital proofs?
Quantity usually drives the price first, because higher volume lowers the unit cost. Decoration complexity matters too, especially multi-color embroidery or special patch construction. Rush fees, sample charges, and split shipping can move the quote more than buyers expect.
Do digital proofs show the exact look of embroidered cuffed knit beanies?
They show placement, layout, and color intent, but not the exact hand feel of the finished knit. A proof is useful for judging proportions and positioning, not tactile texture. If the finish matters a lot, ask for a sample or production note.
What files should I send to get a cleaner beanie proof faster?
Send vector art when possible, ideally AI, EPS, or PDF, so the design scales cleanly. Include Pantone or thread color notes if the shade has to be precise. Add a reference photo or placement note so the supplier knows where the logo should sit on the cuff. That keeps the electronics cuffed knit beanies digital proof checklist useful instead of decorative.