Embroidered Beanies Quality Control Checklist for Buyers
An embroidered beanie can look perfect in a sample photo and still fail the moment it is stretched, folded, or worn, which is why an embroidered beanies Quality Control Checklist has to go beyond the artwork and into the way knit, thread tension, and backing behave together.
If you buy custom headwear for retail, uniforms, promotions, or event kits, the difference between an approved order and a costly rework usually shows up in small but measurable details: placement drift, puckering, loose trims, color mismatch, and packaging that makes a decent product feel careless.
The checklist has three jobs. It protects brand presentation, catches defects before shipment, and gives your supplier a clear standard that does not depend on guesswork. That means measuring, comparing, and rejecting with enough precision that the next run can be built the same way.
Embroidered Beanies Quality Control Checklist: What It Covers
The tricky part with embroidered knitwear is that the decoration can look sharp when the beanie lies flat, then distort once the fabric stretches and the rib opens up. A good checklist is not just an art review. It is a buyer-side control tool for approving artwork, checking placement, verifying stitch integrity, and confirming that the finished piece matches the approved sample.
Inspection usually falls into three buckets. Cosmetic defects are appearance issues like thread tails, slight sheen differences, or fold marks from packing. Functional defects affect wear or durability, such as broken stitches, loose backing, or embroidery that pulls the knit out of shape. Critical defects make the item unsellable, including severe misplacement, holes from needle damage, or a logo that does not match the approved artwork.
The checklist also needs tolerances. A note such as “logo should look good” sounds friendly, but it creates disputes later. One person may accept a 2 mm shift while another rejects it. Better language is measurable: logo width, centerline placement, cuff distance, thread color reference, and an acceptable tolerance for each position. When those numbers are written down before production starts, the supplier can build to the same target from the first run to the last carton.
A beanie is not only judged on the table. It has to survive stretch, folding, handling, and the customer’s first wear without the embroidery warping or the finish looking rushed.
Packaging matters too. If the order ships retail-ready, the final impression depends on more than the embroidery itself. Hang tags, folding consistency, polybag clarity, carton marks, and size labeling all shape how the product is received. A clean stitch with sloppy packaging still reads as a weak product.
For knitted beanies, the fabric itself changes the standard. A tightly knit acrylic cuff behaves differently from a looser acrylic-wool blend or a soft recycled polyester style. The checklist should reflect that reality instead of treating every blank as interchangeable. Small changes in yarn, gauge, and stretch recovery alter how embroidery sits and how much movement the logo can tolerate without distortion.
Embroidery Process and Production Steps That Shape QC
Most quality issues begin earlier than buyers expect. The sequence matters: digitizing, stitch mapping, machine setup, backing choice, embroidery, trimming, steaming, folding, and final packing. Each step adds its own inspection risk, and if one step is off, the defect often shows up later as puckering, edge distortion, or a logo that sits crooked on the cuff.
Digitizing is the first major gate. Underlay, stitch direction, density, and pull compensation all influence how a design behaves on a soft knit surface. Too much density can make the logo stiff and cause the beanie to ripple. Too little density leaves gaps and weak edge definition. On ribbed knit, the digitizer has to think about fabric movement, not just artwork. A design that looks balanced on screen can sew badly in real life if it ignores stretch.
The first sewn sample matters more than a flat proof because it reveals the interaction between the decoration and the fabric. Inspect it under normal lighting, then stretch it on a headform or stretch fixture to see whether the logo still sits correctly. If the design only looks right when relaxed, it is not really approved. The same logic applies to thicker winter knits, where heavy thread counts can make the front panel feel boardy and change the drape.
Backing choice also matters. On beanies, suppliers often use cutaway or tearaway backing, sometimes paired with a lighter stabilizer or topping film depending on the knit texture. The goal is to support the stitches without making the front feel hard or leaving visible support marks. A stiff backing may hold the logo well, but if it telegraphs through the knit or distorts the cuff, it creates a different problem. The best choice depends on the fabric weight, stitch density, and final hand feel you want.
Thread selection is another practical checkpoint. Polyester embroidery thread is common because it handles wear, moisture, and UV exposure better than many alternatives. Rayon can have a softer sheen, but it is less forgiving in rough use. On beanies that will be worn outdoors or washed repeatedly, thread choice influences both appearance and durability. Color should be matched to a physical reference, not just a digital swatch, because knit texture can make the same color read lighter or darker after stitching.
For packaging and transit, think through the container path. If the beanies are folded tightly into cartons or polybags, compression can change the appearance before the customer ever sees them. The standards at ISTA are useful when you want to think about vibration, handling, and compression risk in a practical way. If cartons, inserts, or labels carry a sustainability claim, chain-of-custody guidance from FSC matters as well.
Here is a simple way to separate inspection points:
- Pre-production: approve artwork, stitch file, thread color, backing, and sample placement.
- Inline: check first-off pieces, then spot-check production for tension, trim quality, and repeatability.
- Final: confirm stretch appearance, measurements, folding, labeling, and carton accuracy before release.
If your supplier measures fabric weight in GSM, keep that method consistent across reorders. A beanie that is 65 GSM lighter or heavier than the approved blank can change stretch recovery and how the embroidery sits. That does not mean every style must hit the same number, but the measurement method should stay the same so comparisons remain useful.
Key Inspection Factors for Fit, Placement, and Finish
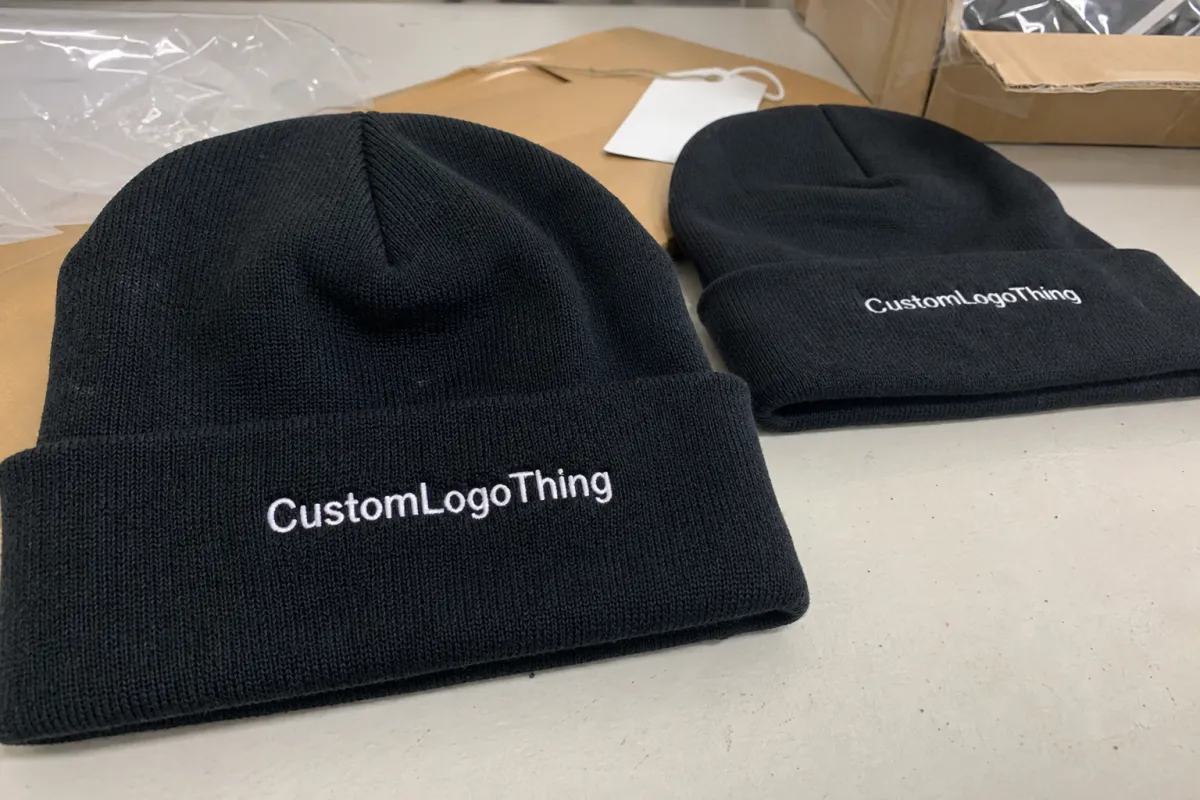
Placement on soft headwear is unforgiving. A logo that is off by a few millimeters on a flat knit swatch can look obviously wrong once the beanie is worn. For front-center embroidery, confirm both the centerline and the distance from the cuff edge. For side marks or multi-panel decoration, measure the spacing against the approved spec sheet rather than estimating by eye.
Fit matters just as much. Beanie depth, cuff height, stretch recovery, fabric weight, rib texture, and silhouette all influence how the embroidery sits. A cuffed beanie gives you a different working area than a slouch style, and a tighter knit behaves differently from a looser rib. If the style changes, recheck the approved placement even when the artwork does not change.
Finish is where many orders quietly lose quality. Thread sheen should match the approved color standard, and the thread lot should stay consistent across the run so one carton does not look duller than another. Backing should not show through in a distracting way. Trimming should be clean, with no long tails or clipped fuzz left behind. Then stretch the beanie, release it, and look again. Tension marks often appear only after that test.
A useful inspection worksheet can include a few hard numbers:
- Logo width: compare against the approved sample within a defined tolerance.
- Centerline drift: measure left and right placement, especially on cuffed styles.
- Embroidery height: confirm the design does not crowd the cuff seam.
- Stretch recovery: check that the knit returns to shape after handling.
If you are buying for retail, ask for a standard lighting review and a second pass on a headform. If you are buying for fulfillment or promotional kits, inspect the folded appearance too, because the first touch point may be the packed piece rather than the worn one. That difference matters more than many buyers expect, especially for products displayed in trays or shipped in mixed cartons.
| Inspection Point | What It Catches | Typical Buyer Action |
|---|---|---|
| Placement and size | Shifted logos, drift after stretch, cuff misalignment | Reject or request rework if outside tolerance |
| Thread and tension | Puckering, loose stitches, gaps, edge distortion | Hold production until machine settings are corrected |
| Finish and trim | Thread tails, lint, visible backing, rough hand feel | Accept only if minor and clearly within spec |
| Packaging and labeling | Mixed sizes, poor folds, wrong carton marks | Stop shipment if order identity is affected |
Material notes help here too. Acrylic beanies usually hold a clean, predictable embroidery field and are the easiest to control. Wool blends can feel richer, but they may itch, breathe differently, and respond more sharply to heat or steam. Recycled polyester can be soft and appealing for eco-led programs, although it may behave differently under dense stitches. The checklist should name the exact blank, because a one-size-fits-all approval method tends to miss the quirks that matter.
Cost, Pricing, and MOQ Factors That Change the Checklist
Decoration cost is tied directly to complexity. More stitch density, more thread colors, more placement adjustments, and more backing control all raise the unit price. A simple single-color logo on a standard cuffed beanie may sit in a lower production range, while a multi-color badge with tight detail can cost noticeably more because setup and machine time increase. For buyers, that means the checklist and the quote have to be read together.
Typical sample charges and setup fees are worth asking about early. Digitizing is often a separate line item, and depending on the supplier and logo complexity, a first file may fall around $20 to $60, sometimes more if the design needs multiple rounds of correction. Sample knitting or embroidery can add another charge. If the sample requires revision, that can add both time and cost. A buyer who approves without checking this upfront can get surprised later when a small change becomes a new setup.
MOQ changes the inspection strategy too. At a low quantity, a buyer may accept a lighter inspection routine if the order is simple and the decoration is already proven. At a larger quantity, stronger sample approval, tighter defect limits, and more formal signoff are justified because more units are at risk. In other words, the bigger the run, the less room there is for vague acceptance language.
Retail buyers often want the same beanie to hold up across multiple seasons, while event buyers may only need it to look good for a short window. That difference affects how strict the checklist should be. A short-run promo order may tolerate simpler packing, but a retail program usually needs firmer rules for thread consistency, labeling, and carton presentation because returns and shelf standards are much less forgiving.
There are still ways to save money without weakening quality. The most practical ones are usually plain:
- Use fewer thread colors.
- Simplify tiny text that may blur on knit.
- Standardize the blank beanie style across the order.
- Keep placement consistent so the machine setup does not keep changing.
One useful rule: if a quote looks unusually low, ask what is missing. Sometimes the price excludes digitizing, sample approval, retail polybags, or carton labeling. The quote may still be valid, but the checklist has to match the actual scope or you will end up paying for a higher-quality result than the budget assumed. For bulk embroidered beanies, a realistic landed price often falls somewhere between $3.50 and $9.50 per piece depending on blank quality, stitch count, packaging, and order size, with premium blanks or dense multi-color logos running above that range.
Turnaround, Lead Time, and Approval Gates in the Production Timeline
The fastest orders are usually the ones with the cleanest approval path. From a planning standpoint, the flow is straightforward: artwork submission, digitizing, stitch file approval, physical sample, production, inspection, packing, and ship date. Delays usually happen when one of those gates stays open too long or when the buyer changes a detail after the sample is already approved.
That is why a solid embroidered Beanies Quality Control Checklist should sit beside the schedule, not after it. If the art file is still changing, the placement spec is not final. If the thread color is not confirmed, the sample is not really approved. If the carton label format is missing, the order is not ready for release. Small gaps at the front end often create rush fees at the back end.
In practice, lead time risk shows up in a few repeatable ways: a thread substitution because the original color is out of stock, a late revision to the logo, a missing size callout, or a sample that needs another round because the embroidery looks different once worn. None of those issues are dramatic by themselves, but each one can push a shipment by several business days.
A simple timeline worksheet helps a lot. Track these dates:
- Artwork lock: the day the final file is approved.
- Sample signoff: the day the physical sample passes inspection.
- Production start: the day bulk stitching begins.
- Final release: the day cartons are cleared for ship.
For many orders, a well-managed sample and production cycle can move in roughly 12 to 15 business days after final approval, but that depends on decoration complexity, seasonality, and how many revisions happen. Simple styles with one or two embroidery positions may move faster. Dense logos, special thread colors, or retail packaging usually add time. If a supplier promises speed without locking the approval gates, the buyer usually pays for that later in avoidable rework.
Cold-weather season also matters. Beanie programs often peak before the first real drop in temperature, which means embroidery schedules, packaging capacity, and carton space all tighten at the same time. A buyer who leaves sample approval too late in the season can lose flexibility on thread sourcing or packing dates even if the design itself is simple.
Common Mistakes That Undermine Beanie Quality Checks
The first mistake is approving only a flat sample. Knit behaves differently on a head than it does on a table. Stretch can reveal puckering, skew, edge distortion, or thread gaps that were invisible during the initial review. A buyer who skips the worn test is approving appearance under the easiest possible condition.
The second mistake is vague acceptance language. “Close enough” sounds reasonable, but it creates disputes the moment one carton differs from another. Stronger language is measurable: logo placement within a stated tolerance, thread color matched to an approved reference, and finish defects limited by a written severity level. If the supplier knows what passes, the conversation stays practical instead of subjective.
Wash, wear, and snag testing are often skipped on promotional orders, and that is fine only if the end use truly does not matter. For retail or uniform beanies, those tests are worth doing. Embroidery can loosen, backing can lift, and thread can catch on rough handling. Even a simple rub test can reveal problems that a quick visual inspection will miss. If the style will be washed, make sure the care label and fabric claim match the actual construction, because shrinkage or distortion after laundering is one of the fastest ways to turn a good sample into a complaint.
Packaging mistakes are another quiet failure point. Buyers often focus on the logo and ignore folding consistency, hang tag position, carton labeling, or polybag clarity. The product may be sewn correctly, but the shipment still looks sloppy when the boxes are opened. That hurts the perceived quality of the whole order, especially for first-time customers or retail buyers opening cartons at receiving.
Common failure patterns worth watching:
- Artwork approved on screen, but the stitched version is too dense or too small.
- Placement measured on the flat sample, but the worn piece shifts off-center.
- Thread color matched by description, not by actual sewn sample.
- Carton count and label information not checked before dispatch.
The best fix is discipline, not heroics. Clear sample approval prevents most of these problems before they become a shipment problem.
Expert Tips for a Repeatable Inspection Workflow
If you handle repeat orders, build one master checklist and stop recreating the standard from scratch. Keep a photo of the approved sample, a measurement sheet, and pass-fail language on a single page. The value is not just organization; it is consistency. Different people can inspect the same beanie and reach the same answer when the reference is clear.
Use the same headform size, the same light source, and the same table setup whenever possible. That sounds minor, but inconsistent conditions can make two identical beanies look different. A 2 mm shift feels larger under one light angle and smaller under another. The more repeatable your inspection station, the easier it is to defend a decision later.
I also recommend dividing defects into critical, major, and minor. Critical issues stop the line or block shipment. Major issues trigger rework or partial hold. Minor issues may be acceptable if they stay within an agreed limit. This structure keeps the team from overreacting to cosmetic noise while still protecting the order from real quality loss.
Recordkeeping is worth the effort. Save photos of approvals, rejected samples, corrected runs, and final packed cartons. Over time, that quality history becomes useful on future orders, especially when a new buyer inherits the program or a supplier changes operators. The more visible the history, the fewer arguments you need to have about what “good” looks like.
That is the reason an embroidered Beanies Quality Control Checklist should be treated as a working document, not a one-time PDF. The strongest programs keep improving the same checklist with each reorder, because every approved sample teaches you something about fit, finish, or decoration behavior.
Next Steps for Approving Your Beanie Order
Before the next production run starts, gather the art file, stitch sample, measurement sheet, and packaging specs into one approval packet. That gives merch, operations, and fulfillment one place to review the order instead of scattering decisions across email threads and chat messages. It is a simple habit, but it prevents a lot of late-stage confusion.
Then do a quick internal review with the people who will actually feel the impact of the order. Merchandising can confirm the brand look. Operations can confirm the quantities and timing. Fulfillment can confirm folding, carton labels, and storage handling. When those teams sign off together, the supplier gets a cleaner order and the buyer gets fewer surprises.
Release the run only after stretch testing, placement checks, and finish review are complete, and write the tolerances down before production begins. If a change is needed, confirm whether it affects cost or lead time before you move ahead. That short pause is usually cheaper than a rework.
Used well, an embroidered beanies Quality Control Checklist becomes a repeatable buying tool that protects brand image, shipment consistency, and margin. It is not paperwork for its own sake. It is the difference between a product that looks right once and a product that keeps looking right from approval to arrival.
What belongs on an embroidered beanie quality checklist?
Include artwork approval, stitch placement, logo size, thread color, backing type, and stretch-fit checks. Add finish items like trimming, steaming, folding, labeling, and carton marks so the full order is reviewed. Use a pass-fail note for each item to make approvals faster and less subjective.
How do you inspect embroidery placement on cuffed beanies?
Measure from the cuff edge and centerline, then compare the result against the approved spec sheet. Check placement both flat and worn, because the logo can shift visually once the knit stretches. Use the same headform or wearer size for every sample so the comparison stays consistent.
What thread issues usually cause beanie QC failures?
Common problems include loose tension, poor color match, shiny thread mismatch, and stitch gaps at curved edges. Backing showing through or puckering usually means the digitizing or stabilization choice needs adjustment. A quick stretch test often exposes defects that do not show up on a flat inspection.
How do MOQ and unit cost affect quality checks on beanies?
Higher MOQs usually justify stronger sample approval and clearer defect limits because more units are at risk. Unit cost changes when stitch count, color changes, and setup complexity increase, so QC should match the decoration method. If the quote looks unusually low, confirm what inspection steps are included before approving the order.
When should sample approval happen in the beanie production timeline?
Approve the sample before bulk production starts, after both artwork and stitch file checks are complete. Do not release the run until the physical sample passes placement, fit, finish, and packaging review. If revisions are needed, confirm whether the change affects lead time or setup cost before continuing.


