pet treat Embroidered Baseball Caps material sample guide
Pet Treat Embroidered Baseball Caps Sample Guide for Buyers
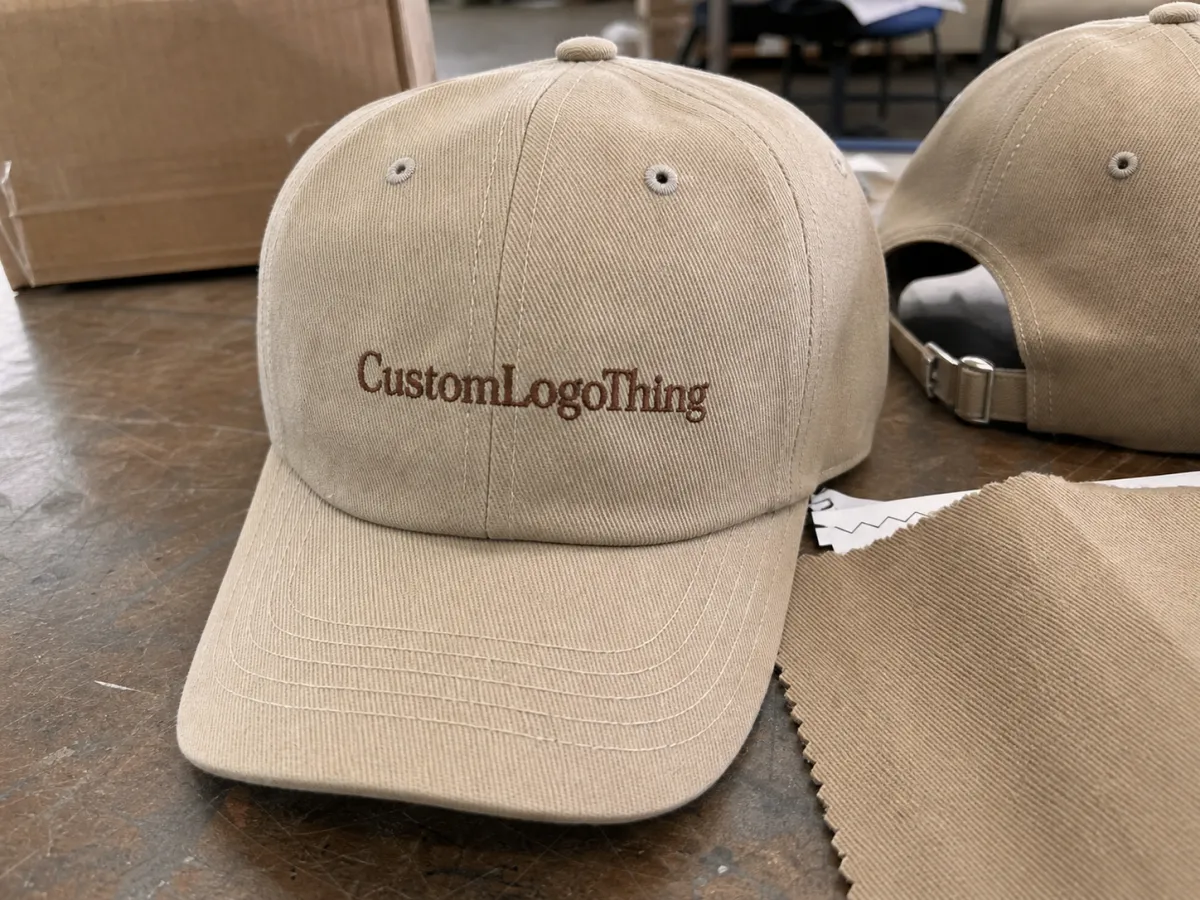
pet treat Embroidered Baseball Caps Material Sample guide is the checkpoint where a concept stops being a mockup and becomes a real object with weight, tension, and surface texture. That matters more than people expect. A cap can look crisp on screen, then the front panel flexes, the thread catches light differently, or the logo shifts a few millimeters once the seam lines and crown curves are taken into account.
For pet treat brands, the sample is not decorative. These caps get handled at events, worn by staff, photographed for storefronts and product pages, and sometimes displayed beside packaging that is doing its own branding work. Weak embroidery, poor fit, or a fabric that reads cheap under daylight can undo the whole presentation. If the sample misses the mark, bulk production simply multiplies the mistake.
The useful way to think about a sample is simple: it is a production test, not a mood board. You are checking how the cap behaves in fabric, stitch, and fit before committing to quantity. That is the difference between a neat idea and a sellable product.
Pet Treat Embroidered Baseball Caps Material Sample Guide: What It Proves
A flat proof only tells you so much. It can confirm artwork placement, color intent, and the rough balance of the logo, but it cannot show how the cap holds shape once stitched or how dense embroidery changes the front panel. It also cannot tell you whether the thread sheen is flattering or distracting in natural light. That is the point of a physical sample.
In practice, the sample proves four things buyers usually care about most: crown stiffness, seam balance, thread coverage, and wearability. A logo that looks centered in a PDF may sit too high once the cap is sewn. A color that feels warm on a monitor can look flat on washed cotton. Dense fills can make small marks look bulky; light fills can leave open areas that feel unfinished. The cap is a system, not a single decoration.
The packaging and presentation side should be checked at the same time. If the cap will ship in a retail box or mailer, the sample stage is the moment to verify whether the pack protects shape or arrives crushed. Corrugated cardboard mailers are often safer than thin cartons for soft goods, and kraft paper wrap can help reduce scuffing without adding much cost. If the brand is making sustainability claims, get specific about what is actually certified. FSC certification applies to paper-based material, not every part of the package. Recycled content is useful only if the percentage is documented. Vague green language creates trouble later.
“The sample is where everybody learns whether the idea works in the real world. If the embroidery is off, the cap fit is strange, or the fabric makes the logo look cheap, that is the time to say it.”
That is also where the expensive surprises show up early: warped lettering, weak front structure, thread that looks too glossy, stitch pull on thin panels, or a color that looked balanced in a render and muddy in cotton twill. A good sample saves arguments later. A bad one only confirms that the wrong production run is about to happen.
How the Embroidery Sample Approval Flow Works
The cleanest sample process starts with a complete input set. Send final artwork, cap style, fabric choice, thread colors, closure type, logo placement, label details, and any packaging notes together. If one of those changes after sampling starts, the factory may need to rework setup or restart the sample entirely. That is where time and budget leak out.
The first physical version is usually called a proto sample or development sample. This is the stage where the factory builds one cap so you can judge actual construction instead of guessing from a screen. In a pet treat embroidered baseball Caps Material Sample guide, this is the real decision point. The question is not whether the art looks attractive in isolation. The question is whether the cap can be produced at scale without visible problems.
Review the sample in two passes if possible. Start with photos for a fast check on placement, color, and obvious defects. Then inspect the physical cap for structure, handfeel, stitch tension, sweatband quality, seam alignment, and overall symmetry. Photos hide too much. They will not tell you whether the visor is too rigid, whether the crown collapses when handled, or whether the front panel feels thin after embroidery pulls it inward.
A practical sample review also includes a short checklist. Measure the logo against the approved art. Check if the embroidery sits level on both sides of the center seam. Turn the cap inside out and inspect thread tails, backing, and trimmed ends. Look at the sweatband stitching and the lining around the seam junctions. Small shortcuts here usually show up later as quality complaints or returns.
Ask how the sample will be packed for shipping. A cap tossed loose into a poly bag is not the same as a cap protected by a shaped insert or cardboard support. If the packaging needs to do real work in transit, say so early. If you are relying on environmental claims, make sure the language matches the specification. A carton may be FSC certified, but the whole pack may still include mixed materials that are not recyclable in every market. That distinction matters more than marketing copy suggests.
The approval discipline is straightforward: collect written notes, label the approved reference sample, and freeze the spec before bulk production begins. Without that, people will remember different versions of the same cap. That is how a cap line drifts from “approved” to “almost right.”
Fabric, Structure, and Stitch Factors That Change the Look
Fabric changes the result more than most first-time buyers expect. Cotton twill is the most common starting point because it offers a stable surface, decent color depth, and predictable embroidery behavior. Brushed cotton feels softer but can mute contrast slightly. Washed cotton gives a relaxed, worn-in look, which can work well for casual merch and look wrong for a brand that needs a clean retail finish. Poly blends resist wrinkles and hold shape well, though some blends show a synthetic sheen under bright store lighting.
Structure matters just as much. A structured crown gives the front panel enough support for clean embroidery and sharper logo edges. An unstructured cap has a softer hand and a more casual profile, but dense stitching can distort it if the front panel is too light. For premium retail displays, structured caps usually photograph better. For laid-back promotional merch, unstructured styles often feel more natural and less formal.
Stitch settings decide how polished the embroidery feels. Stitch count, underlay, thread thickness, and backing all influence the final look. More stitches are not automatically better. High density can make a cap pucker, especially on thin fronts or small logos. Too little density leaves gaps and weakens the edge definition. On a busy retail rack, that difference shows immediately.
Thread choice deserves more attention than it usually gets. Standard polyester thread is durable and cost-effective. Rayon can offer a softer sheen, but it may not be the best choice if the cap will see hard handling or frequent wear. Matte thread can hide minor puckering better than glossy thread, while glossy thread can make a logo look sharper from a distance and harsher up close. The right choice depends on the cap’s purpose, not on what looks best in a digitized image.
Practical details also shift perception. A sweatband that feels rough can make a decent cap seem lower quality. A brim that holds shape too aggressively can make the cap look stiff. A snapback closure is quick to size and usually easier to price. A fabric strap can feel more premium. A buckle adds cost and weight, but sometimes the extra finish is justified if the cap is meant to sit in a higher-priced assortment.
Judging the cap as a product, not just as decoration, is the only reliable approach. Ask whether the final piece needs to feel sporty, premium, playful, or understated. If the embroidery is technically correct but the cap shape feels wrong, the sample failed anyway.
| Sample Type | What It Proves | Typical Cost Range | Typical Timing |
|---|---|---|---|
| Photo proof only | Artwork placement and color intent | $0-$25 | 1-3 business days |
| Development sample | Fabric, fit, structure, and embroidery behavior | $35-$90 | 5-10 business days |
| Pre-production sample | Final materials and production-ready spec | $50-$120 | 7-15 business days |
If packaging is part of the project, keep the standards consistent. Ask whether the outer pack uses kraft paper, corrugated cardboard, or recycled board, and whether any recycled content claim is documented rather than assumed. For shipping validation, the ISTA framework is a useful reference even when the order is not formally tested against it. It gives you a language for impact, compression, and transit expectations that most suppliers understand.
Sample Process, Timeline, and Revision Steps
The sample timeline usually follows a familiar chain: artwork review, material sourcing, embroidery setup, sewing, inspection, and return shipping. If the cap is simple and the blank fabric is already in stock, the process moves quickly. If the order needs custom closures, labels, or thread that is not already matched, the schedule stretches. That is normal production behavior, not a problem unique to your order.
Simple samples often take about 5 to 10 business days. More complex samples generally land in the 10 to 15 business day range. Overseas freight, customs delays, or a thread shade that requires a second round of matching can push it further. Anyone promising a fully custom sample in two days is probably leaving something out.
The revision process is usually limited to one focused round. Buyers flag color, placement, shape, or closure changes; the factory adjusts; the sample comes back for a second look. That works well if the design is stable. It works poorly if the project keeps changing midstream. Every new revision adds cost and introduces another place where the result can drift.
Use this stage to lock down the approval record. Name the person who can sign off. Set the deadline for feedback. Record thread codes, cap color, closure spec, and packaging details. If multiple departments need to review the cap, gather comments first and send one consolidated response. Split feedback creates split production.
- Confirm final artwork and dimensions.
- Approve the fabric, thread colors, and closure type.
- Review the first physical sample in hand.
- Write down exact edits, if any.
- Approve the master sample and freeze the spec.
If the sample ships in retail-ready packaging, inspect that too. A neat cap in a crushed box still lands badly. If you want lower-impact packaging, specify it before the cartons are printed and before inserts are cut. The late request is the one that usually gets simplified beyond recognition.
Cost, MOQ, and Quote Drivers
Sample pricing comes from a few predictable pieces: sample fee, embroidery setup, blank cap cost, shipping, and any rush or revision charges. A simple cap with a one-color logo can stay relatively low. A dense multi-color mark on a less common fabric rises fast because setup takes longer and the chance of rework goes up.
MOQ changes the equation more than many buyers expect. A low order quantity spreads setup costs across fewer units, so the per-cap price rises. Larger runs absorb setup across more units and usually bring the price down. That is why a 300-piece order can look expensive per unit while a 5,000-piece order settles into a more manageable range. It is not a pricing trick; it is basic production math.
The biggest quote drivers are predictable: fabric type, stitch density, number of embroidery colors, custom labels, packaging, and inspection level. A one-color logo on cotton twill is cheaper than a six-color embroidered mark with woven labels and retail packing. More colors mean more thread changes. More density means more machine time. More packaging means more labor and more materials. Every layer has a cost.
Ask for itemized pricing. One lump sum hides too much. An itemized quote shows whether the cost sits in embroidery setup, premium packing, freight, or a low-MOQ surcharge. That makes comparisons cleaner and keeps buyers from assuming a cheaper quote is actually cheaper.
Here is the range many buyers see for custom samples and first runs:
- Sample fee: about $35-$120 depending on complexity
- Bulk unit price: often $2.20-$5.50 for basic embroidered caps at mid volume
- Packaging add-on: about $0.20-$0.75 per unit for nicer retail pack-outs
- Rush fee: commonly 10%-30% if the schedule is compressed
Packaging deserves a separate check because it often gets treated as an afterthought. If the order needs a clean presentation, ask for FSC certified paperboard, recycled cartons with documented content, or kraft paper inserts that actually fit the product. A claim is not a spec. Buyers who ask for documentation usually avoid the worst quality shortcuts.
One more practical point: the cheapest sample is not always the cheapest path. If the sample is too barebones, you may end up paying for a second or third round because the cap was never tested under realistic conditions. A slightly higher sample fee can be cheaper than a delayed launch.
Common Mistakes Buyers Make With Sample Requests
The biggest mistake is approving a photo instead of the physical cap. A photo can hide stitch puckering, crown collapse, seam drift, and fit problems that only show up when someone wears the cap. Then the bulk order arrives and everyone acts surprised. That surprise is usually self-inflicted.
Another common mistake is changing too many variables at once. If you switch fabric, thread color, logo size, and closure style in the same round, it becomes impossible to know which change caused the problem. Keep one variable fixed while you test another. It is slower, but it is the only way to learn anything useful from the sample.
Buyers also forget to fit-test the cap on an actual person. The brim may feel too stiff, the crown may sit too high, and the closure may land awkwardly on the head. A cap can be visually correct and still wear badly. That matters if the item will be photographed, handed out, or sold as a lifestyle accessory rather than a pure giveaway.
Small misses create larger problems later: no backup sample, no written color standard, no note on labels or packaging, and no agreement on which sample is the master reference. In a pet treat Embroidered Baseball Caps Material sample guide, that kind of sloppiness is exactly what turns a manageable order into a messy production run.
“If you do not write the approval down, you did not really approve anything. You just had a conversation.”
That line sounds blunt because production tends to be blunt. Put decisions in writing. Keep the sample. Photograph all angles. Label the approved version. If the order includes a packaging spec, store that with the cap sample so no one swaps in a cheaper substitute later. The more exact the record, the fewer arguments you have to manage when bulk goods land.
Next Steps After the Sample Looks Right
Once the sample is right, sign off the physical cap, attach photos of every angle, and lock the exact thread codes, cap color, closure spec, and packaging details. At that point the sample stops being a prototype and becomes the production standard. Anything less leaves room for interpretation, and interpretation is where defects sneak in.
Send one final approval message that names the accepted sample, the approved changes, and the production quantity. Keep it short and specific. If the factory knows exactly what got approved, there is less room for substitutions that are technically “close” but not actually correct.
Hold the approved sample as the master reference for inspections, reorders, and future style updates. If the order comes back months later, that sample is still the clearest proof of what correct looks like. Good buyers keep it close and use it like a standard, not a souvenir.
Do the same for packaging. Keep a record of carton specs, inserts, and any sustainability claims tied to recycled materials or post-consumer waste content. If the pack is described as FSC certified, keep the supporting documentation with the approval file. If the outer mailer uses kraft paper or recycled board, record the exact stock and thickness. That way the marketing line and the actual spec do not drift apart over time.
The value of the pet treat embroidered baseball caps material sample guide is not in making the process sound polished. It is in making bulk production repeat the right details every time, with fewer surprises and less waste.
What should I check first in an embroidered baseball cap sample?
Check logo placement, size, and stitch clarity first. Then test fit, crown shape, and brim structure on a real head, because a cap that looks fine on a table can feel wrong once someone wears it.
How many sample caps should I request before bulk production?
One physical approval sample is the minimum if you want a real reference. Ask for a backup sample when you have multiple colors, closures, or packaging versions, so you are not guessing later.
How long does the material sample process usually take?
Simple samples often take about 5 to 10 business days. Custom details can stretch that to 10 to 15 business days, especially if thread matching, blank sourcing, or shipping adds friction.
What drives the unit cost of embroidered baseball cap samples?
Stitch count, fabric quality, embroidery colors, and low MOQ are the biggest price drivers. Rush turnaround, custom labels, and premium packaging can add more cost than buyers expect.
Can I still change details after approving the sample?
Yes, but treat it as a revision and expect the quote or lead time to change. Lock thread colors, sizing, and closure details before production starts if you want fewer surprises.


