Retail Five Panel Caps print options can make a cap look sharp, expensive, and intentional, or like a rushed promo item that wandered onto the shelf by accident. That gap is bigger than most buyers expect. A five panel cap gives decoration a flatter, cleaner front than many six-panel styles, so the same logo can read premium in one method and awkward in another.
For a buyer, the job is not just “put the logo on the hat.” It is matching decoration style to shelf appeal, brand position, and the price point the product line can actually support. A retail cap that sells at a premium needs better shape control, cleaner color handling, and a decoration method that holds up under close inspection. That is where the useful retail Five Panel Caps print options separate from the cheap-looking ones.
If the logo looks confused on the mockup, it will look worse on the shelf. Caps are small. They punish sloppy artwork fast.
There is a reason some cap programs feel elevated without screaming for attention. The front panel, stitch density, surface texture, and color contrast all work together. Get those right and the hat does the selling for you. Get them wrong and the cap looks like a blank with a logo slapped on top.
Retail five panel caps print options: what actually sells on shelf
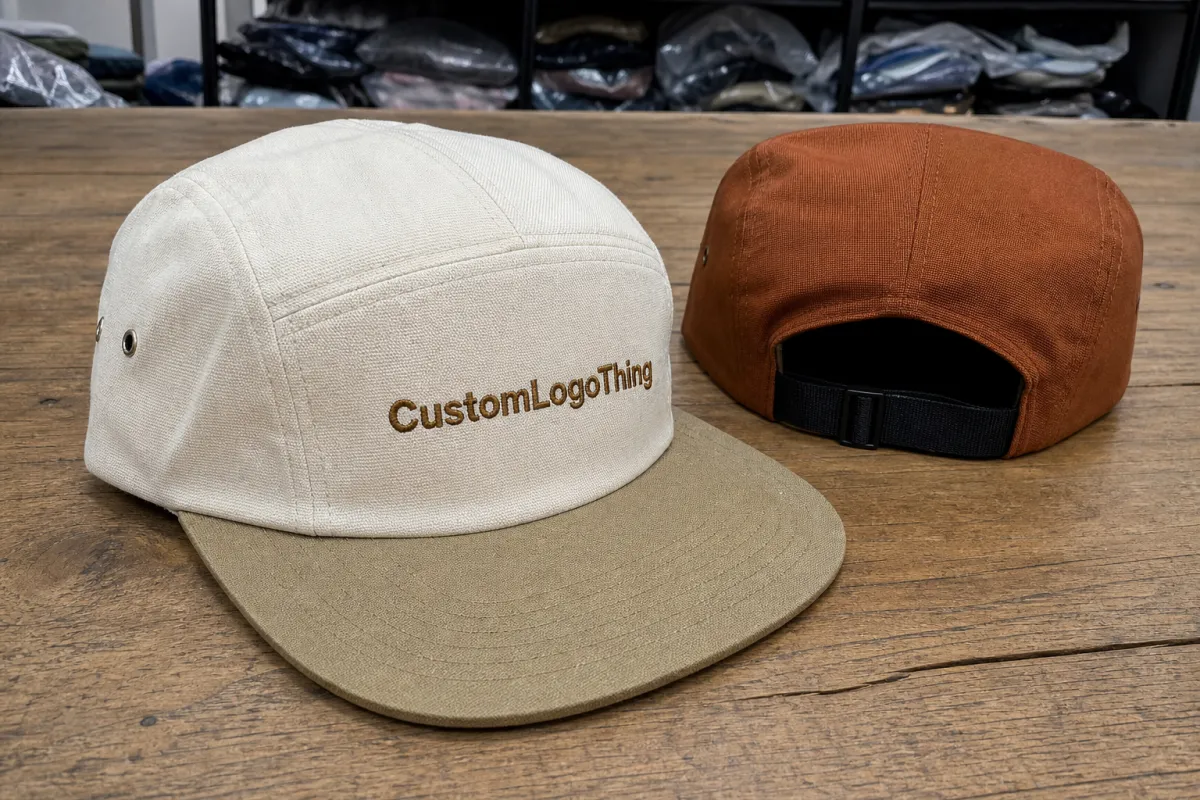
The front of a five panel cap usually gives a cleaner stage than buyers expect. That flatter front panel helps logos read more clearly, especially when the artwork is compact and centered. A structured five panel with a stable front panel can look polished in a retail environment because the graphic sits on a relatively uninterrupted surface. That is a very different effect from a soft promo cap that crumples as soon as someone touches it.
The first buying mistake is assuming every decoration method creates the same impression. It does not. A bold embroidered mark can look strong and brand-driven. A woven patch can feel more fashion-aware. A cheap-looking transfer, on the other hand, will show its weaknesses the moment it sits beside better-made merchandise. Retail shoppers may not know the process terms, but they absolutely notice balance, edge quality, and whether the cap looks considered.
Five panel cap shape matters too. A low-profile front panel gives less room for large art, which means the logo needs to be simplified or resized. A soft unstructured crown can be comfortable and trendy, but it also makes direct decoration behave differently because the fabric moves more. If the artwork is too detailed, the cap can start reading crowded instead of clean. In practice, the best retail Five Panel Caps print options are the ones that respect the silhouette instead of fighting it.
That is also why retail-ready and promo-style caps should not be treated as the same product. Retail styles usually need tighter tolerances, better hand feel, and a decoration method that can pass close inspection under store lighting. Promo caps can survive more compromise. Retail caps cannot. Shoppers pick up the hat, look at the front, and decide quickly whether it belongs in their cart.
From a packaging buyer’s point of view, this is similar to choosing print finishing on a box. The decoration method changes the perceived value faster than the raw material does. A cap at $4.50 factory cost can still look expensive if the branding is smart. A cap at $2.00 can look cheap if the front execution is lazy.
How the cap build affects decoration quality
The build of the cap decides how forgiving the decoration will be. Panel seams can interrupt artwork, front-panel backing can stiffen the surface, crown height can shrink the usable area, and visor shape changes how the whole silhouette reads. A five panel cap often gives more continuous space across the front, but that does not mean the decoration can be oversized without consequence.
Embroidery works best when the logo is bold, simple, and not trying to say too much. Small type under about 5 mm high usually gets messy. Fine lines can fill in. Stitch count climbs quickly when the art has gradients, tiny details, or multiple color changes. A flat front panel helps embroidery stay readable. Once the logo crosses a seam, the risk goes up. The seam can pull the stitches out of alignment, and the finished cap starts looking slightly off. Slightly off is expensive in retail.
Patches solve some of that. Woven patches can capture finer detail than direct stitching, and they work well for brand marks that have thin lines or small text. Leather and PU patches push the look in a more premium or lifestyle direction, while silicone and rubber patches create a more technical, molded appearance. Screen transfers and heat-applied graphics are useful when the artwork needs a cleaner digital look, although they depend heavily on the supplier’s print finishing and heat control. If the file is built in CMYK with subtle gradients, the supplier may steer you toward digital printing on a patch face or transfer, rather than forcing it into thread.
The cap itself also changes the outcome. A structured front panel with backing or foam support will hold shape better under embroidery. An unstructured cap may need a lighter decoration method because a heavy stitch field can make the crown droop or buckle. That is why two hats with the same logo can need different treatment even if the artwork is unchanged.
There is also a color-side reality that buyers ignore. Spot color embroidery threads often give more predictable brand matching than a crowded set of mixed tones. On the patch side, printed detail may be built differently depending on whether the supplier uses offset printing, digital printing, or another print line for the art face or backing card. Those methods are not cap decoration methods themselves, but they matter if your retail program includes hangtags, cartons, or insert cards alongside the cap.
Cost, pricing, and unit cost tradeoffs
Pricing for Retail Five Panel Caps print options usually breaks into five buckets: art setup, decoration labor, sample or proof charges, freight, and the per-unit cost. Buyers often focus only on the unit number because it is the easiest line item to compare. That is convenient, and also wrong. The cheapest quote can hide setup fees, a slow schedule, or a decoration method that falls apart on closer inspection.
Digitizing for embroidery often lands around $45-$120 for a simple logo, but more detailed work can go higher. Per-unit embroidery on a retail cap might sit around $0.90-$2.75 at mid-size quantities, with small runs trending higher. Woven patches usually add a separate patch build cost, then a sew-on or heat-apply labor step. Leather and PU patches often carry higher setup because the die or mold matters. Silicone or rubber patches can cost more again because the tooling is less forgiving.
For many buyers, a realistic order range looks like this:
| Decoration method | Typical setup | Approx. unit cost at 300 pcs | Best use | Main tradeoff |
|---|---|---|---|---|
| Direct embroidery | $45-$120 digitizing | $1.10-$2.75 | Bold logos, clean retail branding | Weak on fine detail |
| Woven patch | $60-$180 patch setup | $1.40-$3.25 | Small text, sharper edges | Extra application step |
| Leather / PU patch | $80-$200 tooling | $1.60-$4.00 | Lifestyle and premium looks | Less friendly for tiny type |
| Screen transfer / heat transfer | $50-$140 setup | $0.90-$2.40 | Graphic art, flatter branding | Needs good heat control |
| Silicone / rubber patch | $150-$450 mold cost | $2.00-$5.50 | Technical, sporty retail programs | Tooling cost is real |
At 1,000-5,000 pieces, unit cost can drop enough to justify a better decoration method. That is where many buyers move from direct embroidery to a cleaner patch build, or from a simple transfer to a more durable application. The price jump is not always dramatic per unit, but the retail difference can be. If the product is supposed to sit next to quality apparel, shaving twelve cents and losing the look is a bad trade.
Also ask what else sits in the quote. Does it include bagging? Carton labels? A retail hangtag? If the supplier is handling packaging, the rest of the program may involve offset printing, digital printing, or flexographic printing on the inserts or shipping materials. That is fine, but the cap spec and the packaging spec need to stay separate so you know exactly what you are paying for.
For sustainability-minded retail programs, some buyers request FSC-certified board for hangtags or insert cards through a supplier chain that can document it. For shipping validation on heavier retail kits, test references like ISTA help keep the pack-out honest. For fiber-based packaging items, FSC is the simple acronym that tells you whether the paper side of the program is being treated seriously.
Production steps, timeline, and approval checkpoints
A good cap order moves through a predictable path: art file review, method recommendation, digital mockup, sample or photo proof, bulk production, inspection, and packing. The problem is that many buyers think the process starts with bulk production. It does not. The process starts the moment the art file arrives and someone has to decide whether the logo will survive the chosen decoration method.
For direct embroidery, the supplier usually needs a clean vector file and a digitized stitch map. If the logo will be patched, the patch face may be built separately, then attached with sewing, heat, or adhesive support depending on the construction. A careful proof should show logo size, exact placement, and color references. If the cap has a structured front, the proof should also show how much of the panel the graphic actually occupies. On a five panel cap, that detail matters a lot more than people think.
Typical lead times vary, but a standard retail run often lands around 12-18 business days after proof approval. Small, simple jobs can move faster. Orders with custom materials, special trims, or multiple revisions can stretch to 3-5 weeks. Rush options exist, but they usually cost extra and leave less room for fixing mistakes. That is a lovely way to learn nothing from your own errors.
Three checkpoints protect the buyer:
- Artwork approval - confirm logo size, placement, and color count before anything is sampled.
- Sample sign-off - verify thread density, patch edge quality, or transfer finish before the bulk run.
- Packing approval - confirm folding, bagging, carton count, and label accuracy before shipment.
This is also where many orders lose time. A buyer sends a logo in the wrong format, then asks for three revision rounds after the mockup comes back. Or the supplier quotes one material, then the buyer changes the cap body after sample approval. Or the front-panel size is approved without checking the seam location. Delays are rarely mysterious. They are usually self-inflicted.
Choosing the right decoration for your brand and channel
The best retail Five Panel Caps print options depend on where the cap will live. Lifestyle retail wants something that looks styled, a little restrained, and not desperate for attention. Team merch can handle bolder marks and stronger contrast. Event sales need a method that can be produced quickly and priced aggressively. Employee uniforms often need durability first, then polish.
Embroidery works well for brands with simple logos and a premium lean. It feels built-in, which is why buyers often use it for clean wordmarks or compact symbols. If the mark is too intricate, though, embroidery starts fighting the art. Patches fix that problem because they can carry more detail and keep the edges cleaner. Woven patches are especially useful when the logo has tiny text or a fine outline that thread would muddy.
Leather and PU patches shift the story again. They work for outdoor, heritage, and fashion programs where texture matters as much as graphics. Silicone patches land in a sportier lane and can look sharper under strong retail lighting. Screen transfer is useful when the artwork is graphic-heavy and the brand wants a flatter, more printed look. That said, a flat look is not automatically better. It just fits certain brands better.
Think about wear as well as appearance. A cap for daily use needs abrasion resistance and wash tolerance. A retail fashion cap may only need to look good on a table and in a mirror, which gives more freedom to choose a method that prioritizes appearance over brute durability. The buyer has to decide whether the cap needs to survive hard use or mainly survive the fitting room.
If the brand position is understated, keep the decoration smaller and let the quality of the cap body do more work. If the brand wants shelf impact, make the front mark cleaner and more visible, but avoid shouting across every millimeter of fabric. Not every logo needs to be loud. Some should simply be unmistakable.
From a practical buying angle, this is where the phrase retail five panel caps print options stops being a search term and becomes a decision tree. The right method depends on logo complexity, target price, and the level of finish the channel expects. A boutique retail line can justify a more polished patch. A volume merch program may need simpler embroidery to keep margin intact. Both can work. They just solve different problems.
Common mistakes that derail cap orders
The first mistake is bad artwork. A logo that looks fine on a screen may be too detailed for a front panel that is barely a few inches wide. Thin strokes vanish. Small text clogs. Gradients lose their shape. If the artwork was built for a poster, not a cap, it needs simplifying before production starts.
The second mistake is ignoring seam placement. A five panel front often gives more room than a six-panel crown, but seam interruption can still ruin a clean logo if the art is placed too low or too wide. Buyers sometimes ask whether a logo can cross the seam. Sometimes yes. Often no. If the artwork must stay crisp, choose a centered placement or a patch that bridges the surface more cleanly.
The third mistake is comparing quotes without matching specs. One supplier may be quoting direct embroidery, while another is quoting a woven patch or a silicone badge. Those are not the same job, no matter how nicely the numbers are arranged on the page. If you want a fair comparison, match the cap body, decoration size, attachment method, and packing detail first.
MOQ surprises create another mess. A buyer requests 150 units, but the factory minimum for a molded patch is 300. Or the cap fabric is available, but the closure hardware is not. Or the thread color has to be custom matched, which adds time. Small orders are possible, but the fewer pieces you want, the more the setup cost bites.
Color mismatch is another easy trap. Buyers should ask whether the supplier is matching to a Pantone reference, a physical swatch, or a best-effort thread chart. CMYK-style thinking does not map cleanly onto thread. A screen transfer or printed patch can stay closer to the artwork, but even then, print finishing and material choice change the final tone. If brand color matters, approve it against a physical sample, not just a monitor.
Finally, people skip sample approval because they want to save time. That is a strange habit, because the sample is the cheapest place to catch the mistake. A one-color embroidery sample that looks slightly too small is easy to fix. A 5,000-piece run with the same mistake is not a fun conversation. The cost of one approval step is usually smaller than the cost of one avoidable correction.
What are the best retail five panel caps print options for small orders?
For small orders, embroidery and patches usually make the most sense because they keep setup manageable and still look retail-ready. If the logo has fine detail, a woven patch or printed patch is often smarter than forcing direct stitching to do work it should not do.
Is embroidery better than a patch on five panel caps?
Embroidery usually looks more integrated and can feel more premium when the logo is bold and simple. Patches are better when the artwork is detailed, multicolor, or needs to bridge a seam without getting ugly.
How much do retail five panel cap decoration options usually cost per unit?
Price depends on quantity, method, and complexity. Setup fees and sample charges can matter almost as much as the unit price. Lower unit cost usually shows up on larger runs, while small orders and special finishes push the price up quickly.
How long does production take for retail five panel caps print options?
Standard timelines usually include artwork review, proof approval, and bulk production, so the process is rarely immediate. Rush options exist, but they usually cost more and leave less room for revisions.
Can a logo be printed across the seam on a five panel cap?
Sometimes, but seam crossing can distort the artwork and make the decoration look sloppy. If the logo needs to stay clean, a patch or centered embroidery placement is usually the safer choice.
If you want a retail cap that actually earns its shelf space, start with the art, then choose the decoration, then lock the sample path before the bulk run. That order keeps retail five panel caps print options under control instead of letting the cheapest quote steer the whole job.


