If you are buying decorated caps for a promotion, retail shelf, or collector drop, the toy trucker Caps Material Sample guide is where the real decisions happen. A photo can hide a scratchy mesh panel, a foam front that collapses after one bend, or a closure that looks adjustable but sits crooked once stitched. A sample shows the cap the way a buyer, a kid, or a collector will actually meet it.
Toy Trucker Caps Material Sample Guide for Smarter Buying
Most poor cap orders do not fail because the artwork was wrong. They fail because the materials looked acceptable on screen and then behaved badly in hand. A mesh that appears crisp online can feel rough against skin. A foam front that seems firm can buckle after packing, transit, and a few wear cycles. That is why a toy Trucker Caps Material Sample guide matters more than a spec sheet alone.
In practice, the sample is a low-cost insurance policy. One prototype can reveal whether the crown holds its shape, whether the bill keeps its curve, and whether the cap still looks aligned after repeated handling. If the cap is intended for children, fit and comfort become more than finishing details. They decide whether the piece reads as playful, premium, or simply cheap.
Shipping conditions add another layer of risk. A cap can look acceptable under studio lighting and then arrive with crushed panels, twisted binding, or color shift after heat exposure. That is especially common with foam fronts, curved bills, and low-cost mesh. A real sample catches those problems before they turn into returns, rework, or a launch delay that eats the schedule.
"A sample is not there to prove the factory can sew a cap. It is there to prove the cap survives handling, decoration, packing, and wear."
That is the main discipline behind any good sampling process: treat the sample as a decision tool, not a formality. The cheaper mistake is usually the sample fee. The expensive mistake is approving 5,000 caps and then discovering the front panel sags, the mesh scratches, or the closure sits off-center by a few millimeters.
The best buyers use the sample to answer three questions fast: does it feel right, does it hold up, and does it ship well. Those answers are rarely identical. A cap can feel soft but lose structure, or look rigid but irritate the wearer. The sample exists to expose that trade-off before production locks it in.
What the Sample Should Reveal About Fabric, Mesh, and Trim
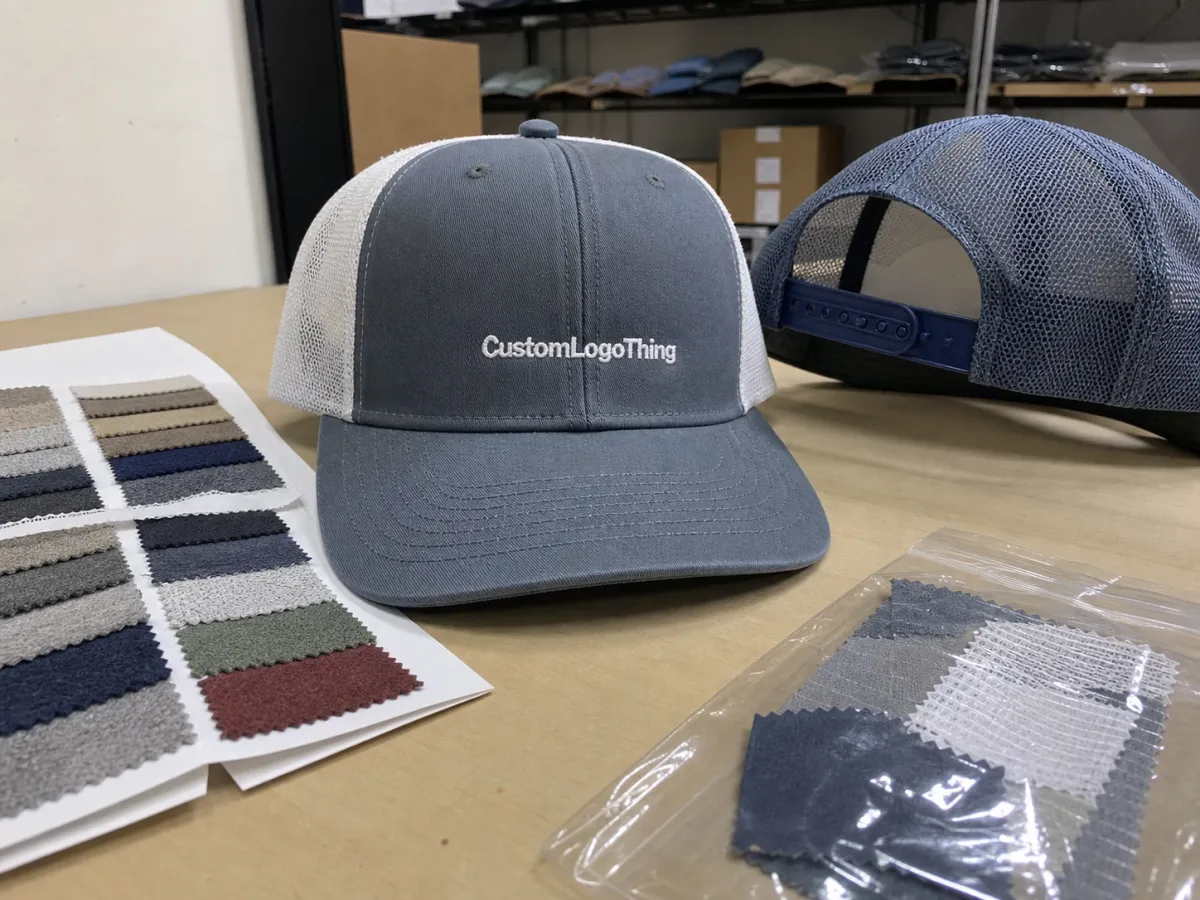
A cap is not one material. It is a stack. The front panel fabric, the mesh backing, the sweatband, the bill insert, the stitching thread, the closure hardware, and any patch or woven label all affect how the cap looks and feels. If one layer is wrong, the whole piece reads wrong.
The front panel usually carries the visual load. Foam-backed polyester gives a classic promotional look, while cotton twill or brushed poly can feel softer and less rigid. Mesh density changes breathability and shape retention. A tighter mesh often feels cleaner and more durable, while a looser mesh can look light but sag faster. Thread matters too: a thick stitch line can sharpen the logo, but if the stitch density is too high on thin foam, the panel puckers.
Trim is where a lot of quality problems hide. Weak snaps, uneven binding, or a closure strap that is just a little too short can make a cap feel amateur even when the front artwork is excellent. The same goes for stitch color. A thread shade that clashes by a narrow margin can make a brand mark look off, especially under bright retail lighting.
- Front panel: check stiffness, print hold, and whether the shape rebounds after bending.
- Mesh: compare density, softness, and visible color shift under light.
- Sweatband: feel for scratchiness, moisture absorption, and seam bulk.
- Bill insert: test curve memory and edge firmness.
- Closure: confirm snap strength, strap symmetry, and adjustment range.
- Decoration: verify embroidery, screen print, woven labels, or puff patches on the chosen base.
Decoration compatibility deserves its own test. Embroidery can pull on lightweight foam. Screen print can crack if the front panel flexes too much. Woven labels may sit beautifully on a flat panel and then ripple once sewn to a curved crown. A careful buyer asks for the sample decorated the same way the bulk run will be decorated, not with a stand-in method that flatters the material.
Material specs should also be checked against the final use. A front panel with too much give may look relaxed, but it can fail a retail display test after packaging compression. A firmer front panel may hold embroidery well, yet feel stiff on a child-sized cap. Neither is automatically wrong. The sample should tell you which trade-off fits the job.
Packaging matters here too. A cap shipped in corrugated cardboard with a clean insert often arrives more honestly than one stuffed loosely into a soft mailer. If the sample kit includes kraft paper wraps, recycled materials, or even post-consumer waste content, that is useful data as well. It hints at what the final presentation could look like if the order is meant for retail or controlled distribution.
If sustainability matters to your buyers, ask whether any paper components are FSC certified. For shipping or retail inserts, FSC guidance helps separate marketing language from actual chain-of-custody claims. If you also care about transit durability, sample packaging that reflects ISTA testing logic is worth discussing. That does not mean every sample needs a full lab program, but the thinking should be there.
Cost, Pricing, MOQ, and Unit-Cost Variables to Compare
In a Toy Trucker Caps material sample guide, price should be broken into parts. Sample fees are not the same as setup charges, and neither one is the same as unit price in bulk. Buyers often compare the prototype cost to the production quote and think the factory is changing numbers. Usually, the pricing structure is just doing different jobs.
A simple swatch may cost $10-$30, depending on material and freight. A sewn prototype often lands around $35-$90. A fully decorated pre-production sample can move into the $60-$150 range, especially if the cap needs custom mesh, embroidery, or a specialty patch. Those figures can climb if you want multiple colorways or revisions. That is normal, not suspicious.
| Sample type | Typical cost | What it shows | Best use |
|---|---|---|---|
| Material swatch | $10-$30 | Fabric hand feel, mesh density, color tone | Early shortlist |
| Sewn prototype | $35-$90 | Fit, structure, seam behavior, closure placement | Build comparison |
| Pre-production sample | $60-$150 | Near-final decoration, trims, and appearance | Bulk approval |
The unit cost variables are easy to underestimate. Specialty mesh, higher-density foam, custom labels, extra stitch lines, and exact color matching all add cost. Smaller order quantities do the same because the fixed setup work gets spread over fewer pieces. A slight MOQ increase can sometimes reduce the per-cap cost by $0.10-$0.35, which sounds small until you multiply it across a launch run.
That is why the best comparison is not one quote against another. It is material A versus material B, sample type versus sample type, and total landed cost versus unit price alone. A lower factory quote can still become the more expensive choice if the sample reveals a high return risk or if the packaging needs a second round of changes. If the cap must ship inside a retail carton, include the cost of carton board, inserts, and any biodegradable packaging requirements in the comparison. Buyers who ignore packaging often undercount by 8-15%.
One practical move: ask for two builds side by side. For example, compare a standard foam front with a denser front panel, or a standard snap closure with a wider adjustment range. The sample fee rises a little, but the information value is much higher. You are buying a cleaner decision, not just a product preview.
MOQ also affects risk. A factory may quote a lower unit price at 3,000 pieces than at 1,000, but that only helps if you can move the inventory. If the cap is seasonal or tied to a short campaign, a smaller run with better material control can be the smarter buy. Unit cost is only one line on the sheet; dead stock is the line that hurts.
Process and Lead Time: From Sample Request to Approval
A sample process should start with a clear brief, not a vague request for "something similar." Send the cap style, artwork file, color references, closure preference, and target use. If the cap is a toy accessory for a promotion, say that. If it is meant for a collector release, say that too. The material decision changes with the job.
The sequence usually looks like this: define the style, confirm material references, approve the build plan, and then wait for the first sample. Simple swatches can move in a few business days. Sewn prototypes often take about 7-15 business days, and a revision round can add another 3-7 days. If you need a decorated pre-production sample, plan for enough time to check stitching, print registration, and any patch alignment before production starts.
Lead time depends on more than sewing capacity. Artwork complexity, color matching, trim sourcing, and peak-season congestion can all slow the calendar. A cap with standard mesh and a common closure may move quickly. A cap that needs custom foam thickness, specialty binding, or a printed front panel usually takes longer because each added variable creates another point to verify.
Clear feedback shortens the timeline. Comments like "looks good" create guesswork, and guesswork creates another round of samples. Better feedback sounds like this: "The mesh is too rough, the closure needs a wider adjustment range, and the logo sits 4 mm too low on the crown." That level of specificity saves days.
The approval checkpoint matters most. Once you sign off, the supplier treats that sample as the reference for the bulk run. If the approved version has a slightly darker thread, a more upright front panel, or a different closure snap, those details can carry through to the full order. That is why sign-off should be deliberate, not rushed because the calendar is tight.
For buyers who ship samples to multiple stakeholders, ask for packaging that reflects the final handling path. A sample packed flat in corrugated cardboard tells you something different from one packed in a soft poly bag. A paper wrap made from kraft paper or recycled materials may be enough for review kits, but retail sets may need stronger protection. If the carton spec includes post-consumer waste content or FSC certified board, note that in the approval file so the final order does not drift from the sample presentation.
Step-by-Step Sampling Workflow for a Cleaner Decision
A useful toy Trucker Caps Material sample guide starts with the end use. Is this a promotional giveaway, a retail accessory, a collector piece, or event merchandise? A giveaway can tolerate simpler materials and a lower trim budget. A collector item usually cannot. The right sample depends on that answer.
- Shortlist two or three builds. For example, compare foam front plus mesh, brushed twill plus mesh, and a denser structured front if the design needs more shape.
- Inspect in different light. Bright light, natural light, and indoor light each reveal something different about color shift and stitch contrast.
- Touch the weak points. Feel the sweatband, press the bill, bend the front panel, and test the closure at both ends of its adjustment range.
- Check decoration fit. Embroidery should sit flat, patches should not lift at the corners, and print should not warp over a seam.
- Record the result. Use notes, photos, and a simple scorecard so the decision rests on evidence.
That scorecard does not need to be fancy. A 1-5 scale for comfort, structure, finish, decoration, and packaging is enough to compare samples honestly. Add a short note beside any low score. The point is not to create paperwork for its own sake. The point is to stop the loudest opinion in the room from deciding the order.
One underrated test is the wear-and-pack loop. Try the cap on, remove it, re-close it, and pack it flat or in a carton the way the bulk order will travel. If the cap loses shape after a single cycle, the sample has done its job. You now know the style needs a stronger bill insert, a firmer front panel, or better packaging protection before you approve the run.
For suppliers who provide packaging options, ask for a version using biodegradable packaging or paper-based inserts if that aligns with your brand. Some buyers want the cap and the packaging to send the same message: cleaner materials, less waste, and a better unboxing moment. The sample is where you test whether that story is believable.
Document tolerances while the sample is in hand. If the logo placement is off by 2 mm, decide whether that is acceptable before the production line starts. If the closure sits unevenly by 3 mm, note whether the issue is visual only or if it changes function. Small deviations become large problems when they repeat across a full run.
Common Mistakes That Turn a Good Sample Into a Bad Order
The first mistake is judging only color. A cap can match the Pantone tone and still fail on structure, breathability, or decoration durability. Color is visible in one second. The other issues show up after handling, wear, or shipping.
The second mistake is approving from one angle. Front-on photos can hide asymmetry in the closure, uneven seam spacing, or logo centering that looks fine until the cap sits on a head. Turn the sample, lift the bill, and check the back. A cap that looks clean from the front and sloppy from the side will still come back as a complaint.
The third mistake is skipping a production simulation. If the cap will be packed flat, palletized, or stored in heat, the sample needs to survive those conditions as closely as possible. Packaging choices matter here. A sample that arrives protected in corrugated cardboard may not behave the same way if the bulk order is packed differently. A buyer should ask that the sample packout reflect the final method, including any kraft paper wrap or insert style.
The fourth mistake is vague feedback. "Looks good" can be one of the most expensive phrases in sourcing. It often produces repeated errors because the supplier has no clear target. Say what worked, say what failed, and say what must stay fixed. The cleaner the feedback, the fewer the revisions.
Another quiet risk is assuming sustainability claims are automatic. If the sample kit mentions recycled materials, post-consumer waste, or FSC certified paper, make sure the wording matches the actual spec sheet. Marketing language and purchasing language do not always align. Ask for proof where it matters, especially if those claims appear on a retail insert or shipper carton.
There is also a timing trap. Buyers sometimes approve a sample that is not fully resolved because they want to hold the schedule. That saves a week and costs a month later. If the sample is missing a trim detail, has a weak closure feel, or still needs a color correction, those issues rarely fix themselves in bulk.
"The sample is not a yes-or-no answer. It is a list of hidden questions, and good buyers use it to find the ones that would have cost money later."
Expert Next Steps Before You Place the Order
Before you approve anything, create a one-page sign-off sheet. Lock the material name, color code, decoration method, closure type, packaging spec, and acceptable tolerance range. If the order is meaningful in size or tied to a launch date, ask for a final pre-production sample even if you have already approved a prototype. That extra step is boring. It is also often the difference between a clean receipt and a warehouse headache.
Get every stakeholder to sign off once. Design, purchasing, operations, and anyone who will receive the final goods should review the same sample. Reopening the decision later usually means the order gets delayed, not improved. The best sample process has one clear close.
For buyers who care about shelf presentation, ask what the cap will ship with: carton board, insert cards, tissue, hangtags, or a retail sleeve. If those materials are part of the offer, note whether they are FSC certified, made from recycled materials, or sourced with post-consumer waste content. That defines the full buy, not just the cap.
Keep the final comparison practical. A sample that photographs well but does not hold structure under pressure is not ready. A sample that feels sturdy but scratches the wearer is not ready either. The right order only appears when appearance, comfort, and packability line up with the price you are willing to pay.
Here is the simplest rule to keep in front of the team: compare, test, approve, then order. A toy Trucker Caps Material Sample guide works because it slows the buyer down in the right place. The small pause before bulk production can save a return cycle, a reprint, or a late launch. That is the kind of discipline that keeps a fun product from becoming an avoidable expense.
Frequently Asked Questions
What should I compare first in a toy trucker caps material sample?
Start with the front panel fabric, mesh density, and closure style, because those three pieces usually shape the feel, fit, and price the most. Then check decoration compatibility so your logo method matches the material without cracking, puckering, or bleeding.
How much does a toy trucker caps material sample usually cost?
Sample cost depends on whether you are ordering swatches, a sewn prototype, or a fully decorated pre-production sample. Expect extra cost when the sample needs custom colors, special trims, or multiple revisions before approval.
How long does the sample and approval process take?
Simple swatches can move quickly, while sewn prototypes and revision rounds add more time before bulk production can begin. Lead time is usually shorter when the buyer sends a complete brief, clear artwork, and exact material references up front.
Can I test embroidery or patches on the sample cap?
Yes, and you should, because decoration often reveals problems that plain samples hide. Check stitch density, patch adhesion, edge quality, and placement so the final order matches the approved look.
What is the difference between a swatch, a prototype, and a pre-production sample?
A swatch shows the material itself, a prototype shows the cap build, and a pre-production sample shows the near-final version of the order. Each stage answers a different question, so buyers should not skip straight from swatch approval to bulk production.


