A sample can save an order or sink it. That is not drama; it is packaging math. A bag that looks fine in a PDF can hang crooked, seal badly, fog under showroom lights, or fit the giveaway item so tightly that the final pack-out turns into a mess. The trade show giveaway opp header bags Sample Approval Checklist exists for exactly that reason: it catches the small failures before they become expensive ones.
For trade show work, the stakes are oddly asymmetrical. The giveaway itself may be inexpensive, but the schedule around it is not. Freight bookings, booth install dates, sales previews, and inventory counts do not forgive a bad approval. A $0.28 bag that misses the booth window can cost far more than the bag ever did.
Why the trade show giveaway opp header bags sample approval checklist matters
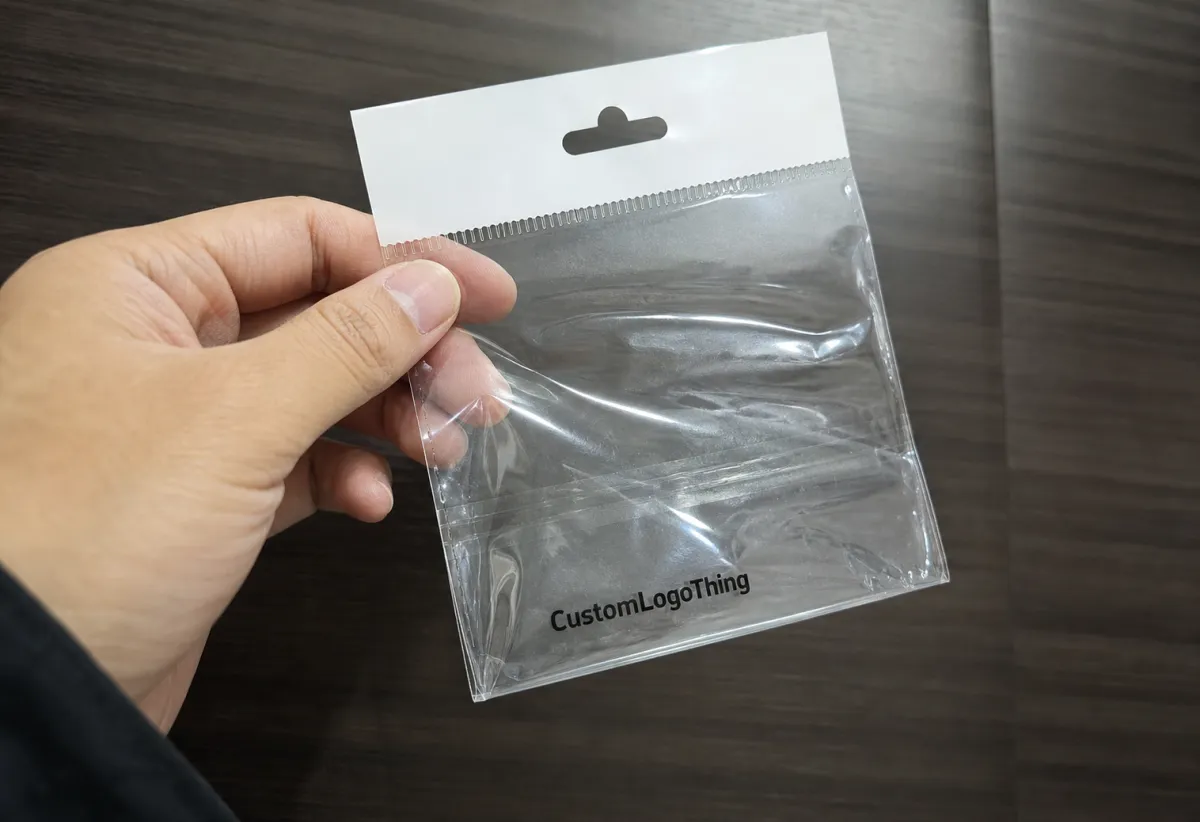
OPP Header Bags are simple on paper: clear film, a header area for hanging, a seal, and a printed face or insert. In practice, the details carry the job. The hole punch can sit too low, the print can drift toward the edge, the film can show glare, and a product that fits in a dimensioned drawing can still feel cramped in hand. Those are the kinds of problems a buyer sees immediately once a physical sample lands on the desk.
Short deadlines make the problem sharper. Many promotional runs move inside a two- to four-week window, and a revision can erase nearly a quarter of that if someone discovers an issue after proof approval. On a 5,000-piece order, a one-week slip is not just annoying. It can trigger split freight, overtime packing, or a decision to ship something that should have stayed in production.
The checklist is useful because it turns judgment into something repeatable. Instead of relying on memory or a half-remembered email thread, it forces the team to verify the items that actually affect performance: size, hang position, print fidelity, seal integrity, and real-world fit. That sounds basic. It is also where most preventable failures live.
A screen proof can confirm artwork layout. It cannot tell you whether the bag will bow once filled, whether a white logo vanishes against glossy film, or whether the header hole tears after two moves through a warehouse. A physical sample gives those answers. It does not need to be perfect. It needs to be honest.
If a sample hangs crooked, a booth wall starts to look crooked too. Visitors may not know why the display feels off, but they notice the imbalance immediately.
One practical comparison helps: packaging approvals for a trade show bag are closer to a tool inspection than a design review. The piece has to function, survive handling, and meet a deadline. Beauty matters, but it is not the only test.
What the Sample Needs to Prove Before You Sign Off
Start with the dimensions, and use the actual giveaway item rather than a placeholder. A brochure, folded card, sample kit, or small promotional item can behave differently once it is fully inserted. A bag that is 3 to 5 mm short may still close, yet it can wrinkle the contents or push the seal out of square. A bag that is too large can look loose and unfinished, even if it technically works.
The header area deserves the same scrutiny. The punch or hang hole should be centered, reinforced, and high enough to clear the display hook without covering the artwork. If the sample will sit on a pegboard, retail rail, or booth display, test that exact hanging method. A hole position that is acceptable in isolation can become a problem once 40 bags line up side by side under identical lighting.
Print quality is where many approval mistakes hide. Check the actual ink density, the sharpness of fine type, and the alignment of logos near the seal line and edges. Small text that looks legible on a proof can become fuzzy on clear film, especially if the art uses thin strokes or pale colors. On glossy OPP, contrast matters more than most mockups suggest. White ink, if used, needs special attention because it can shift from crisp to translucent faster than the design team expects.
Then there is the pack-out test. Load the sample with the intended contents, not a convenient substitute. If the event kit includes a folded leaflet, use the final paper stock; if it includes a sample bottle, use the real bottle. The bag should hold the item without cracking, clouding, or bowing at the side seams. This sounds obvious, but it is exactly where assumptions break down. A nice-looking sample that fails under the right product weight is still a failed sample.
Clarity matters too. Clear OPP is prized because it shows the giveaway inside, but clarity can be affected by film gauge, print coverage, and even warehouse scuffing during handling. A slightly heavier film can resist creasing better, while a lighter gauge may feel cheaper but ship at a lower cost. That trade-off should be visible during sample review, not discovered after cartons are already on pallets.
Finally, inspect the edge quality and seal behavior. If the seal line is too weak, the bag can open during packing or transit. If it is too aggressive, staff may slow down because the bag is hard to open by hand. Either way, the issue matters. The best sample is the one that behaves the way the final production run should behave.
Production Steps and Turnaround: From Proof to Approved Sample
The approval chain is usually straightforward, but only if everyone respects the order. It starts with file intake, continues through artwork review, moves into proof correction, and then reaches physical sample fabrication. After that comes review, revision if needed, and final sign-off. Skip one step and the whole process becomes guesswork. Guesswork is slow, and slow is costly.
Digital proofs are fast and useful. They show copy, layout, and placement. They do not show rigidity, gloss, seam pressure, or how the film behaves once it is folded and packed. That is why a physical sample still matters for trade show packaging. It is the only way to judge the object in three dimensions.
Lead times vary by structure, print complexity, and whether tooling already exists. A clean artwork proof may come back in 1 to 2 business days. A physical sample often takes 5 to 10 business days, and custom structures can run longer if the header shape or insert pocket needs separate setup. Add revision time if the first version misses the mark. Even a modest correction can add 3 to 7 business days, and rush work typically costs more than the original sample.
That timing can be deceptive because small delays stack. One person waits on the proof, another waits on a revision note, and then shipping gets squeezed into a tighter window than anyone expected. The order may still ship on time, but only by removing margin from every step that follows. Buyers who work in promotional packaging long enough learn to protect that margin early.
Clear revision notes help more than people admit. “Move the logo 4 mm higher,” is a usable instruction. “Make it feel stronger,” is not. Production teams can work with exact dimensions, not mood. If the sample is wrong, mark precisely what changed: hole placement, color density, header width, film thickness, or pack-out performance. The cleaner the note, the less likely the next round will drift.
There is also a difference between a sample that is approved and one that is approved conditionally. Those two things should not be confused. If the revision is required, the order is not truly done. If the sample is accepted with notes, the notes need to be written where everyone can see them, not buried in someone’s inbox. That discipline matters most when the event date is fixed and the reorder window is thin.
Cost, MOQ, and Unit Price Drivers for Header Bags
Unit price is always the first question, and usually the least complete one. For standard custom OPP header bags, small promotional runs around 5,000 units often fall somewhere near $0.18 to $0.42 per piece, depending on film thickness, print coverage, size, and whether the bag is standard or custom cut. At 1,000 units, the same piece can jump to roughly $0.35 to $0.80 because setup charges are spread over fewer bags. Those are working ranges, not a promise, but they are close enough to shape a budget before the quote arrives.
MOQ changes the conversation quickly. A lower order quantity sounds convenient until the fixed costs show up. Tooling, plate work, setup waste, and machine adjustment all have to be paid somewhere. That is why a quote with a small unit price can still become the more expensive option once the order lands. The real question is not just what one bag costs. It is what the whole run costs once the press starts and the cartons need to move.
Sample charges also deserve attention. A basic physical sample might cost $75 to $150, while a more complex sample with a specific pack-out or a custom structure can climb to $150 to $250. Rush revisions can add another $50 to $150, sometimes more if the timeline is punishing. None of this is unusual. It simply needs to be built into the planning instead of treated as an unpleasant surprise.
Freight can dwarf the sample or even the print cost when the schedule is tight. Split shipments to two show locations, special carton marking, and last-minute rework all affect landed cost. A bag that looks inexpensive at the factory gate may not be inexpensive after cross-dock fees, reshipment, and labor at the receiving end. Buyers who track landed cost instead of unit cost usually make better decisions.
| Option | Typical MOQ | Sample Cost | Typical Unit Price | Best Use |
|---|---|---|---|---|
| Digital proof only | None | $0-$25 | Not final | Artwork layout and copy review |
| Standard physical sample | 1,000+ | $75-$150 | $0.18-$0.42 | Fit, finish, and hang review |
| Custom sample with pack-out | 3,000+ | $150-$250 | $0.22-$0.55 | Trade show kits and higher-risk launches |
| Rush revision sample | Varies | $200+ | $0.25-$0.70 | Deadline-driven reapproval |
Price is also tied to practical construction choices. Heavier film adds material cost. More print colors add setup and often more waste. A custom size can require extra tooling or more manual adjustment. Even the choice between a simple header and a more reinforced hanging top can change the final bill. These are not dramatic differences one by one, but they add up quickly.
Specs That Change Approval Decisions Fast
Material choice is the first signal buyers feel, even before they open the bag. Standard OPP is clear, crisp, and common because it shows the product inside without adding much bulk. A heavier gauge version feels more structured and resists wrinkles better. That better feel costs more, but it also reduces the chance that a giveaway looks flimsy under show lighting. The difference can be subtle in a quote and obvious in hand.
Seal type is another fast-moving decision point. Heat seals are common for volume, but they need to open cleanly if staff are packing items by hand. Adhesive strips can help with repeated access, yet they introduce their own alignment concerns. Flap or insert-style closures create a different user experience altogether. None of them is automatically better. The right choice depends on whether the bag is being filled once in a warehouse or repeatedly at a booth table.
Header width and hole placement control presentation. A hole that is too low can cover branding; one that is too close to the edge can weaken the top and tear during shipping. Reinforcement matters more once bags are handled in bulk. A display that looks tidy on a single desk can unravel when 100 pieces are loaded, stacked, and rehung. The sample should tell you whether the structure is disciplined enough for that reality.
Compliance details change the approval decision faster than design teams expect. If the bag carries a recycling mark, material note, food-contact statement, or sustainability claim, the wording has to be correct. If the insert uses paperboard, many brands now ask about FSC-certified stock or comparable documentation. If the order is tied to a regulated product category, the checklist needs to capture those notes before sign-off. A pretty sample with inaccurate language is still a risk.
Quick rule: if the spec affects fit, hanging, handling, print legibility, or compliance, it belongs on the approval sheet. If it only lives in someone’s memory, it is likely to disappear at the worst possible moment.
Step-by-Step Approval Checklist for the Buyer and Art Team
The Trade Show Giveaway opp header bags Sample Approval Checklist works best when it is short enough to use and detailed enough to matter. The point is not to create paperwork for its own sake. The point is to make sure the sample can survive real use. That means the buyer, art team, and whoever owns fulfillment need a shared reference before the order moves forward.
- Confirm the finished dimensions against the real giveaway item or insert.
- Check header height, hole placement, and hanging method against the intended display.
- Review logo size, text legibility, and bleed safety on the actual sample.
- Compare print color to an approved reference rather than the screen mockup alone.
- Test seal strength and opening ease under normal packing conditions.
- Load the sample with the real product and inspect fit, bowing, and surface marks.
- Verify carton labeling, pack count, and any booth-filling instructions.
- Record approval, conditional approval, or revision notes in writing.
Assign ownership before the sample arrives. One person should own artwork accuracy. Another should own physical fit and handling. A third can manage fulfillment notes or shipping details. Shared responsibility is fine; shared assumptions are not. The fastest teams are usually the ones that know who says yes, who says no, and who documents the final call.
A good approval record includes the sample version, date, reviewer name, and any exceptions. That creates a clean reference for reorders, which is where packaging programs often save time or lose it. If the sample was approved with one small note, keep that note with the file. If the revision was rejected, say exactly why. Years later, the approved sample often matters more than the original proof.
Common Mistakes That Delay Reapproval and Raise Costs
The most common mistake is treating a PDF like a finished review. It is not. A proof can confirm artwork placement and copy, but it cannot show seal behavior, glare, stiffness, or how the bag looks once it is hanging in a row. Approving from screen alone is how teams miss issues that become obvious the moment a physical sample shows up.
Another mistake is ignoring the full pack-out. One bag can look fine on its own and fail once 50 or 100 units are packed into cartons for a show shipment. Scuffing, compression, and shifting all become more visible at volume. If the giveaway has to reach more than one location, test the distribution plan as well as the bag itself.
Last-minute artwork changes cause most of the avoidable pain. A new sponsor logo, a different QR code, a line of copy shifted for legal reasons, and suddenly the approved sample no longer matches the production file. That can mean new plates, a revised proof, or a fresh sample. On a small order, those changes can add 15% to 30% to the cost. On a rushed order, the increase can be uglier.
Committee-style feedback slows everything down. If three people send three different edits, production gets noise instead of instructions. Consolidate comments once, decide what is mandatory versus optional, and send one revision note. It is a dull habit. It also saves deadlines.
The fastest way to delay production is to let several people send different versions of the same opinion.
Finally, do not approve a sample just because it is close. Close is useful only if the remaining gap is irrelevant. A bag with the wrong hang position is not close enough. A sample with a slightly off color may still pass if the brand tolerates it. Know the difference, and write it down. That distinction keeps the next run from becoming an argument about what “good enough” meant two weeks earlier.
Next Steps: Request the Right Proof and Lock the Order
Before requesting a sample, gather the final size, artwork files, quantity target, event date, and any pack-out instructions. If the bags will hang in a booth display, say so. If they will be prepacked into kits, say that too. The more specific the use case, the less likely the first sample will miss the mark.
Choose the proof type based on risk. A digital proof is usually enough for low-risk layout review. A physical sample is the better choice when fit, seal, hanging format, or presentation could affect the event. If the deadline is tight, request both. That is not overcautious. It is the sane response to a fixed trade show date.
Once the sample is approved, keep the approved version, the final artwork, and the production notes together. Reorders move faster when the file history is clean. They also produce fewer surprises. That matters more than people expect, because the second run is often where teams discover how much time the first run really cost them.
For a trade show giveaway opp header bags Sample Approval Checklist, the best version is the one that protects schedule, spend, and presentation at the same time. It should be simple enough to use without debate and specific enough to catch the faults that matter. Packaging does not need more ceremony. It needs fewer avoidable mistakes.
What should a trade show giveaway opp header bags sample approval checklist include?
It should cover finished dimensions, header height, hole placement, print location, color accuracy, seal quality, and fit with the actual giveaway item. Add carton labeling, pack count, and any instructions for booth staff or fulfillment teams. The most useful checklist also records the sample version and final sign-off in writing.
How long does header bag sample approval usually take?
Digital proof review can move quickly, but a physical sample usually takes several business days to fabricate. If revisions are needed, the schedule often expands by another week once correction time and shipping are included. The safest plan is to build buffer time before freight becomes the loudest voice in the project.
What drives cost and unit price on OPP header bags?
Film thickness, print colors, custom sizing, and special finishing are the biggest drivers. MOQ matters because fixed setup costs are spread across fewer or more bags depending on the run size. Freight, rush fees, and rework can affect the landed cost more than the base unit price.
Do I need a physical sample if I already have a digital proof?
Yes, if fit, hanging format, seal strength, or presentation matters to the giveaway. A digital proof can confirm layout and copy, but it cannot show how the bag behaves in hand or under store and booth lighting. Physical approval is the safer choice whenever the package has to perform, not just look correct.
What should I do if the sample is close but not perfect?
Write one clear revision note that says exactly what must change and what should stay the same. Avoid vague comments, because production cannot act on them cleanly. Approve only after the revised sample matches the agreed size, print, and handling requirements.

